Announcement

Collapse
No announcement yet.

1967 Pro-Touring 122 Amazon (Project Volvo X)540 Horsepower LS6/Tremec TKO600 5-Speed

Collapse
X
 
  • Filter
  • Time
  • Show
Clear All
new posts

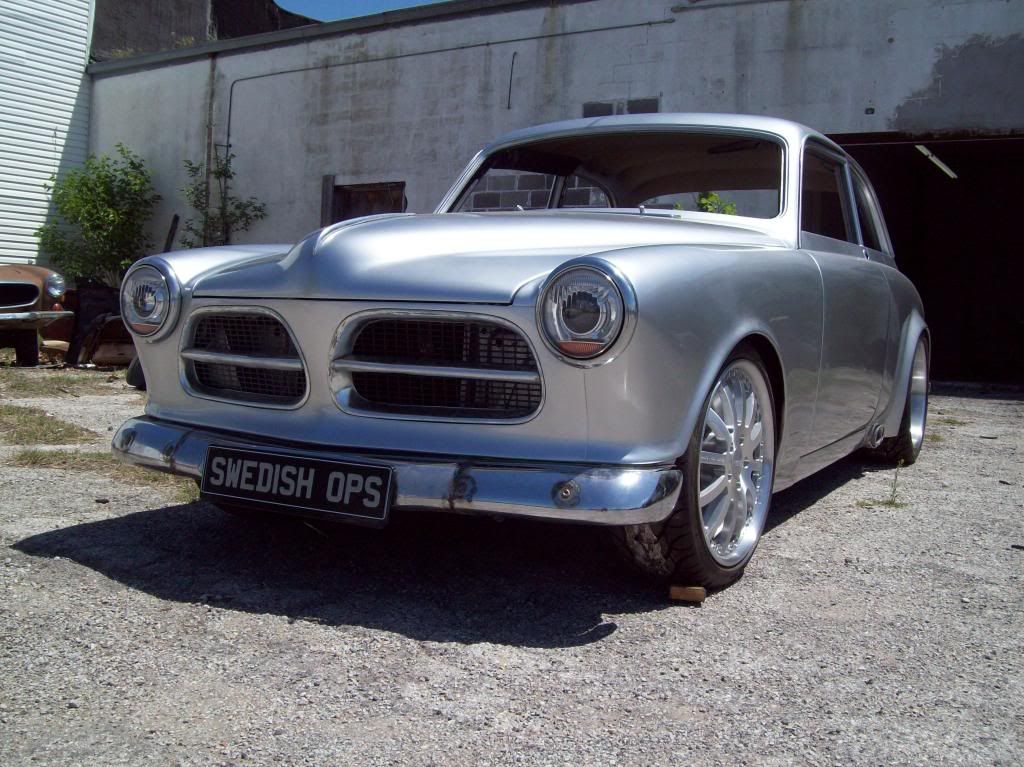
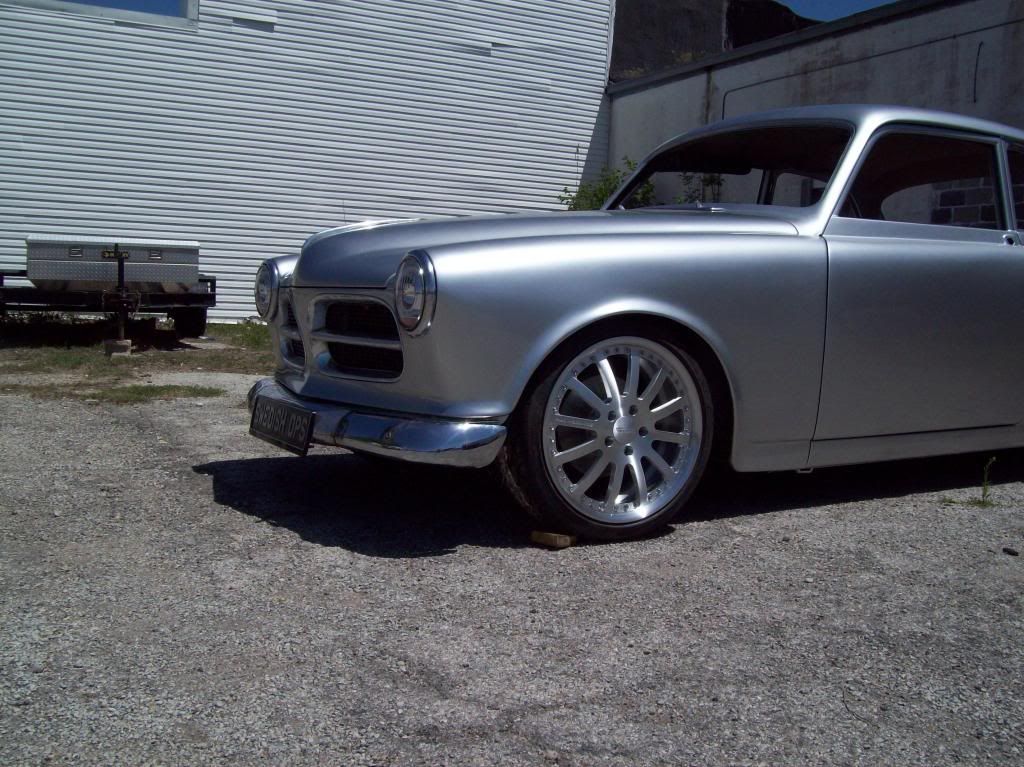
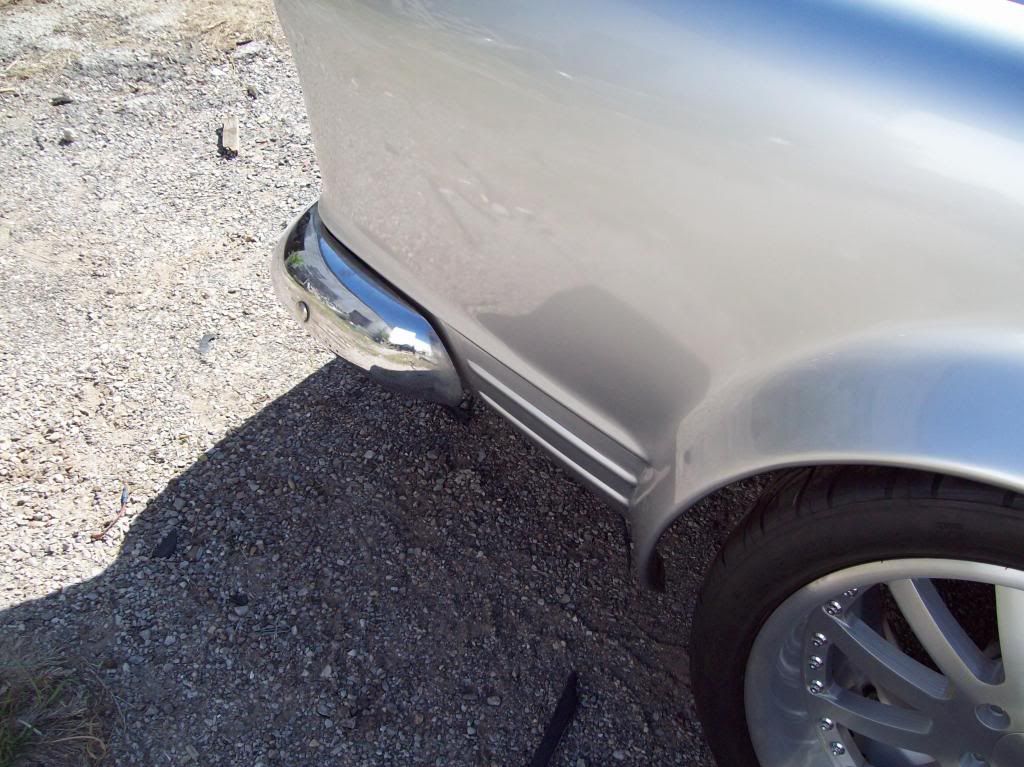
  • Trim should all go out for straightening and plating this week, but I have to double check fitment on everything now that the body work has been done, because there could have been potential changes... I have the bumpers fitting about how I want them, and I have still have to weld the hiddent bolt studs to the rear bumper, and add a bit of adjustment slotting to the brackets, but it all looks like it is going to fit and adjust well.. In the pics, it appears my front bumper is slightly rolled down in the back, but it does level out just fine, and I was trying to show where I actually pulled the bumper ends outward, in order to get rid of a roll in affect.


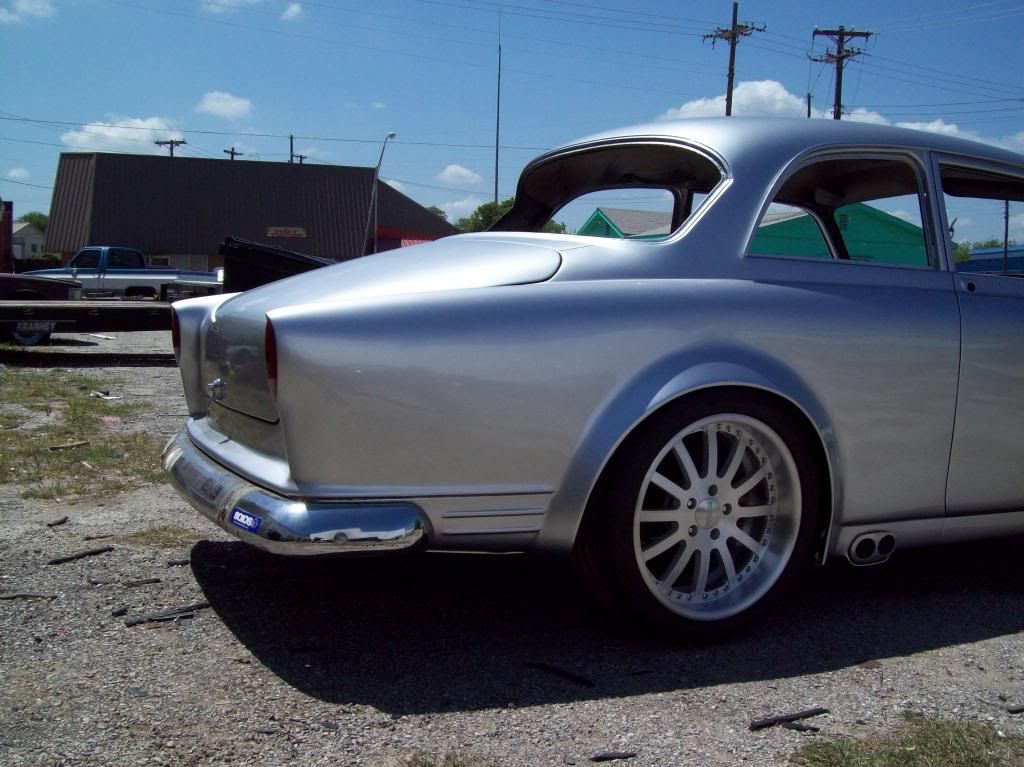
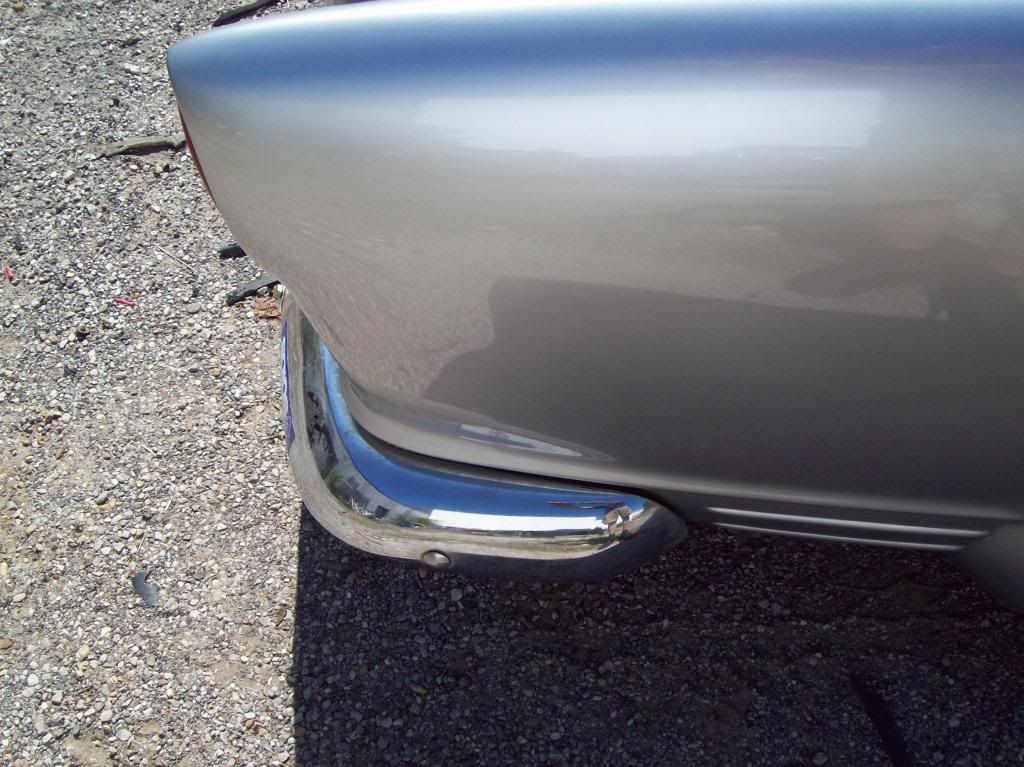
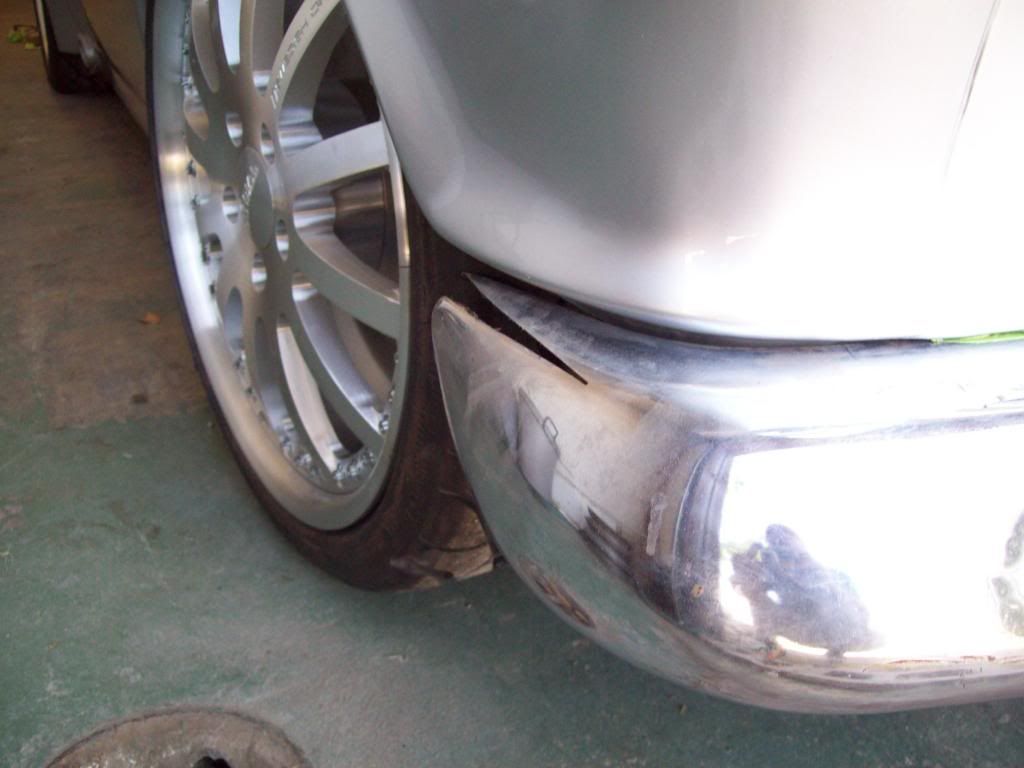
    Here you will notice where I had to slice the top corner of the bumper, because I was trying to get that rolling in toward the wheel well affect of it.. I have also made it a one piece bumper, with hidden bolts, so it will give it a clean look. The rear bumper is done the same way, and please excuse the welds, but I was advised not to do any finish welding or grinding to the pieces, because the plater would prefer to do it.

    Last edited by Iamtheonlyreal1; 04-30-2013, 04:19 PM.

    Comment


    • Paint is absolutely beautiful
      Originally posted by 1badg35
      trust me my last gf and i split because i apparently gave more attention to my cars and business then her. i have no idea where she got that idea from. haha

      Comment


      • I am working on the final fitment of the One Piece Door Glass template, and I was thinking I might go ahead and have a glue in quarter glass made at the same time, but I am not sure that it doesnt look out of place? I didnt want to run the pop out quarter glass anymore, due to having a great AC system, and I also wanted to not have to worry about painting or plating the trim around the quarter glass. I will sit on it a couple of days and see how I think about it then, but I think it may look a little too big, but it might shrink down a bit in appearance, once I get a proper gap between the quarter glass and the body.. The fact that the door glass is in a frame is what is throwing the perspective off on the quarter glass, and I dont want to black out the door frame, but it would help. These templates dont represent how dark the tint is actually going to be on this car, but I find it easier to have contrasting color of the glass and body, so I can fine tune the template fitment.

        I have my Power Window Regulator Conversion kits sorted out, along with the necessary belt line and weatherstrip for the door channels, so the One Piece Door Glasss is going to look great, and eliminate all the annoyances of the quarter glasses. And not to mention, allow me to be able to use a sensible mirror and mirror position for proper viewing..


        Here are some pics of the OEM Style set up...


        Last edited by Iamtheonlyreal1; 05-01-2013, 06:46 PM.

        Comment


        • Oh my god this car is beautiful!!! Great job!!

          Comment


          • wow.. i dont even.... but...


            good job!

            Comment


            • Not liking the black window seal around the windshield and back glass. The chrome would look really nice around the both of them.
              Greg
              1974 Volvo 142

              Comment


              • Originally posted by gdogg16 View Post
                Not liking the black window seal around the windshield and back glass. The chrome would look really nice around the both of them.
                That is part of the reason I am going to go with lighter tinted glass, but I have considered refinishing the trim in the brushed chrome also, but the back glass trim will not work anymore, because it is not made the same as the windshield trim.. It is alot bulkier and wraps around to the lower corner of the quarter glass..

                I am also looking into vaious weatherstrips for the windows, and I am hoping I can actually find a lower profile rubber, and that will take alot of it away. I am not happy with the rubber either, so I will see what I can come up with there.. I was going to do the Flush Mount Glass system for these cars, but the Amazon's will require some body mods for the rear glass to work out, so it isnt feasible for a production run..

                Comment


                • So on the body there will only be what? Door handles obviously, mirrors, bumpers and that's mostly it? Somehow i think you'll be low on detail. Imo there's a fine line between to much and to little, so sometimes it's just begging for a little side trim or such. The window seals make it look somewhat boss dough. I think you should assemble the whole outside before tinting any windows. All in all - still love the work you've done.
                  The Moskvich. (Video)

                  Comment


                  • Originally posted by Edgar. View Post
                    So on the body there will only be what? Door handles obviously, mirrors, bumpers and that's mostly it? Somehow i think you'll be low on detail. Imo there's a fine line between to much and to little, so sometimes it's just begging for a little side trim or such. The window seals make it look somewhat boss dough. I think you should assemble the whole outside before tinting any windows. All in all - still love the work you've done.
                    The side profile will really only have Brushed Door Handles, front Headlight Rings, Brushed wheels, and Brushed Bumper Corners, showing, along with the exhuast ports. The mirrors will be body color, so they really wont stand out too much.

                    I was debating on adding the oem side trim back on it, so I welded up all the holes, because I didnt want to be stuck with no option but to run the side trim.. I can redrill the holes later if I decide I want to install the side trim, but I am thinking that I am going to have issues with potential race event decaling, so that was another reason I held off on the side trim.

                    Comment


                    • I really didnt feel that the Windshield and Back Glass installation was doing the car any justice, and after debating on what to do with the bulkiness of the windshield and back glass weatherstrip, along wih the fact that the huge black rubber was not working with the theme or color of the car, I really had no choice but to use the oem trim at this point.. I was planning on doing a flush mount glass kit for these car, but the back window opening on the Amazon doesnt really allow that application with out body mods being done, so there really isnt a point.

                      My 2nd issue with using the trim was the fact that the lower back glass trim serves a dual purpose as a body seam cover at the lower part of the rear roof/quarter panel seam, and I did away with that seam, because I didnt want the wrap around affect of the oem.. By making the oem trim do this, it also added to alot of trim bulk to the bottom piece, so it really didnt match to well proportionally with the upper and side piecs of the back glass trim, which made it not really match the windshield trim application either.. It is probably a small thing, but it is an annoying feature for me.. There are some that might not like this mod, but the only reason for the lower trim to look as it does, is because the factory didnt want to work and fill in the full lower roof seam.

                      Here is a picture of the original set up..


                      I have found that I can carefully cut the Oem bottom trim, and re work the lower trim corner pieces, and then I have a less bulky trim that is uniform all the way around.. I really like the look of it much better, because it doesnt look as much of an after thought like the original does.. Here are some pics of the process, and it is relatively easy, but you do have to take it slow and careful.

                      I used some 3/4in masking tape to find the lowest part of the V that seperates the two rolled halves of the trim. I tried to cut as close to the tape as I could, that way there wouldnt be to much filing and finish sanding to get it all uniform.


                      You can actually cut the lower corner trim with basic sissors, but you need to leave just enough material on them, so that you can roll a bit of material over the bottom edge of the full trim strips. It is this rolling affect that helps center it on the larger trim, and also helps keep it locked in place.


                      When you have that all done, all the pieces should lock and hold once again.. Here are some pics of the finished pieces, and I have them layed in place over the window weatherstrip, so you can get an idea of proportions and look.. I will have these pieces straighted and done in the the Brush Chrome, so it should tie in with the rest of the car, without being to bulky.


                      Last edited by Iamtheonlyreal1; 05-02-2013, 03:00 PM.

                      Comment


                      • Just a thought, put some trim in the rear side glass like the original. Your current style shows more glass than in the doors, and it throws the balance off. I've always liked the rear side windows to be either exactly as big as the door glass, or smaller. The car is looking wonderful.

                        Comment


                        • Miro... I couldnt agree with you more, and the proportions have been eating me up also, but I think I have a very reasonable solution to the rear quarter glass proportion issue, and it is actually fairly simple.. I have always been annoyed by the difference in size and mount style of the oem, and it was even more noticable with the glue in conversion, so here is the solution..

                          I had some rear door window frames from a 4 door car that I was seeing if a 4 door could be cut into a two door hard top. The 4 door rear door frames are the same roof line profile as the 2 door car, so it really is only about doing some trimming to get the outer window frame face.. I am not sure what is going on with my camera at this point, so the pictures are just a bit blurry for some reason, but I will get another camera for pics of process for the other side.


                          Here is the rough piece with duct tape put on it, and it appears to fix all my issues.. I dont plan on drilling or screwing anything, and I think it will be light enought when it is all done, to actually install with a two way tape/urethane application. I still have just a bit of finish trimming and fitment to the piece, but it will give an idea of proportion.


                          Last edited by Iamtheonlyreal1; 05-03-2013, 04:38 PM.

                          Comment


                          • I have had some emails about this process, and I have tried to take some better pictures while doing the other side, but for some reason my camera isnt coroporating with close ups, but here are some pictures.

                            You first have to acquire a 4-door rear door frame. You dont have to be too concerned with the cut of the front post, but cut the rear connection point as close to the door body as you can can get, and this will keep you from having to add more material to get the rear frame height/gap correct for the rear of the frame.


                            My first cut is in the actual window channel, and you can use the outer channel wall as a cutting guide, so it is very easy to get a correct cut.


                            The 2nd and 3rd cuts are to remove the weatherstrip locking channel, and it is pretty straight forward also. After you complete those cuts, you are left with the actual outer door frame moulding, and has been lightend up quite a bit. You will want to leave the 90degree inner flange on the piece, rather than just cut it flat, because it is that piece that gives you the urethane bonding capability. That flange also locks in the proper window to frame spacing that matches the front door, so you will have the apperance of proper glass depth mounting, or else it might look even worse than the oversized appearance of the oem style quarter glass.


                            At this point, you have the basic window moulding piece, so it is really just a matter of trimming it out for fitment, and that goes pretty easy.. As you can see, the upper center post relief allows the window moulding to be mounted in a basically flush manner, so it should look pretty clean once it is all finished out and painted. The quarter glass mod isnt difficult at all, because it is really just a matter of having a tempered glass cut properly, and glueing it in with a proper urethane. My new outer moulding will actually be two way tapped to the body at the top of the window frame flange, but it will also be urethaned to the glass on the lower section, and that will give it an extra secure mounting.


                            I will be adding some more material to the overlapping flange so I can get a more uniform appearance to the front door frame, and I may have saved some time if I just sliced and hammered out the oem rolling affect of the frame, but we can always get it right the first time.. LOL After all is said and done, I may actually black out the rounded relief section on the post, because it might still appear to be out of place. That could be done very easily with some satin black paint or a black vinyl piece, but I will wait to see how it all looks before I make that determination. If you are running a darker glass, it will probably make it look better if that small section was blacked out, but it is really about body color, shade of the glass, and personal preference there.


                            Comment


                            • Here are some comparison pics of the Oem pop out glass, the glue in glass template (With No Trim), and the glue in glass (With Trim).


                              Oem Pop Out Quarter Glass and factory chrome strip.

                              The OEM always looked a bit off to me, especially with the none continuos use of trim accent, which can be seen with the Door Frame lacking anything, while the Windshield, Wind Wing, Quarter Glass, and Back Window all have some sort of accents, so there appears to be a void of sorts around the door glass.. It just doesnt seem fluid, and not sure why they did it this way, but there are a few things on these cars that really seem neglected or after thoughts.


                              Glue in Glass with No Trim.


                              Glue in Window with Fabbed Modded Rear Door Moulding. There is only one 1/4in piece of 2 way tape holding the moulding in place in these pics, so it isnt necessarily in a fully fixed position. I will also have some sort of very small buffer gasket (1/16th inch) at the front and back edges, where the moulding meets the body, so that should give it a clean appearance.


                              Here are a couple of pics with top rounded corner of the quarter window opening blacked out with electrical tape, and it does clean it up a bit..


                              Last edited by Iamtheonlyreal1; 05-04-2013, 04:42 PM.

                              Comment


                              • I may be going in the totally wrong direction right now, but I am thinking that it might be best to have some sort of stone guard for the front of the rear flares, which is very common with factory flared vehicles. I was debating on putting on some of the clear stone/gravel protection film, but I was thinking the exhaust will turn it yellow fairly quickly, and might cause other issues also. I have never been a big fan of the clear stuff, because it starts looking very bad after awhile, so I was wondering with the black would look like?

                                I know that it needs alot of fine tuning for the proper cut out shape, and there are so many variations that could be done, and that is why the last pic that has the blue tape shows a rounded top variation. It would probably look a bit better if was cut closer to the exhaust at the front, so I may have to just stare at it a bit, and maybe it will grow on me or I might come up with another variation.. I do not want to add a painted stripe or black out to the bottom of the car, because I am really trying to stay away from the painted look.. I would have to find the right person, but stainless steel version of this could be very cool, and even cooler if it riveted on the body?


                                Comment

                                Working...
                                X