Announcement

Collapse
No announcement yet.

Another Mercedes W115, 1969

Collapse
X
 
  • Filter
  • Time
  • Show
Clear All
new posts

  • #61
    I've been working on this for the past couple of weeks, trying to fit in a couple of hours a day. I made a CAD drawing for the airbag mounts and had them cut by a buddy that has a machine shop. They're done I just need to pick them up on Monday.

    In the mean time I've been sorting out lots of ends to install the airtank, wiring for the air management and so on.

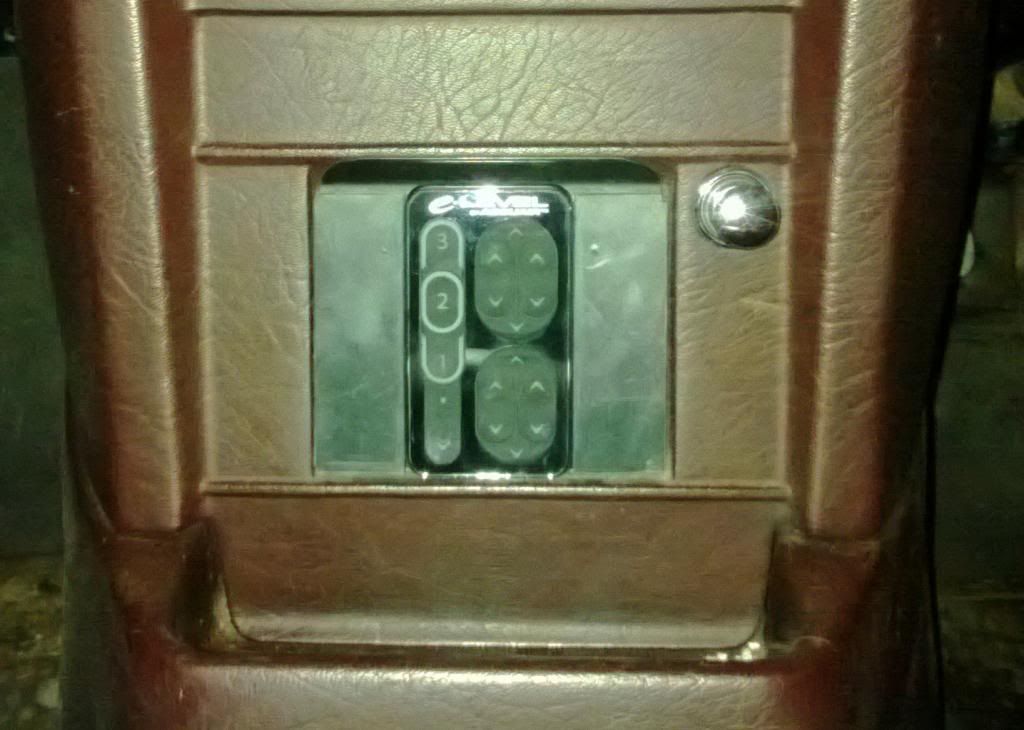
    I found a location for the controller and cut a couple of blanking plates for the sides. I'm happy that its mounted well and doesn't flex or move when the buttons are pressed. I cut up an extra ashtray I had and passed the wire through the dash


    Need to take a better pic when the car is out of the. I'll trim the plastic in some vinyl that matches the dash very closely, found from an old suit case!


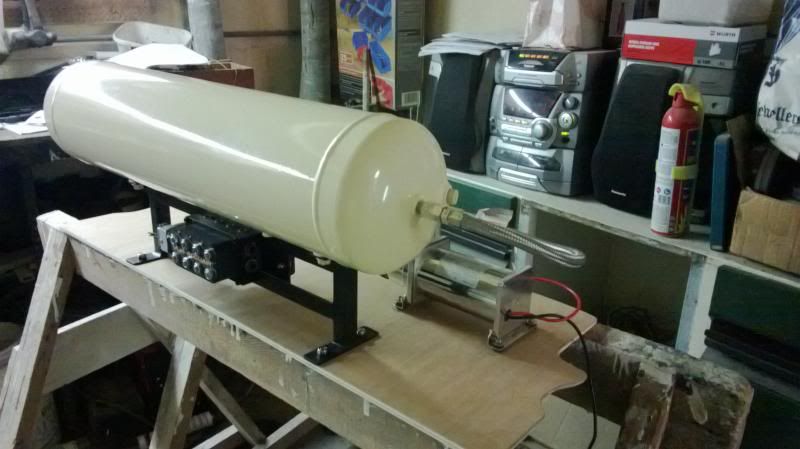
    Mounted the air tank and compressor to the wooden base. I'll need to bolt down the wooden base to the floor later


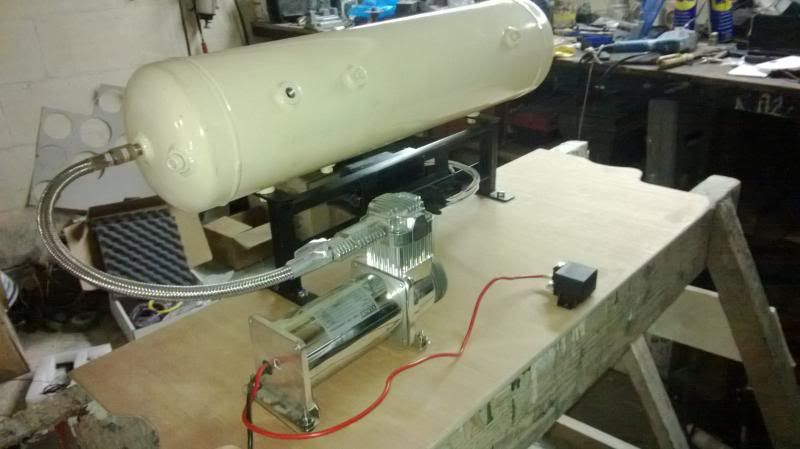
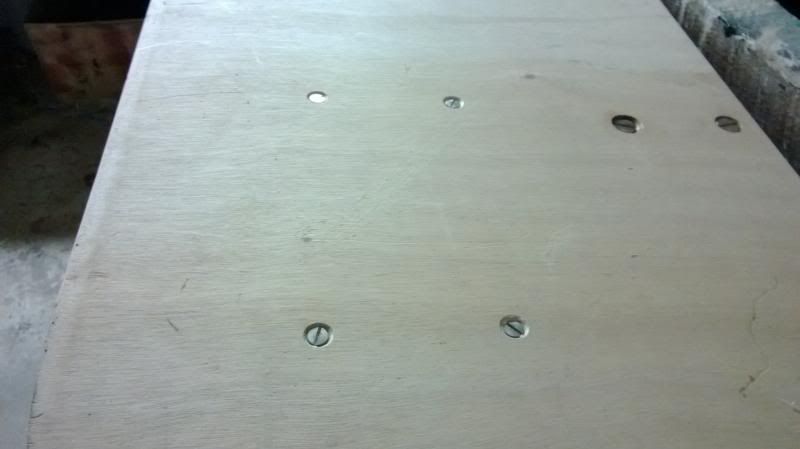
    Counter sunk screws hold everything to the base


    Next is making the mounts work...I'm aiming to have the car done before a big show on the 8th of December
    Last edited by A4crn; 11-02-2013, 07:47 AM.
    Check out my Alfa restoration here:

    https://www.youtube.com/channel/UC8l...7WzTiNj8Xy6C4A

    Comment


    • #62
      Just finished wiring the accuair controller into the car. These are the plates I had cut to mount the airbags. The ones one left are for the front and the right discs are for the back, They still need some holes to be drilled and I need to cut and weld some spacers for between the top plates. They'll make more sense when I take more pics, but I'm shamelessly copying Niscort's set up at the front

      Check out my Alfa restoration here:

      https://www.youtube.com/channel/UC8l...7WzTiNj8Xy6C4A

      Comment


      • #63
        I started mocking the front mounts, trimmed the subframe and control arms not to rub against the bags. The spacer 2x2 section is just for mock up, I will replace it with pipe of large diameter to have better weight distribution. The length of the front spacers is 127mm (from Niscort's thread) but I still need to figure out the length of the rear mounts. It will be easier once the bottom end of the bags are tied down so they won't move around.


        Check out my Alfa restoration here:

        https://www.youtube.com/channel/UC8l...7WzTiNj8Xy6C4A

        Comment


        • #64
          Love how its coming out

          Comment


          • #65
            Thanks....this kind of fabrication really takes time, I hope to have it on the ground soon!
            Check out my Alfa restoration here:

            https://www.youtube.com/channel/UC8l...7WzTiNj8Xy6C4A

            Comment


            • #66
              My aim is to finish front end before starting the rear, even though I've been planning on how to bolt together the rear mounts.

              I have access to a lathe at work, so I skimmed the ends on the pipe to get a total lenght of 127mm. I realise the pipe thickness is a bit of an overkill, but it will take a thicker weld, and its not too heavy :S


              1 mount is almost done

              Check out my Alfa restoration here:

              https://www.youtube.com/channel/UC8l...7WzTiNj8Xy6C4A

              Comment


              • #67
                damn, it was a lot of work to get here, but at least the stock shocks work....I plated the hole on the side after this pic was taken. Just need to grind the welds and paint then mounts, then its on to the back

                Check out my Alfa restoration here:

                https://www.youtube.com/channel/UC8l...7WzTiNj8Xy6C4A

                Comment


                • #68
                  Front mounts are fully welded and ground. I've painted them satin black and installed in place with the bags. Today started working on the rear mounts....pics soon. My plan is to finish the suspension for a show on the 8th December but it seems like there's still a ton of work left to do :S


                  Check out my Alfa restoration here:

                  https://www.youtube.com/channel/UC8l...7WzTiNj8Xy6C4A

                  Comment


                  • #69
                    those brackets look awesome !
                    C280 Build Thread
                    C43 ///AMG Build Thread
                    E320 Wagon Build Thread


                    Follow me on Instagram:@SD_210

                    Comment


                    • #70
                      So cool! I need more cars like this around my area
                      Insta: @pantiesmores

                      Build: http://www.stanceworks.com/forums/sh...hlight=versace

                      Comment


                      • #71
                        Thanks for the comments, I took a picture of the front assembled. I brush painted, would have rather stripped it down and sprayed the assembly, but time is tight. It will end up covered in dust anyways.


                        Moving on to the rear mounts, I'm trying to keep everything removable so I didn't want to weld the bottom plate to the arm. I made a square to fit in the hole for the shock, this will be bolted from underneath the arm by using the bolts that held the shock in place. I still need to mark and drill the 2 holes on the square mount.


                        I made a cardboard template to copy the right side and the postion of the square.


                        I welded the first square in full as I was happy with the postion. Not the nicest welds on the internet, but they'll do. I'm using a flux core MIG welder that splatters like crazy. I miss my old CO2 Mig

                        Last edited by A4crn; 11-22-2013, 03:09 PM.
                        Check out my Alfa restoration here:

                        https://www.youtube.com/channel/UC8l...7WzTiNj8Xy6C4A

                        Comment


                        • #72
                          Good work and creativity on the air setup! I still need to sort out my trunk setup as well. Its all bolted to a piece of mdf right now.

                          Comment


                          • #73
                            Cheers, love your volvo....I copied the front set up from Niscort on this forum but I figured out how to make the rears removable myself I still need to add shocks to the back, as the airbag takes the shock through coil location.

                            The best part of the trunk install is yet to come
                            Check out my Alfa restoration here:

                            https://www.youtube.com/channel/UC8l...7WzTiNj8Xy6C4A

                            Comment


                            • #74
                              Great project, nice work dude
                              KMK Fotografie

                              Comment


                              • #75
                                I'm happy with yesterday's progress, I almost finished the rear mounts left and right for both the base and tops of the bags. I just need to grind the welds and paint them satin black before the final assembly. After that I can run the air hoses and figure out what shocks I can use for the back

                                The bottom mount (upside down)


                                Which mates to this bracket, it uses the stock shock bolts


                                Tacking the top mount


                                The sides are open to reach the air fitting and bolt the airbags

                                Check out my Alfa restoration here:

                                https://www.youtube.com/channel/UC8l...7WzTiNj8Xy6C4A

                                Comment

                                Working...
                                X