 Tweet
Tweet
I was going to weld some in but I wasn't impressed with the adjustability. I was going to have my trailing arms modified but never got around to it.
-
-
I managed to get nothing done yesterday. I was figuring out how to mount the top of the bag but couldn't find the right tools/bits to use. A package came however:

My airline also arrived today. I'll mount the bags Saturday as well as install the studs and hopefully a bunch more.Comment
-
I am very pleased with the outcome of Saturday=)
I finally got the top of my bags mounted. The first side took two hours....the second side only took about 30-45 minutes. Here is what I did (before paint of course)

There is one bolt up top and then a notch underneath for the fitting to sit in. The pockets were the biggest pain to get. The first one took so long because I was trying to use a countersink bit and other drill bits. Then I realized I had air tools that would make it a whole lot easier=)
Once that was finally out of the way, I bolted up my sway bar and bolted the bottom of the mustang shocks to the trailing arms. Everything went super smooth there.
I then installed my 68mm Motorsport Hardware studs. I am super happy with the quality of them. Installation was a breeze and I highly recommend them to anyone who wants to go studs versus lug bolts. The price tag for these is basically just giving them away=D


I also painted the hats of my rear rotors during this time, but did not take a picture. I will be getting new rotors this winter, so this is just to make them look less shitty until then.
After all of this I cut air line for the bags, pushed on some valve stem fittings, and manually aired up the bags. I put the rear wheels on and put it back on all fours for the first time since February. I then aired it out.

I was being goofy. I actually have to do way less fender work than I had initially thought. That's fine by me=) I just need to get the fenders over the tire, but let the lip still poke. Right now it is literally sitting on the tire. Here are a few more of the wheels and being aired out on the Breytons.


I am finally seeing things come together and it is awesome=) The studs poke a tiny bit much for me, but they were the shortest I could get being black and bullet nosed. I think they will still keep the clean and subtle look without being too aggressive.
On a side note, my friend Kerry has been working on my rear bumper and I cannot thank him enough. I wanted the exhaust cutout shaved so I can have the exhaust hidden underneath. I am not a huge fan of DTM tips and this was the cleanest option I could come up with. I also don't really like the M-Tech rear bumper so I figured I would make the OEM one better.


He did such an excellent job. He used no bondo and uses only the finest plastic repair kits. Bravo Kerry=)
More to come Wednesday. Maybe I will take a funny picture of how the rear is sitting right now aired out on stock wheels.Comment
-
Great work Earl. I do have to agree the studs stick out a little bit. Will reserve judgement when it all comes together though. Good choice to go with the shorter shocks.
Def find a way to add some neg camber! Or machine some material off the back of the wheel or rotor hat/hub.Comment
-
Thank you sir. The shocks were an absolute must while I was at it. Some sort of camber adjustability will be figured out this winter. For now I will be able to pull the fender more than enough to get what I'm looking for.Originally posted by touringteg View PostComment
-
I really liked this last page. I am in for more. Originally posted by getamongst-it
Comment
-
Oh wow! this is coming along nicely!
Those wheels are pretty sexual aswell. Well done D
D
 -97 BMW E36: Ready to get the OEM+ Treatment
-85 Nissan Bluebird Wagon: Project In the 'wings'
I<3OEM xD
Follow me on instagram: @cutlets93Comment
-
Comment
-
yeah i must agree those wheels are the deal
W I L D M A N 'S R O D S H O P

R.I.P P.WALKER 2013/11/30Comment
-
-
-
Thank you sir. I am a big fan of your build as well. Glad another bagged e36 owner approves.Originally posted by Evil Panda View PostComment
-
ive read the entire thread. all i want is to see this thing finished.
this thing is badassComment
-
Thank you sir=)Originally posted by ryanjblajda View Post
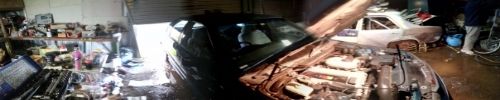
Got something done I've been meaning to.
I finally got the hole cut properly to route my headlight harness back out of. Glad I had the right tools this time=) I also got the harness pulled through.


I also wrestled with the crank bolt for about an hour and still havent gotten it off. I figured the only way to lock it from turning is a wood block in between the crank and block. I didn't want to wrench too hard because I don't need a cracked block. I tried head. a deadblow, a 3 foot cheater bar and still it wouldn't budge.
How are you supposed to get this sucker off when the engine is on a stand? There has to be something I'm overlooking. I've tried a nice large electric impact and that did absolutely nothing besides make noise.
For those who were curious, here is a shot aired out on the 15's. This is with the bags fully compressed. To get lower would require pocketing the arms and frame. I won't be anywhere near this low so no worries for me=)


Also if you haven't noticed, the all reds are back on. I need to reclear the top of the drivers side and then I need to lay into them with a buffer to get them nice and shiny.

More to come SaturdayComment
-
Some slight updates from the weekend.
I didn't get quite as much as I wanted done but it is okay. The only thing I didn't get done is running some airline for the front, but that is a quick affair.
I started by getting the car off the ground and removing the coils.

The fender wells just needed a little cleaning. It was hard to capture but they were very dusty and there was a layer of road debris on everything.
Before:

After:

Out with the old and in with the new=)

I then forgot to take pictures of them completely installed with the new ///M style extended sway bar endlinks. The only thing I don't quite like the design of is the camber plates. There is plenty of adjustment, but the camber adjustment can only be done with them dropped down. You cannot access the screw once they're installed.
After that I threw on the remaining front studs, the fenders, and mounted the Breytons.

Then I lowered it on some wood to get the jack out from under the subframe.

This is with zero camber dialed in. I have to say that a 17x9.5 et14 fits perfect. I can camber these in just how I want. I also noticed that I have over an inch of clearance between the strut body and the barrels. That means I can go at least an inch wider up front. We will see if that happens=)
I also had a friend come over to help me remove the crank bolt with the bmw tool. We snapped the handle off.....oops. One of my buddies works at an engine shop so I threw him some money and had him get it off. It took him a ton of heat and a 3/4" impact to get it off. I also had him board sand my head to give it some bite into the new headgasket.


I then removed the timing cover and called it a day because it was 11:30pm=D

I will inspect the chain guides Wednesday and order any that I need. I'll also run the air line for the front struts so everything is ready to be plugged into the VU4 manifold when the time comes.
Sometime during the day I ran and picked up the bumper. I threw it on and got a crappy picture around 11:00pm. lol

I am a fan=) It made me decide that the wiper needs to be shaved now though. lol
More to come after Wednesday.Comment


 ]
]


Comment