-
Maybe try something similar to this?
Leave a comment:
-
Beat me into pieces but I would close the diffuser or even shave that part and pull the exhaust thru the upper vents. Maybe even some oval tubing cut on an angle to make a pair of super long wide looking tips crossing each other like a X-Pipe. Remove the mesh and put some extra piping there to show the burnt stainless gold.
My brain works better than my explaining skills...Leave a comment:
-
glad you like the bits. It's a good thing even more people don't fancy them or I'd be paying even more for them.
i am absolutely all ears about how to pull the centre exit off. it's killing me. I can't find one single design that I'm actually excited for.
My buddy and I did a photoshop the other week of what I had in mind and it didn't turn out how I thought it might. Inspired by the after market systems Kreissieg do for lambos.

please give me suggestionsLeave a comment:
-
i want to see the exhaust done on this thing soon bad. love a centre exitLeave a comment:
-
awesome build dude. I didn't realise there were people who loved rare 90's jdm parts as much as I do! so many cool parts and a huge effort on your part. Well done.Leave a comment:
-
I am currently off for a few weeks between semesters and have had time for the car. Second half of semester is always a killer, but I did very well so it was worth it.
I'm also doing a big tear down on my daily 675 Daytona. I started riding it a two or so months ago and it's stock as a rock. Nothing mental, just needed the usual; remove unnecessary factory crap, regular bolt ons, odds and ends then tune. Then put it back together and never throw spanners at it again (touch wood).
No big content post on the Zed yet, but one is in the works. I'm doing the front tubs and am probably nearly half way through.
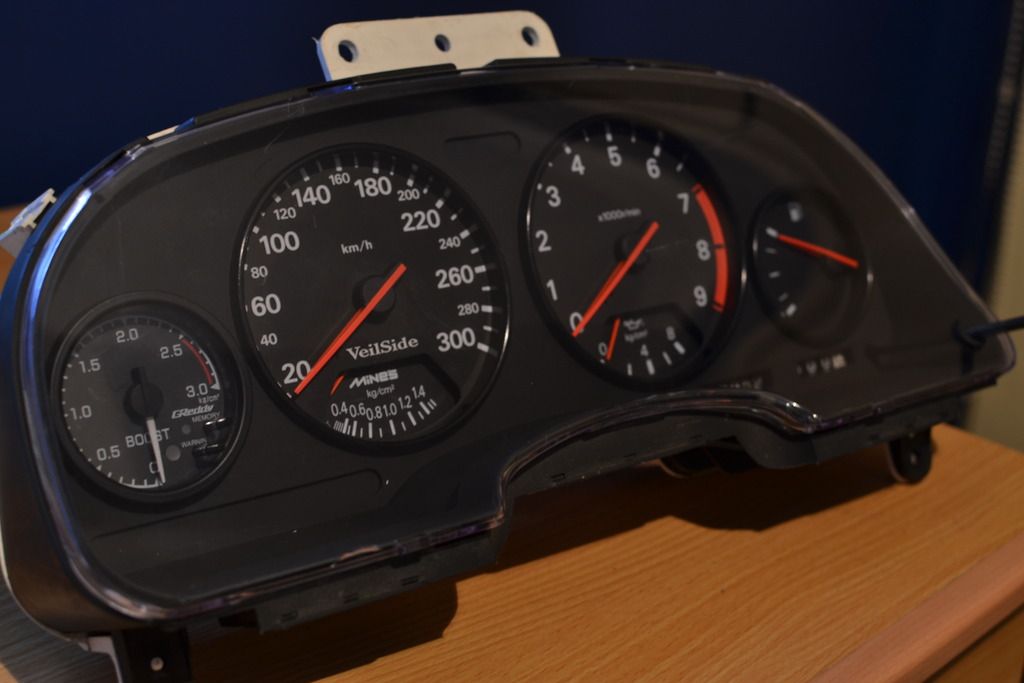
In the mean time though I did polish off a tidy up job on my cluster.
Here's how it used to look:
And now:
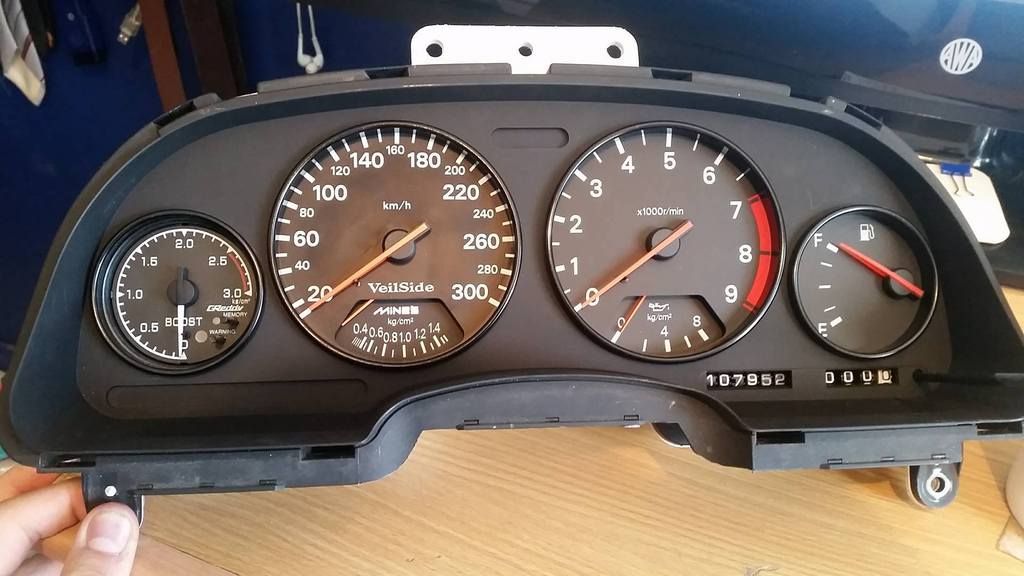
The difference is with the GReddy. I wasn't keen on the double screen and different ring, so I had the gauge disassembled and sent the cup off to a buddy to have him lathe it down to clear the cluster ring from the set I already had. Sprayed the inside of the gauge cup black so it didn't show and now it looks nearly OEM.
- ALeave a comment:
-
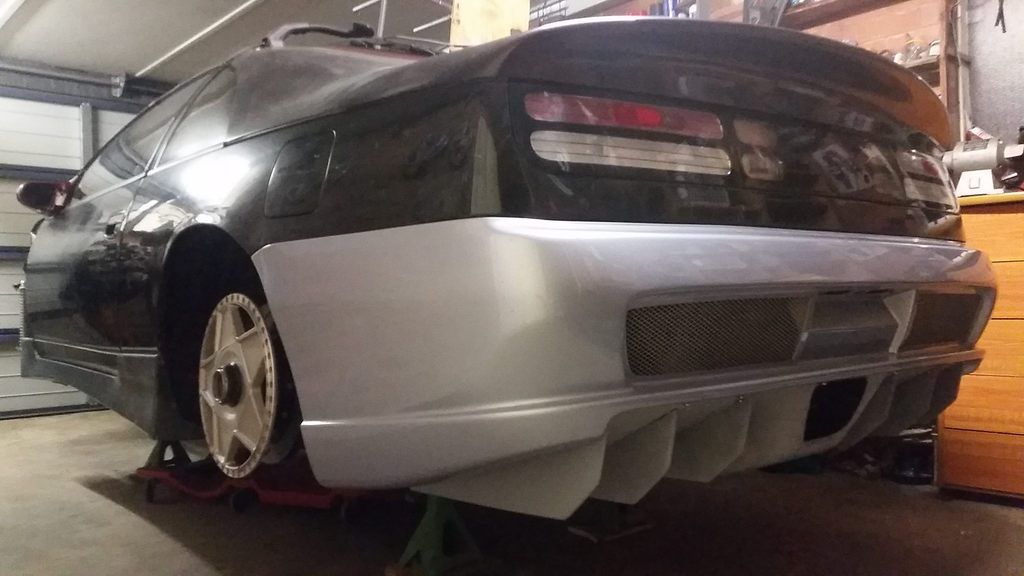
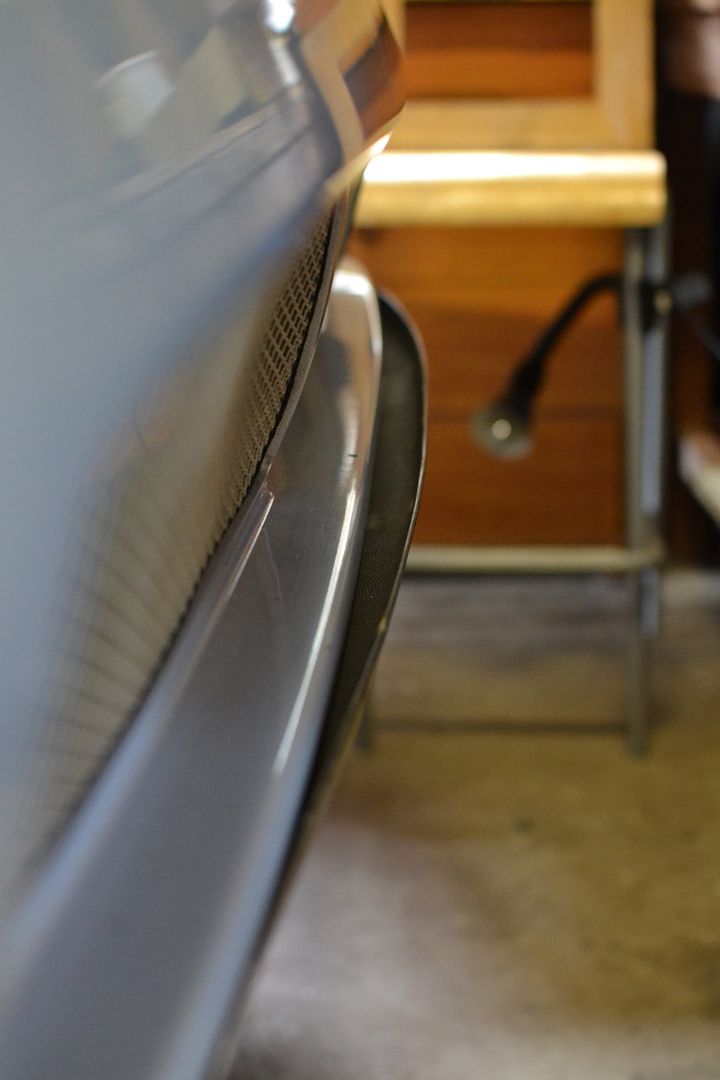
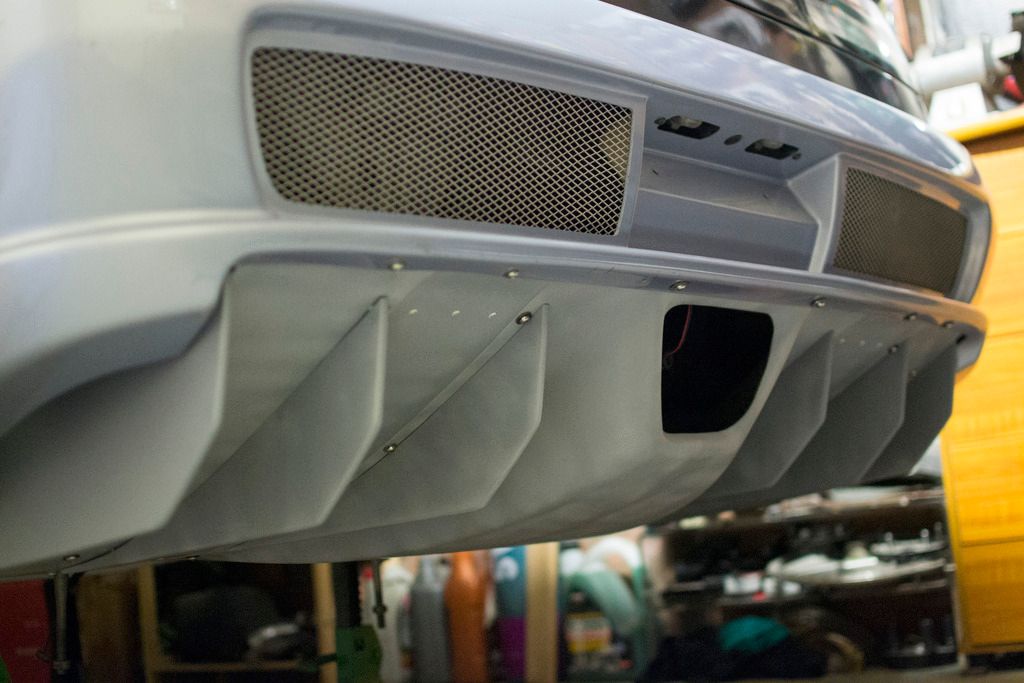
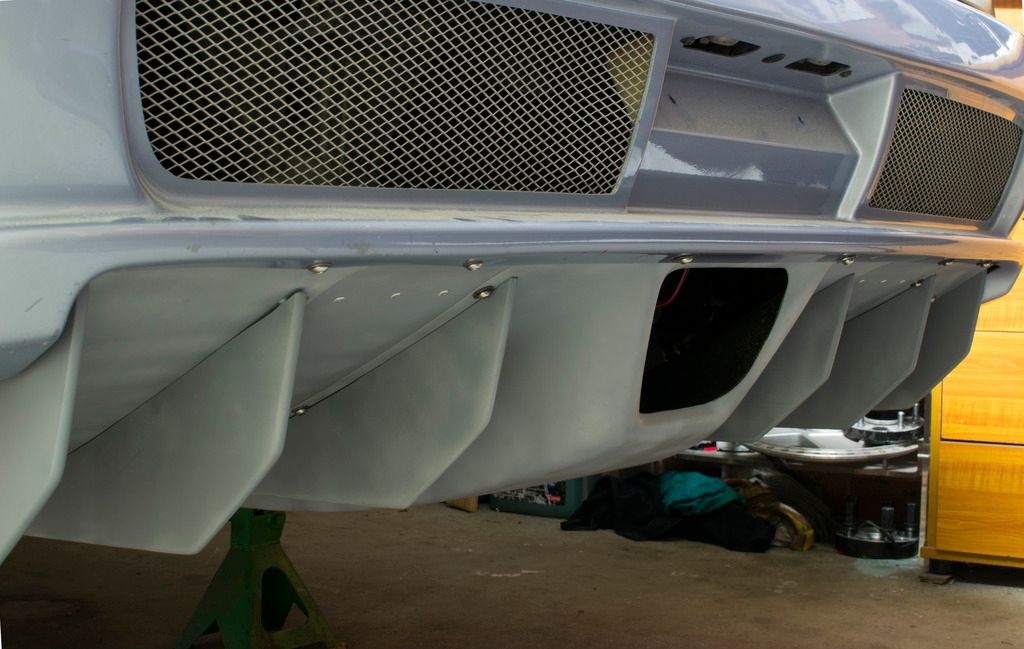
Garage is a bit too tight for my DSLR lens, but the camera phone can take in the new rear end setup a bit better. Sorry about the quality.
Leave a comment:
-
thanks guys I'm glad you like it. and I like the odd compliment about reading the thread, it's a good point! I'll make that correction, I proof my posts but this one was pretty long and it was getting late when I was polishing it off.Leave a comment:
-
Ow man that execution is brilliant!
and the hangers are awesome.
I actually read the text on some threads and this is one of them ...
the fuel tank is black, or a very very VERY dark red...Fuel tank in red, diffuser grey, bumper blue and red the underbody line of the carLeave a comment:
-
With the fitting of my seats I gave my car a proper clean out of the interior which after more than a year with the roof off while I did (bay) bodywork was sincerely needed. After clearing all the shit out of it and vacuuming it hard enough to suck a golf ball through a garden hose it's looking tops especially with the painted rear brace. Before long trashed interior withdrawl symptoms kicked in and that happened;
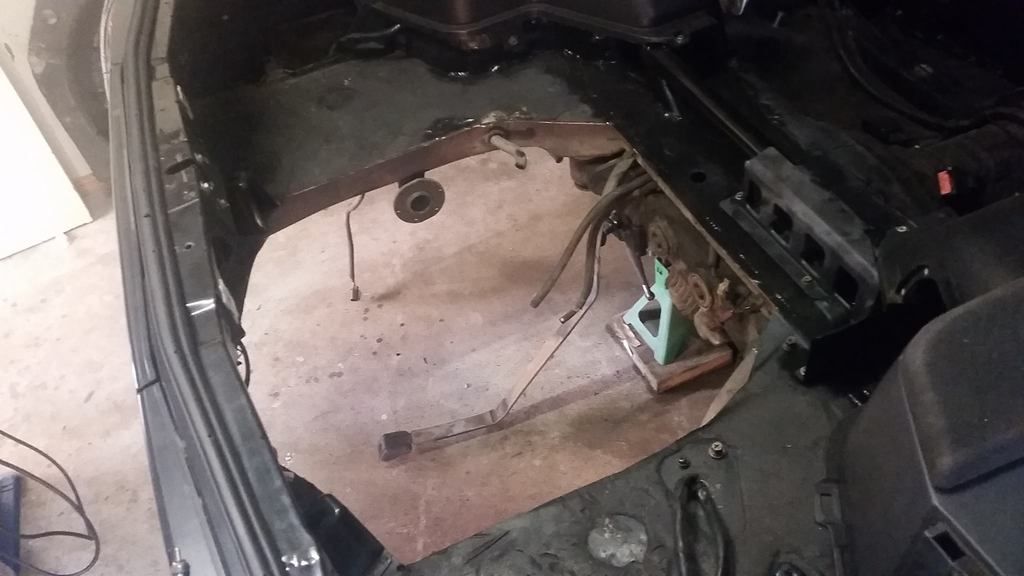
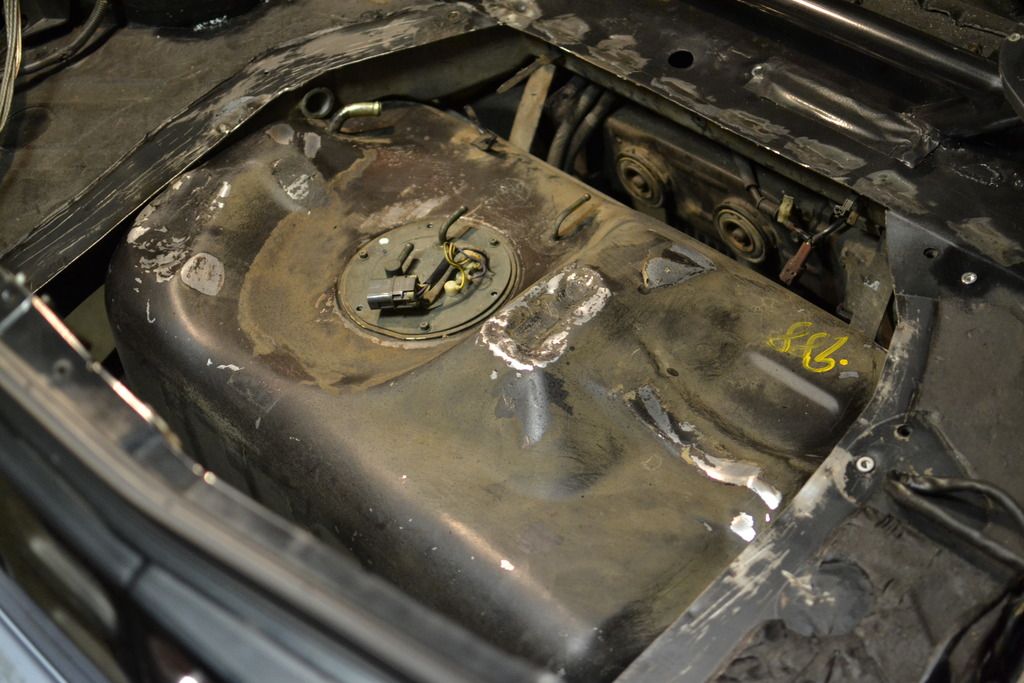
The next project was more or less a total rear end overhaul. This means fitting the rear bar properly (some modification required), extensively modifying the diffuser (read: cutting the shit out of it), making a new boot floor, making a path for the new exhaust system and relocating the fuel tank. Regarding the latter, here's why:
Fuel tank in black, diffuser grey, bumper blue and red the underbody line of the car. The diffuser, a "generic" item from Ab-Flug, doesn't fit the 2+2 Z32 very well. The trailing end of the fuel tank fouls on it, and forces the leading edge of the diffuser to jut down towards the road. With a bit of measuring it seemed like with the tyre well out of the equation there would be plenty of room for activities. The factory space saver spare wheel won't clear my brakes anyway.
With the boot floor cut out rail to rail I jacked the fuel tank up to where I wanted to put it.
It looked like the tank was made to be moved - the contours of it align perfectly with factory reliefs in the frame rails further forward in the chassis. I did in the end have to give it a bit of a love tap here and there as a few portions of it were sticking up above the boot floor.
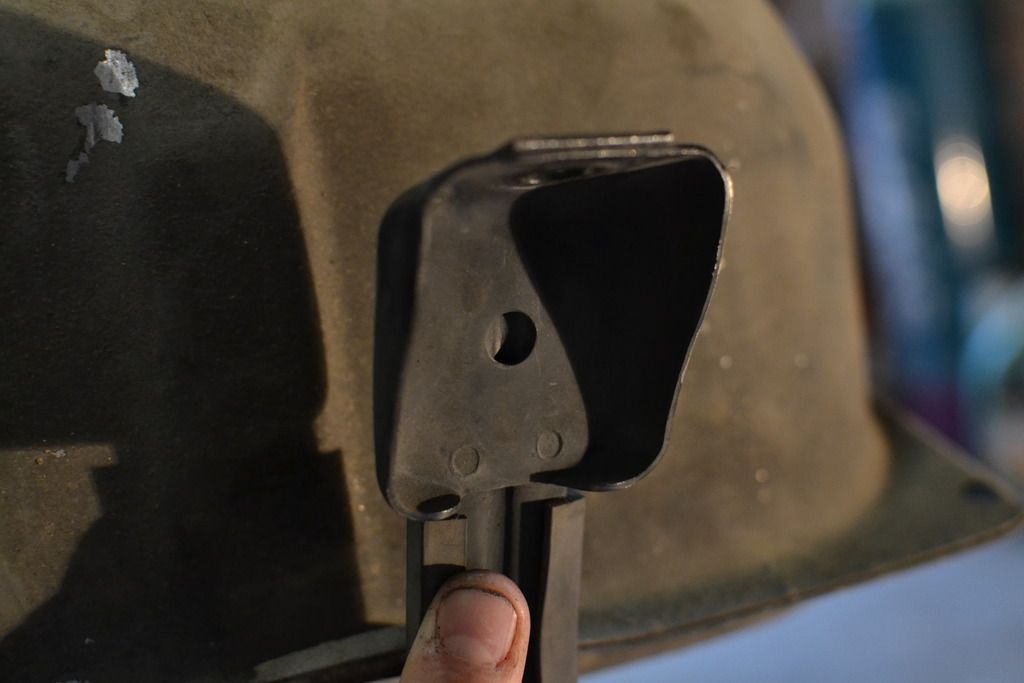
Bolting it up in its new location was actually really easy too. Original straps with original brackets, trailing ends rotated forward and drilled out in an unused OEM hole already in the bracket. The straps then bolted up to the factory mounts with factory bolts.
I blasted the hell out of the tank with a high pressure hose, repainted it with new sound deadening, epoxy'd on the OEM isolation rubbers on in new their new locations and stuck on some rubber pads to the high points.

The old boot floor can be used as a gauge for how far forward the tank has been moved. Bit better weight distribution is an unintended plus I guess.
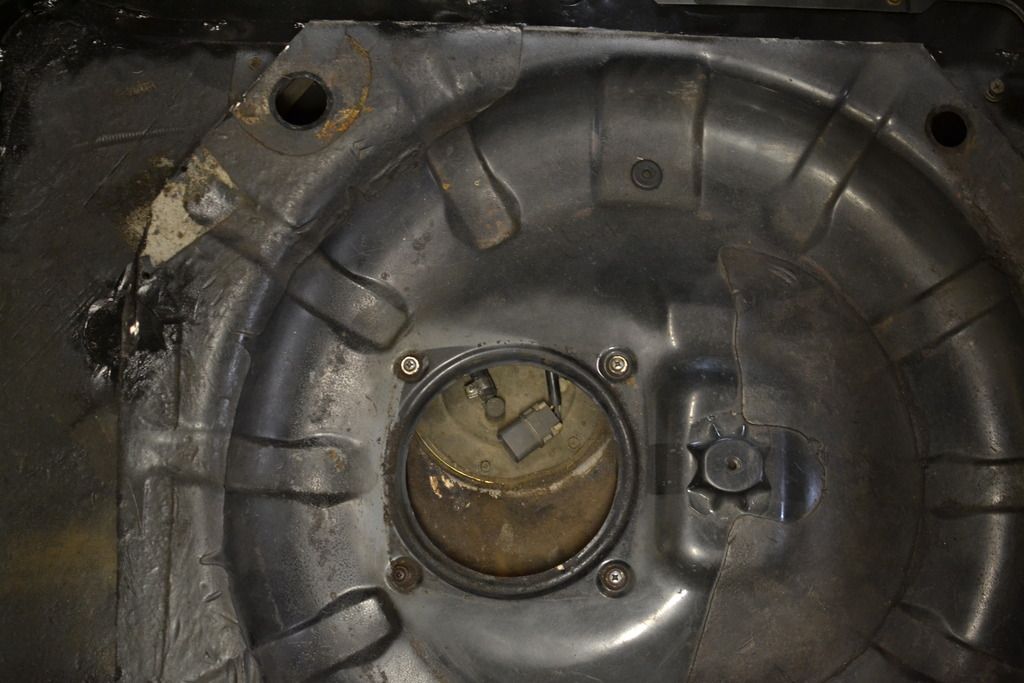
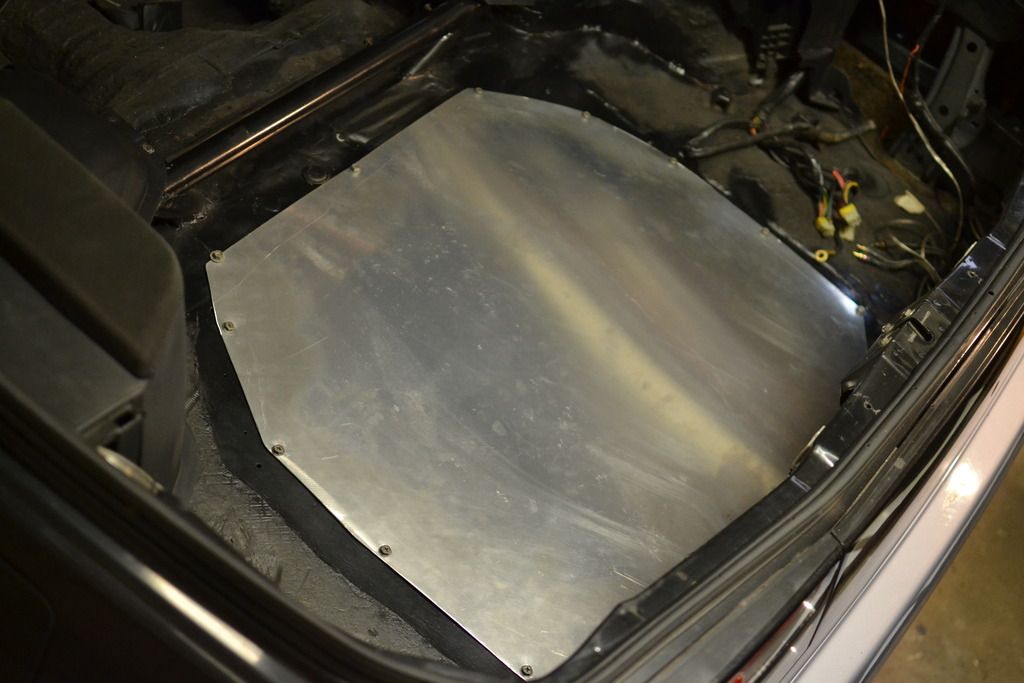
If you look closely in the above pic you can see that I cleared an area of sound deadening around the new hole of dead flat sheet metal. That's so the new aluminium floor panel can bolt down flat against the frame rails with a weatherstrip seal. I put in a daisy chain of nutserts to secure it.
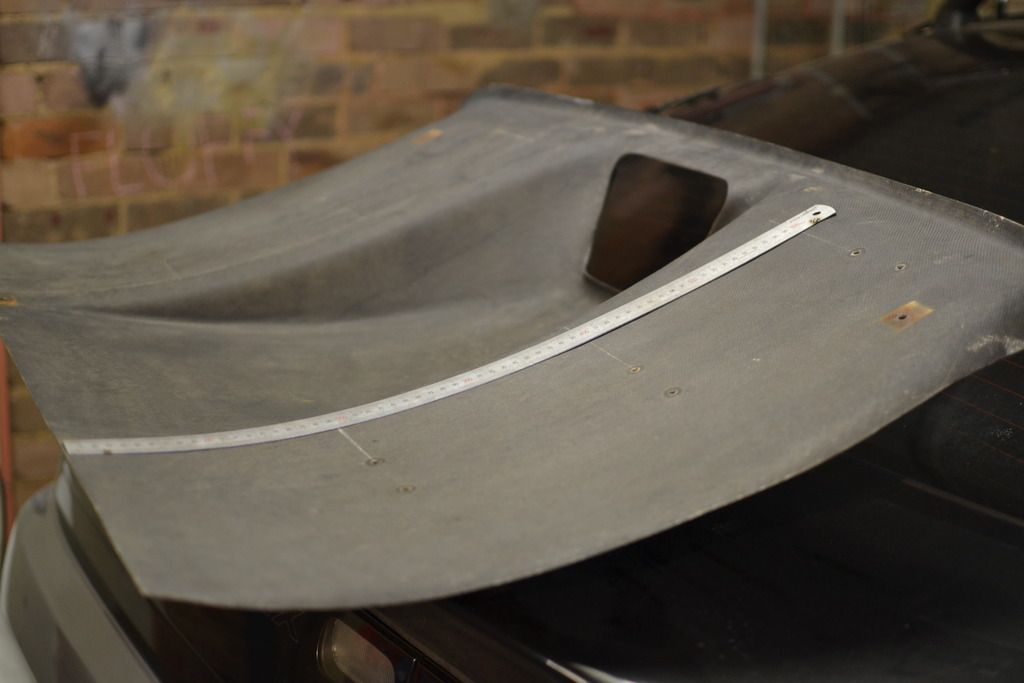
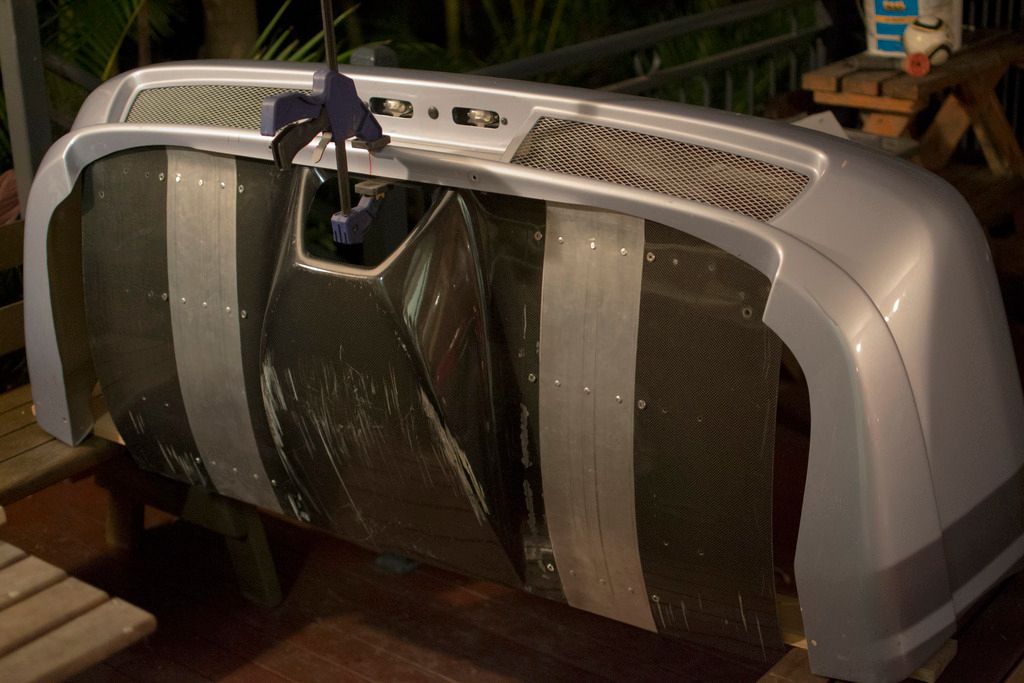
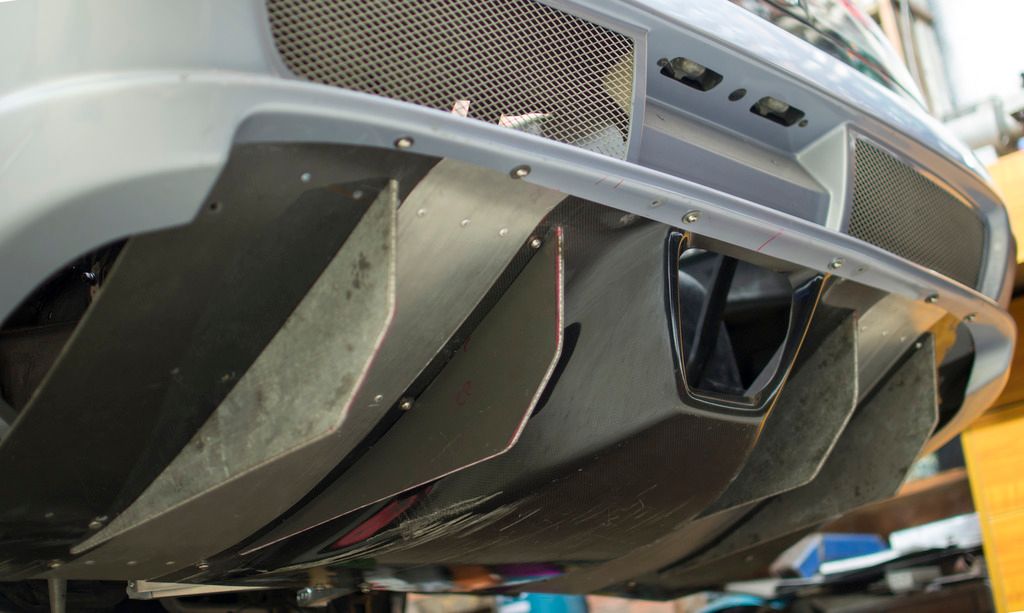
With the tank out of the way I could move on to the party piece - the Ab-Flug carbon fibre diffuser. Now just because I could actually align the leading edge of the diffuser with the under body doesn't mean I was done with it. As you can see here, the generic unit doesn't fill the whole underside of the bumper area. Panel gaps aren't cool on properly sorted street cars and I'm not building a race car. Aside from the sides it also protrudes past the bumper when bolted up in the same manner the previous owner did.
I don't care how JDM tyte your car is it's got ****ing gaps in it. Not slick. Que the chop suey.
With a solid game plan in place I measured up some cut lines using my super magnets to flex a ruler topside the panel.
This was really one of those grit your teeth and don't be a skeptic moments...
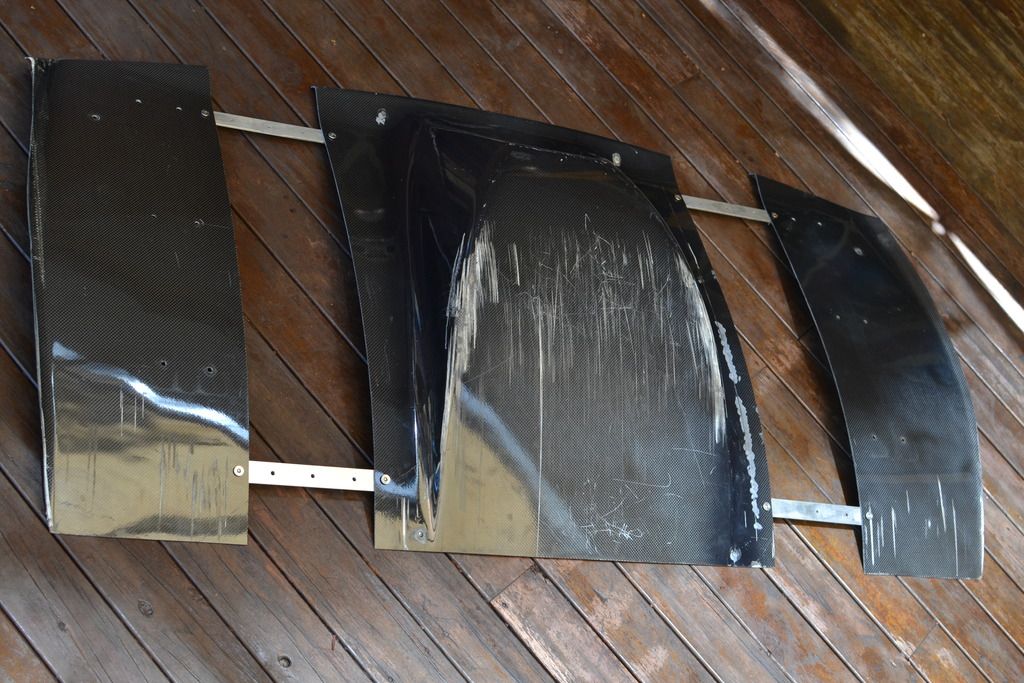
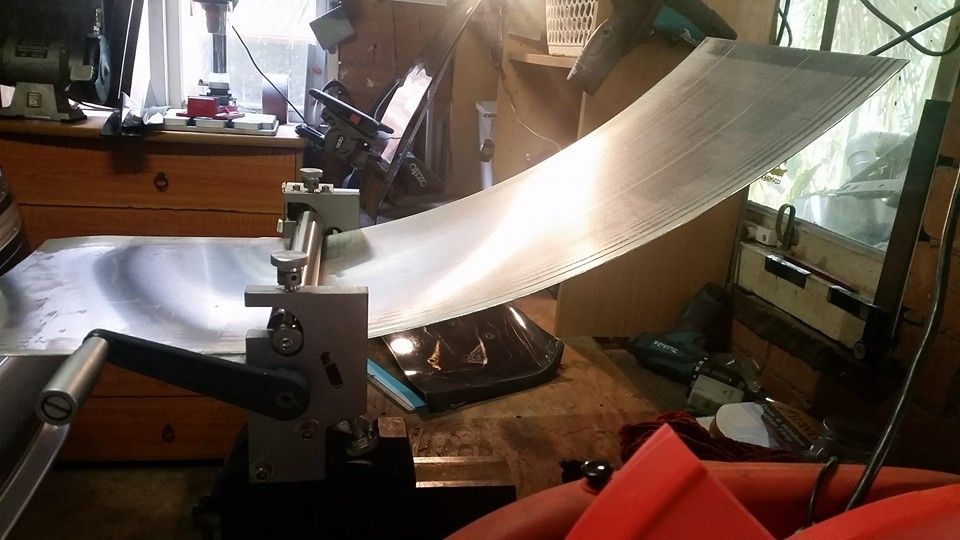
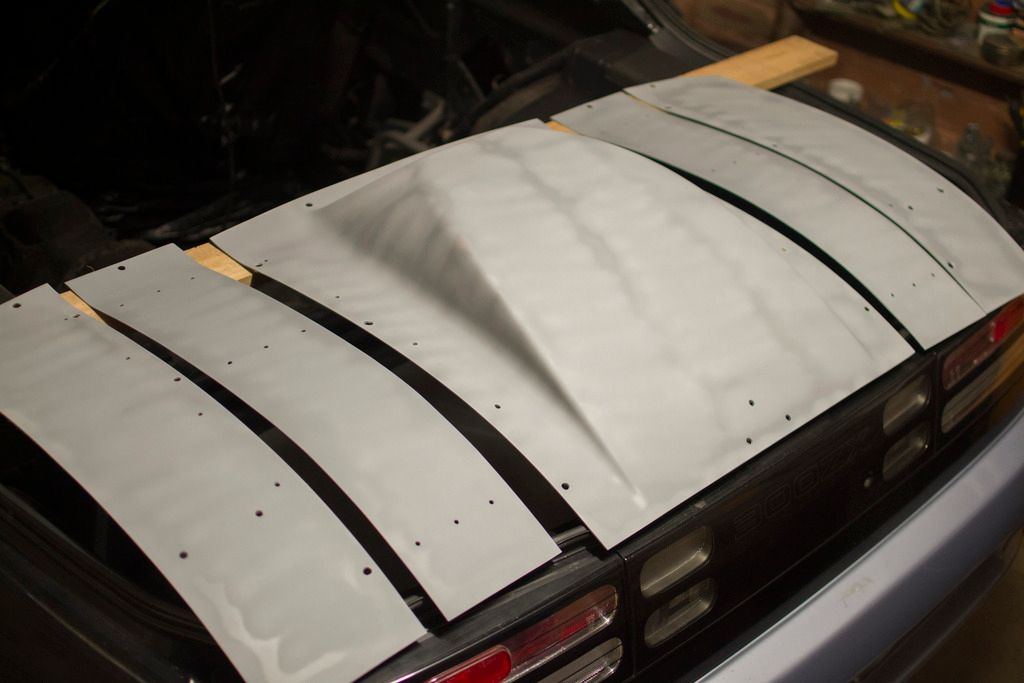
I picked up a slip roller and got to work forming some sheet metal to widen this thing.
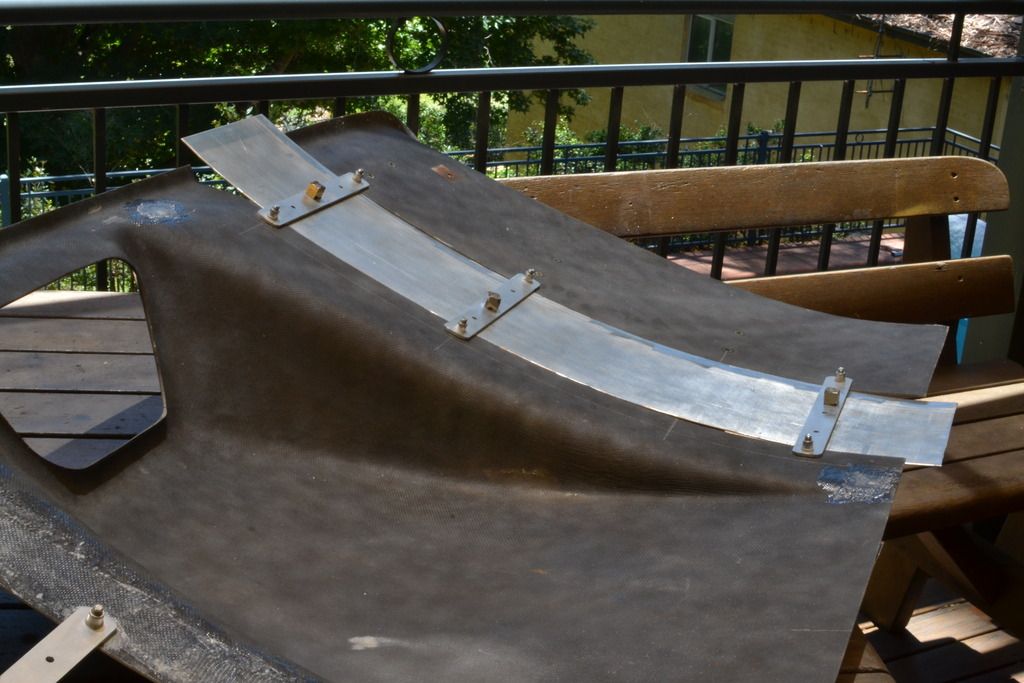
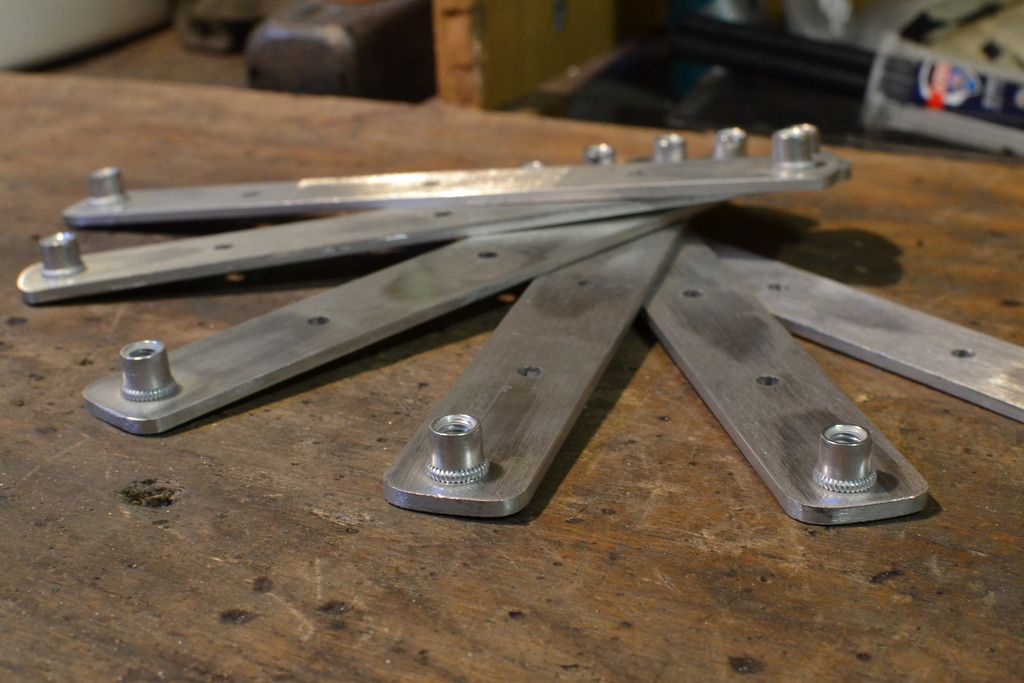
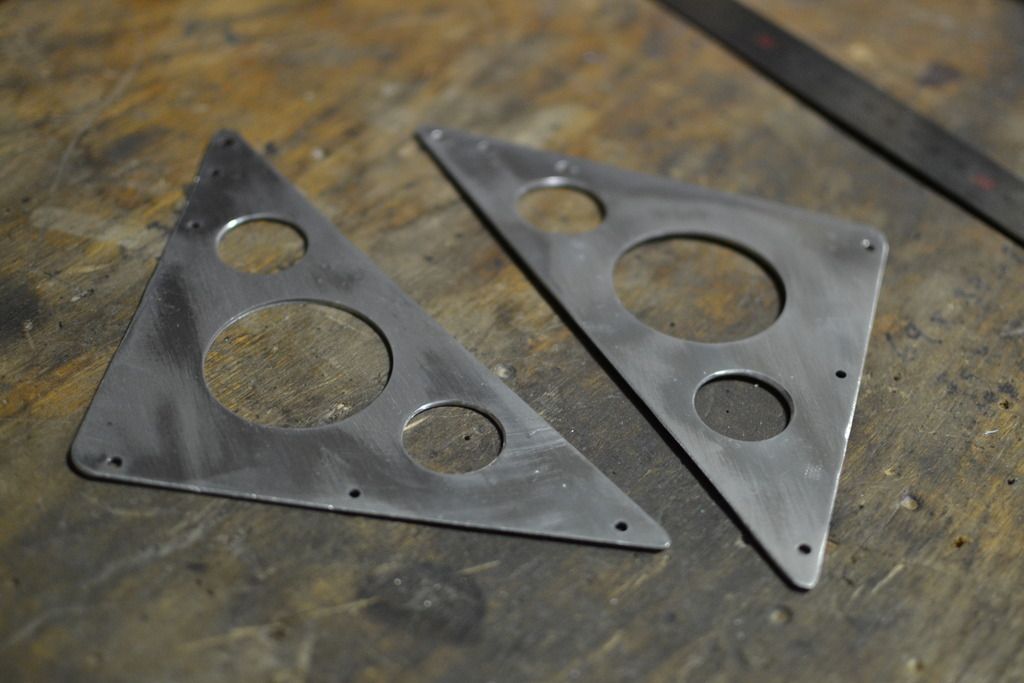
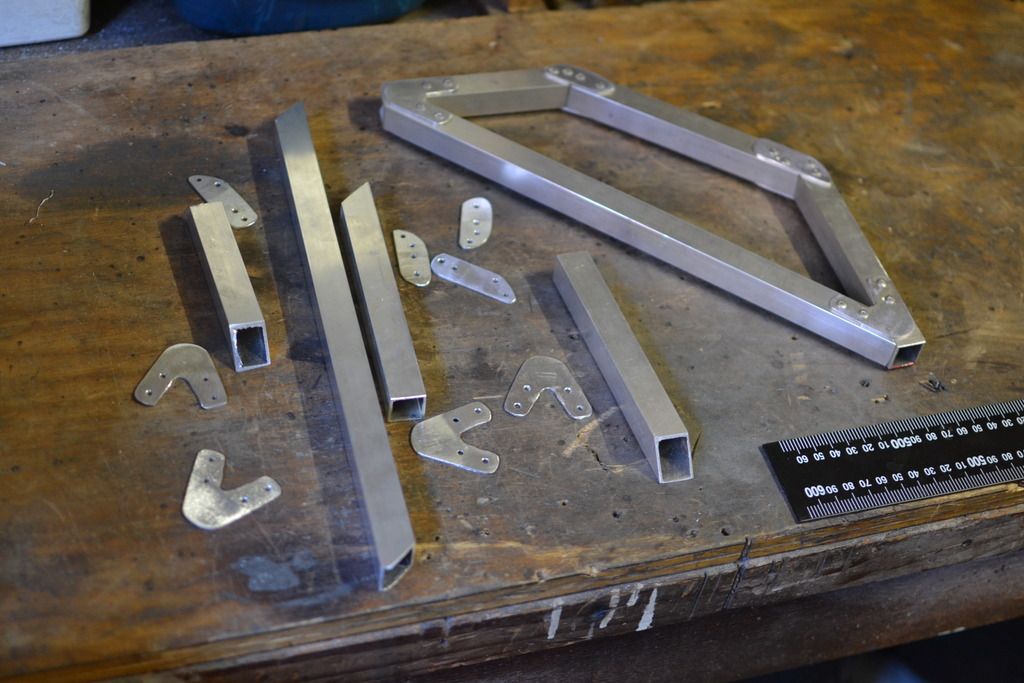
With two 15 cm aluminium sections to go in I needed a set of brackets to hold the thing together. I deliberately chose to keep the diffuser a five piece rather than glassing together the whole thing, but that won't come into play 'til later.
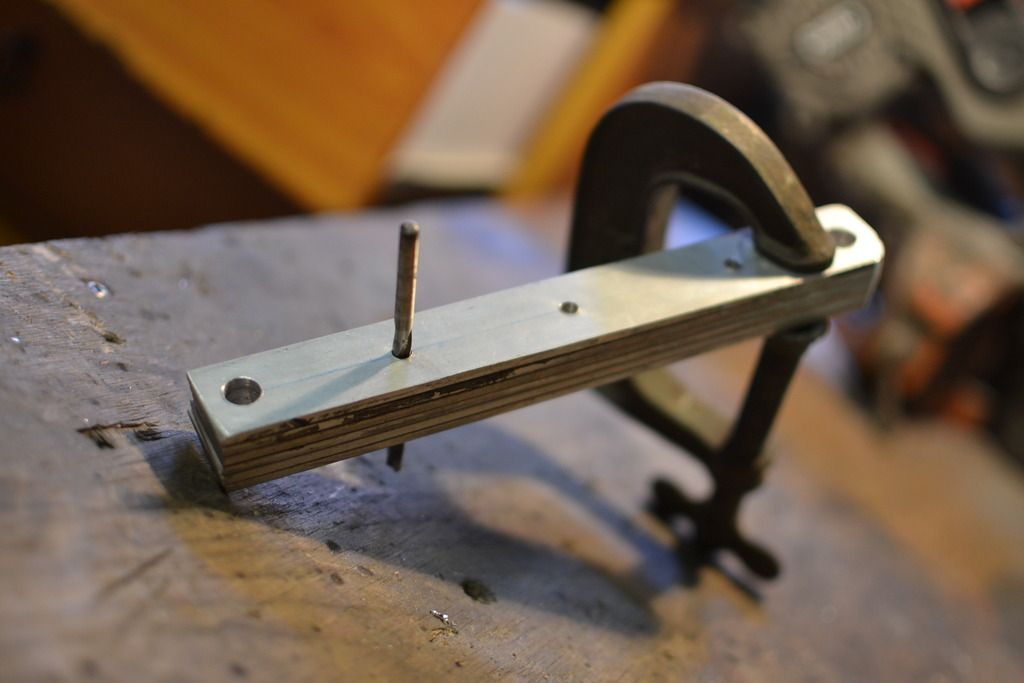
I'm getting better at knocking up bracketry and this was a real quick deal all drilled and shaped together, then nutserted.
I wanted to avoid hacking off the lip on the trailing end of the diffuser and simply tuck it into the bumper but unfortunately it just wasn't going to work.
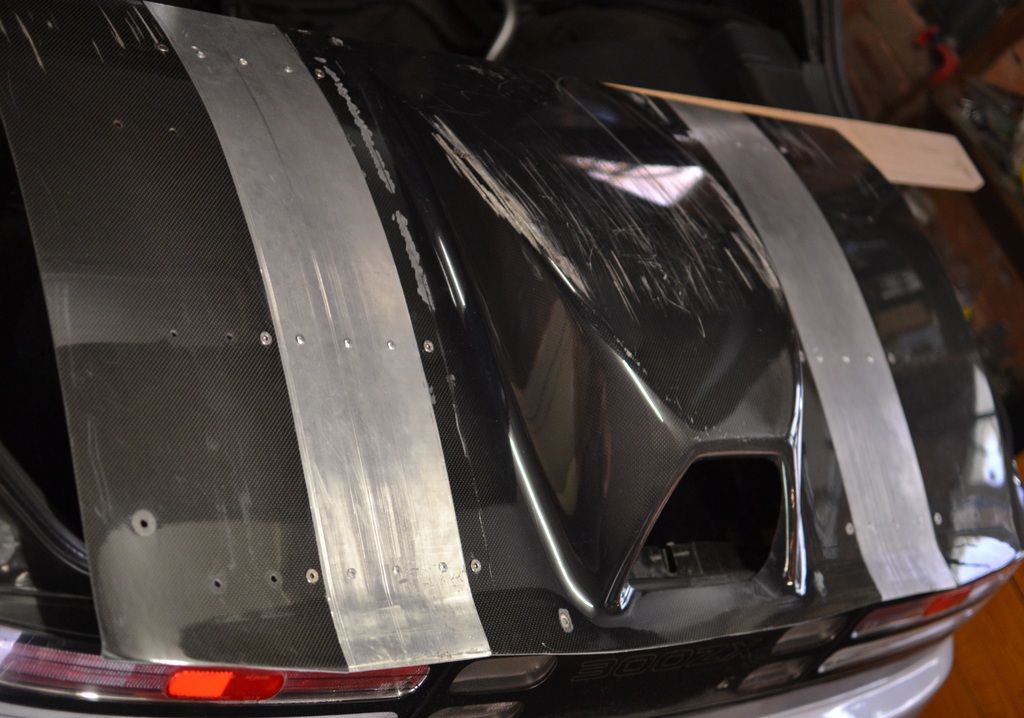
With the width where I needed it to be I set about properly mounting the diffuser. First to the bar, this time with no edges sticking out.
As far as fixing the diffuser to the car, the process was layered. While this is no CFD analysed race car, for me to go to all this effort I want the diffuser to have at least a chance of functioning. First step was lining up the leading edge to the lowest point of the underbody, which meant ordering in the long on-the-buy-list Ultra Racing four point rear underbody brace from the last update.
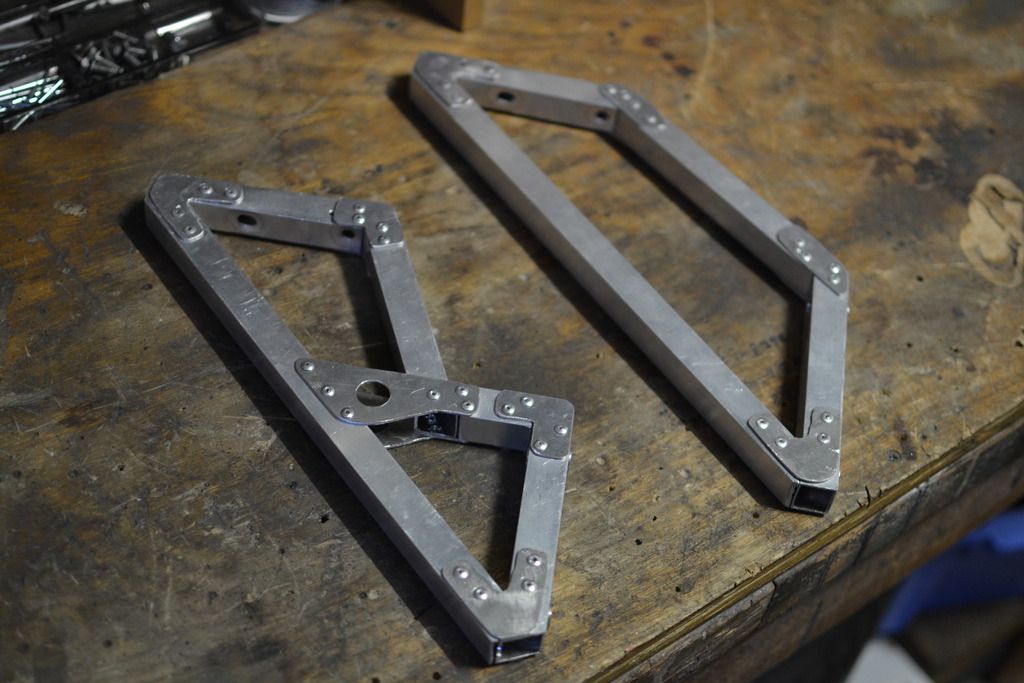
With the height set I made the brackets up from 3/4" box section. This was a pain in the ass as there needed to be ample room to plumb the twin exhaust through there as well as clear the fuel tank. I weighed up a few options including on the the fuel tank straps as well as simply one long wide bracket (that would've been great). Running down from the frame rails via the subframe was the only no-compromise option, and the car had just enough space to do it. The subframe is getting solid mounted down the track so there'll be no flex issues.
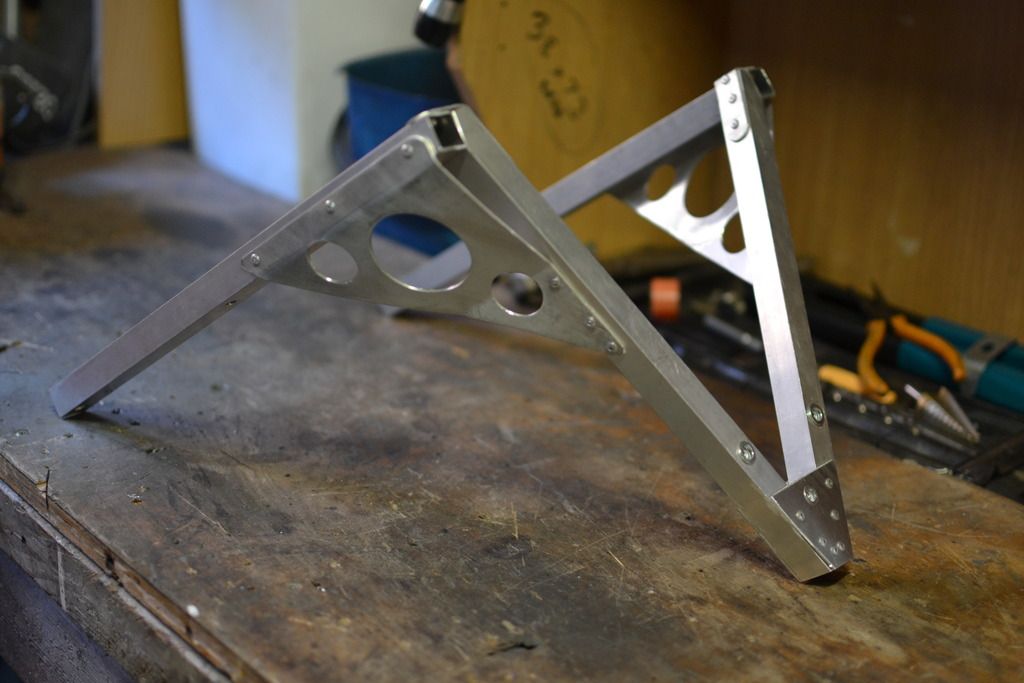
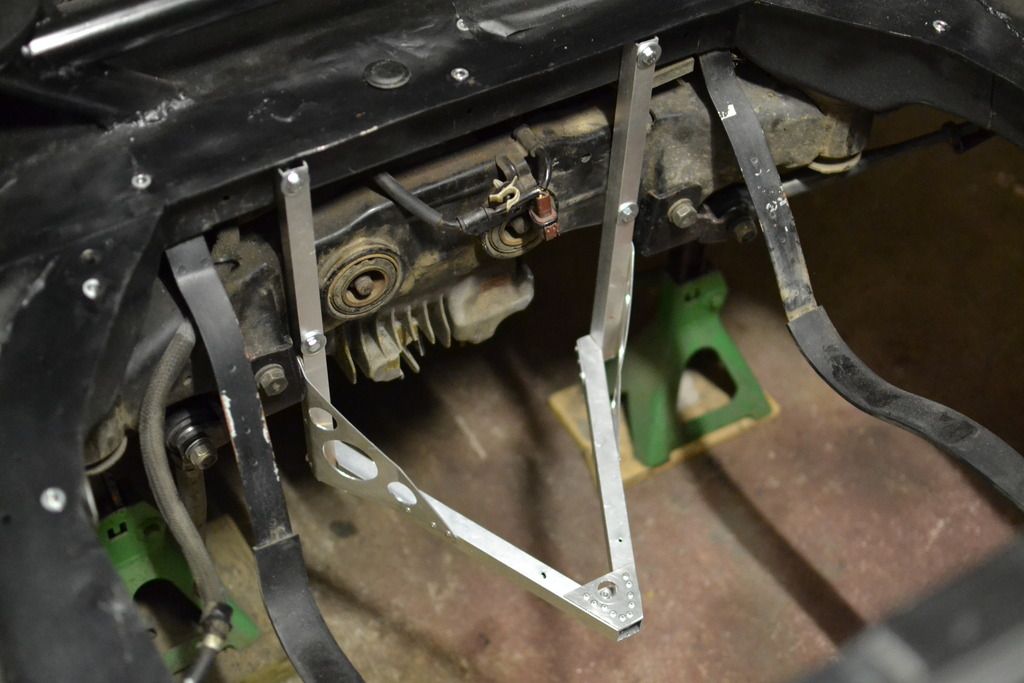
Both far edges got mirrored brackets to the chassis too.
Feels solid as all hell. The brackets are definitely strong enough to hold me up, the diffuser maybe not though. Lining up these things dead even was a battle.
I cut out a new boot floor out of sheet. Much better access to the fuel pump in the long term which is sweet.
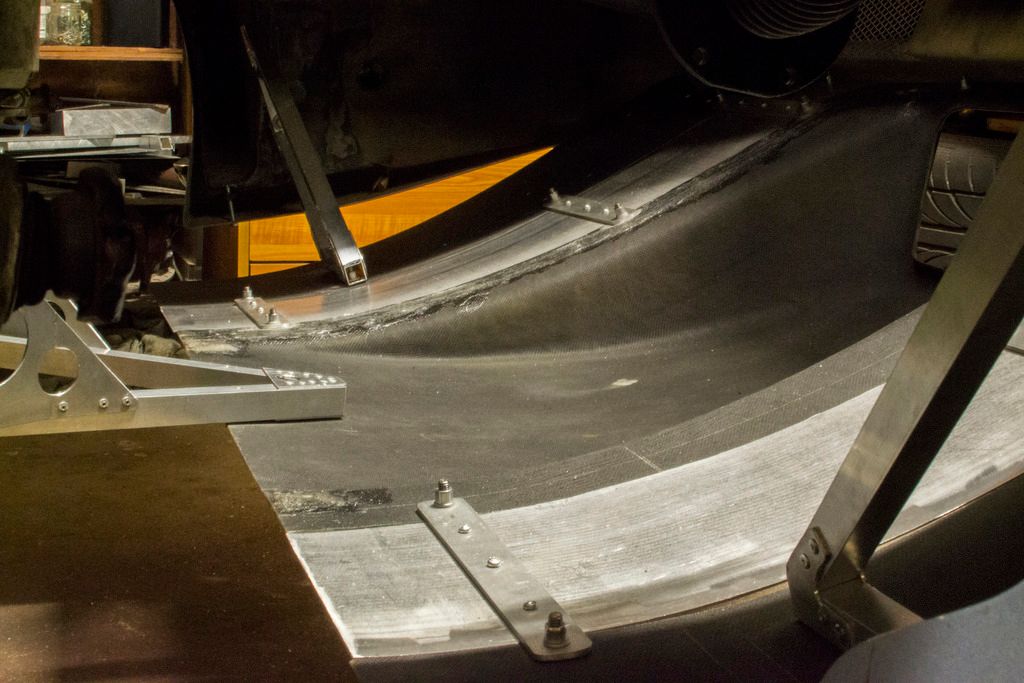
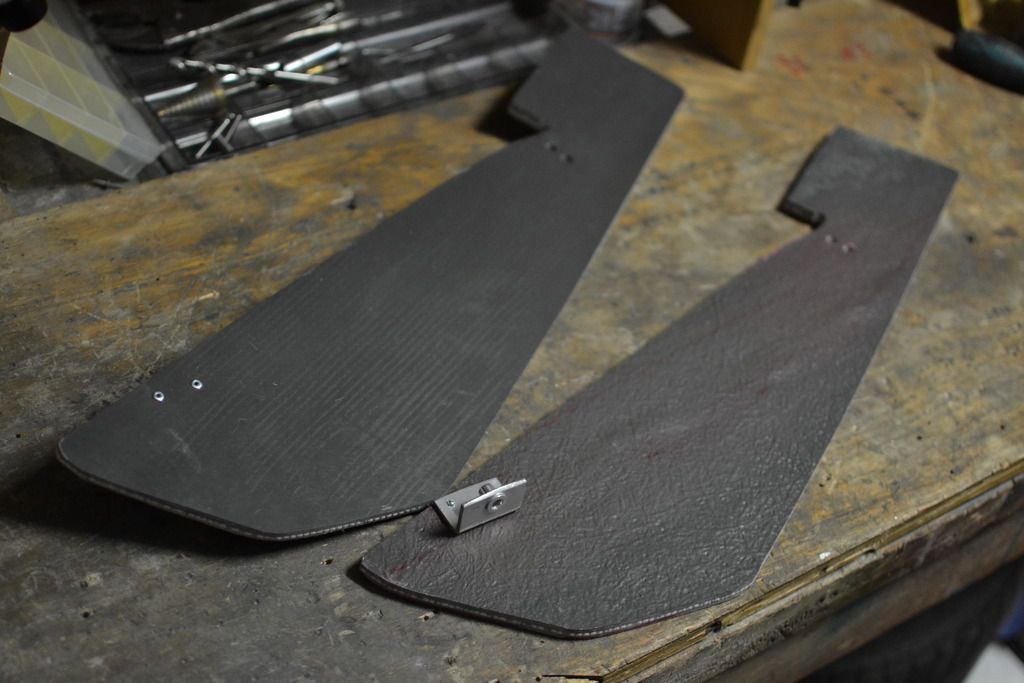
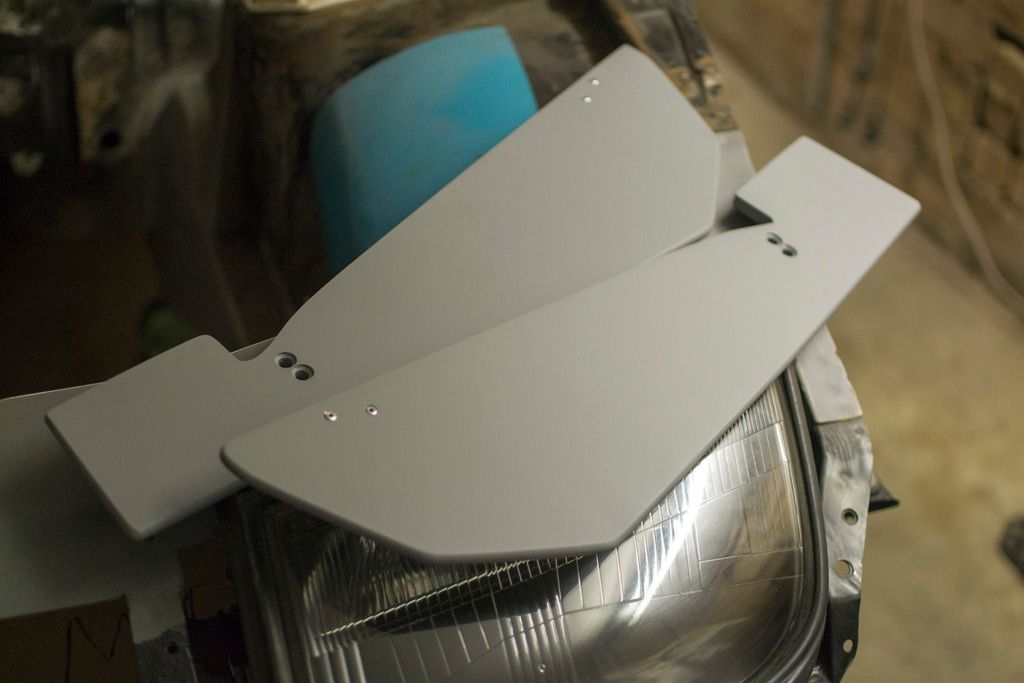
Next up was working out the fin situation. The diffuser came with a pair, which was nowhere near enough with the new width. I was quoted for new fins and the price was just silly, and I wanted to change up the design a bit anyway. After a great amount of digging for a supplier I picked up some preformed 10mm fibreglass plate and went to town.
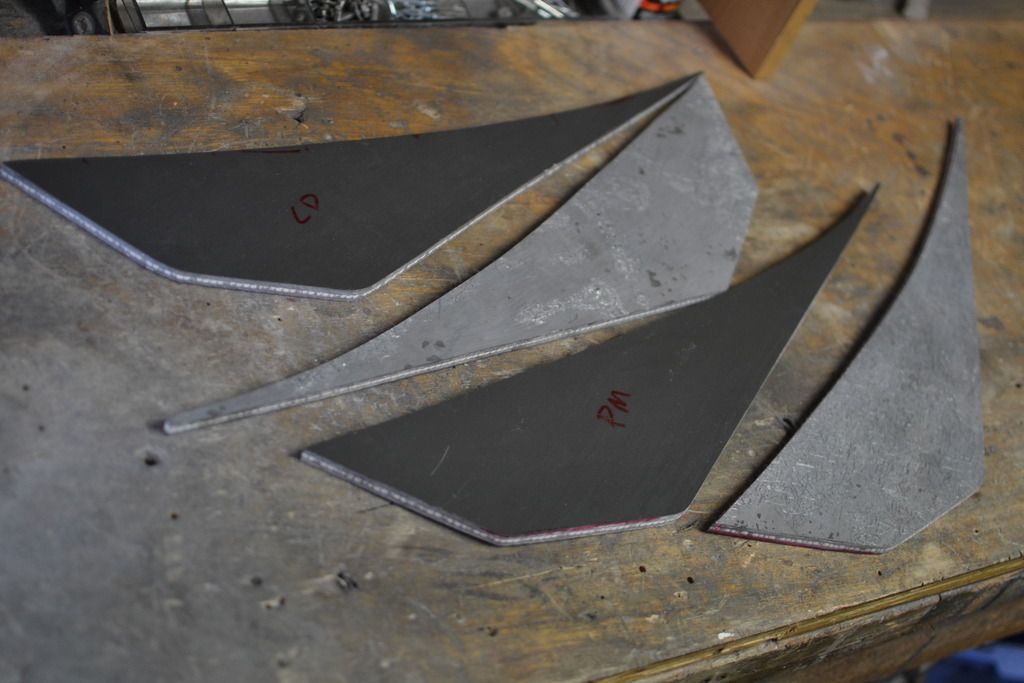
The curves were very difficult to match and each one is slightly different. I went through a few ideas how to mount these, but after cutting them and feeling how light they were I went with the method that meant the least further diffuser decapitation (because you know, it's basically as new right).
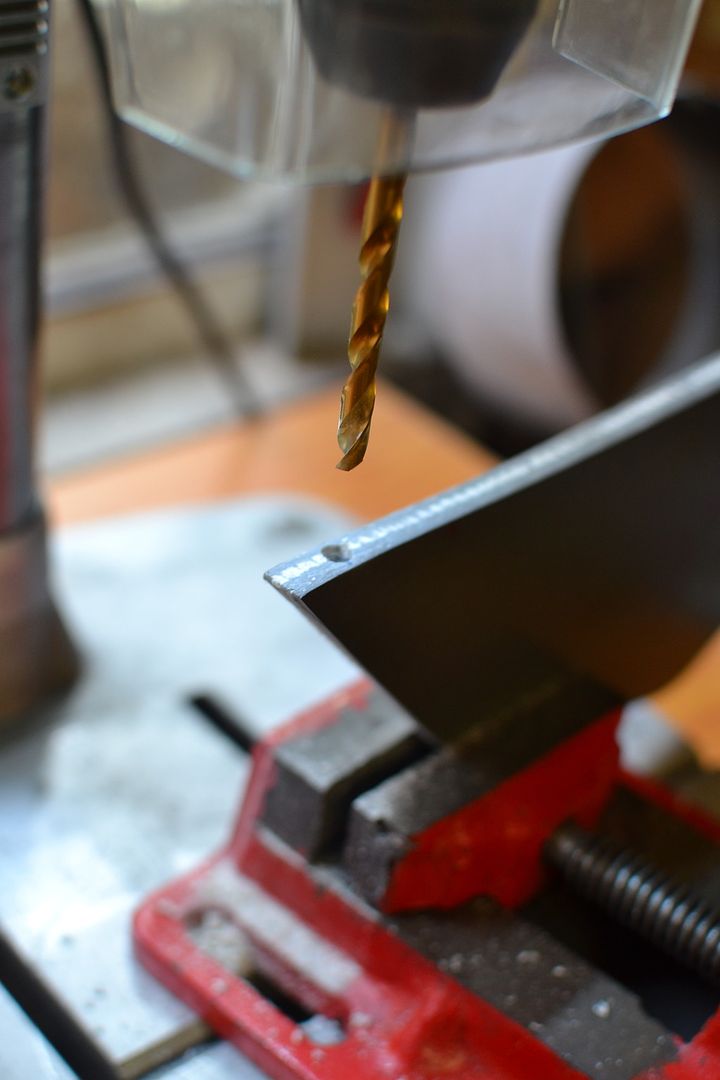
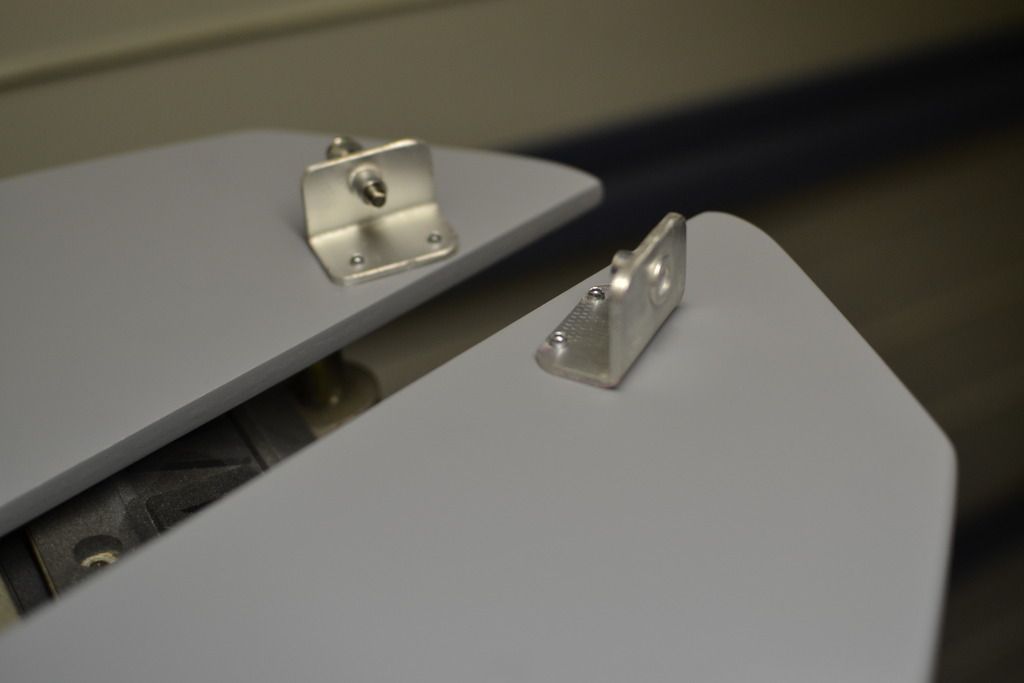
Four M4 rivnuts epoxy'd in to each fin hold the four on.
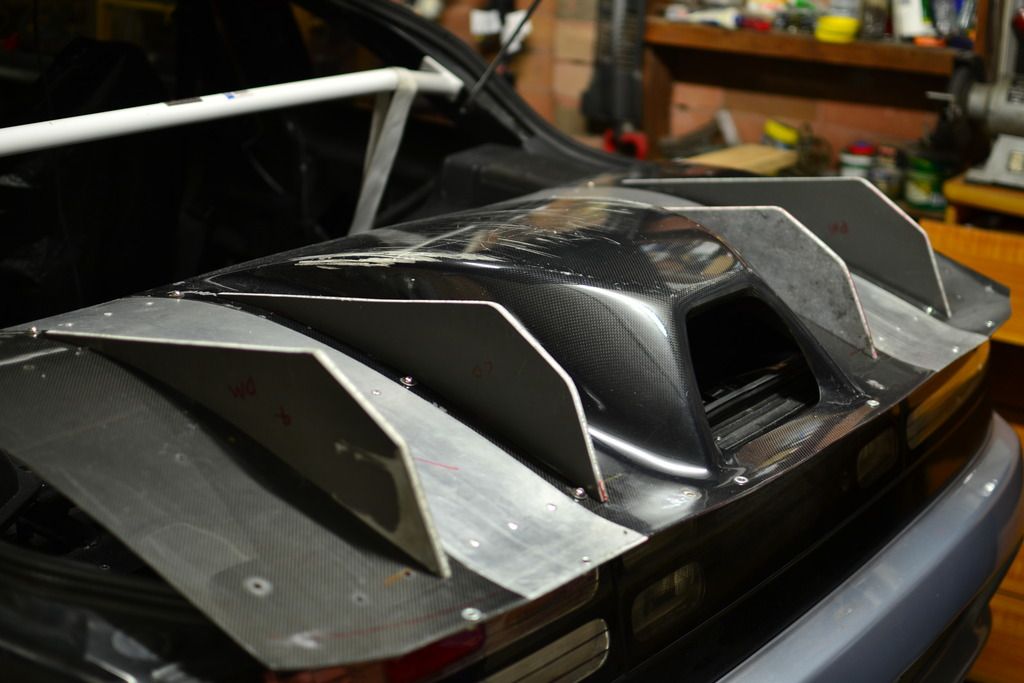
Fit up. Starting to get an idea of how the setup will look.
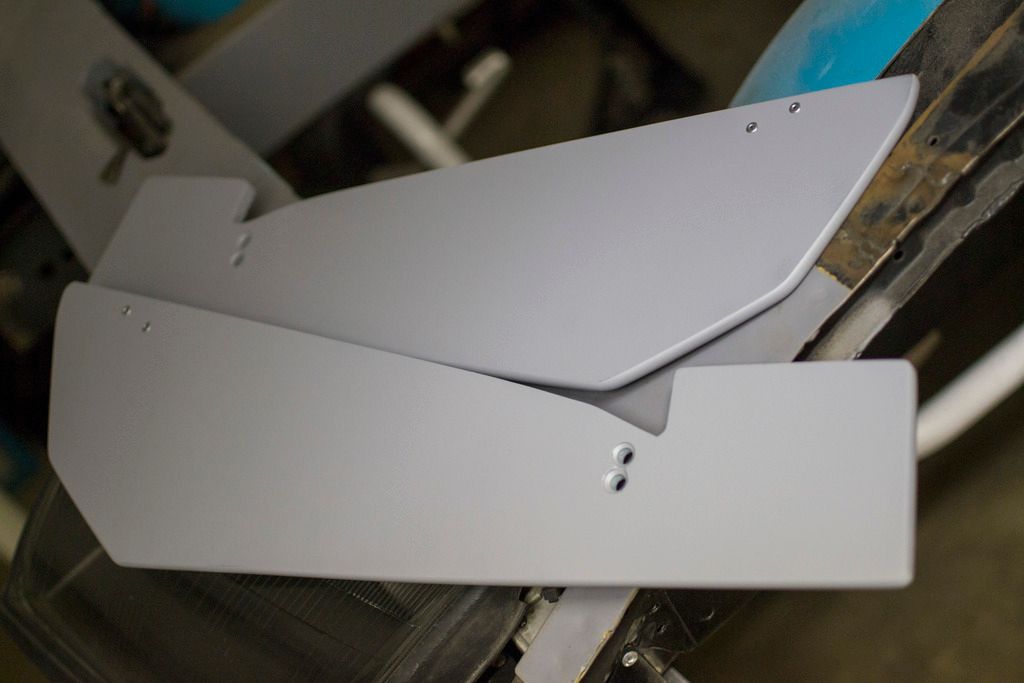
It was about now that I realised I had big problem that I seriously didn't see coming. The diffuser actually hangs lower than the rear bar.
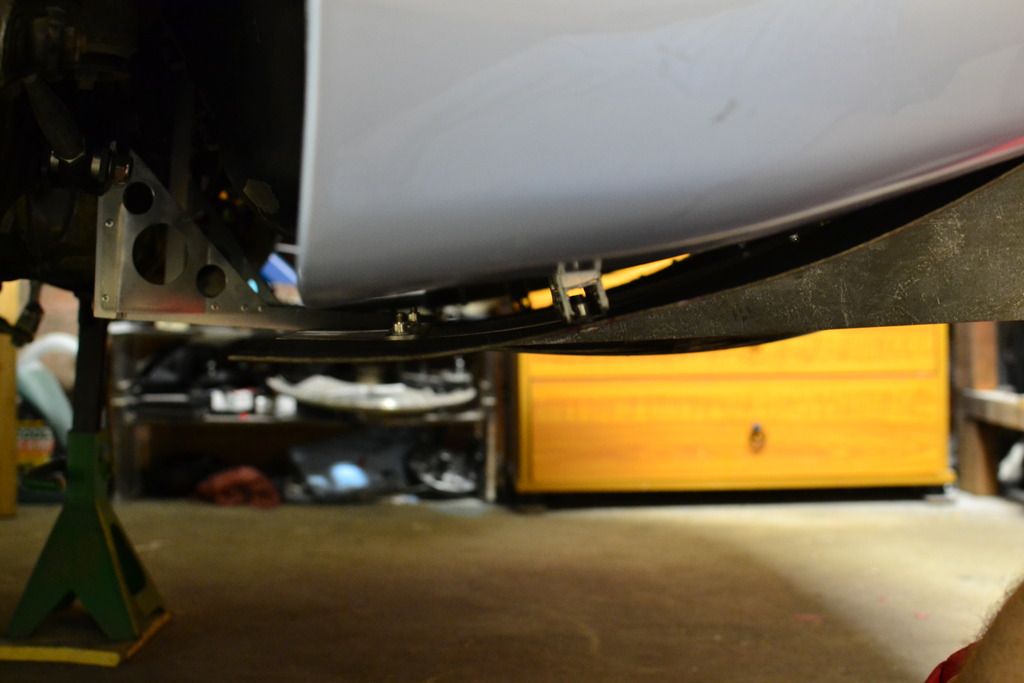
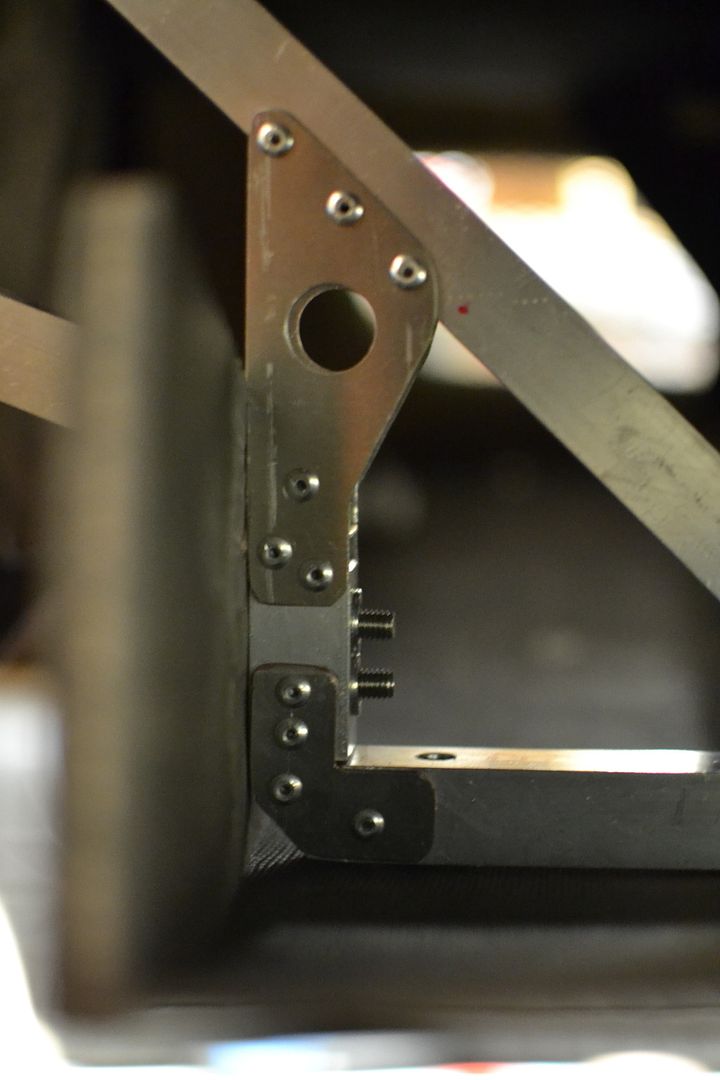
Trying to make an aero part that could actually work has its draw backs. After some good pondering of this honey doodle I worked out a plan for the outer fins to fix the situation. They cap either end of the diffuser and extend up to inside the chassis.
This unfortunately meant seriously modifying the double D mounting brackets I had already completed, which I can assure you I was stoked to have to do.
Now I have double Bs. The outer fins bolt up flat to one of the faces of the brackets as so;
With the fins all shaped up all the fabrication was at long last god damn over. Cue the paint prep, priming and me calling it a day.
I glassed over all the excess holes and filled up all the chips, scrapes and chunks from the previous owner. And a nearly full length cut I made in the centre section before realising I was an inch out from where I needed to be. Dickhead.
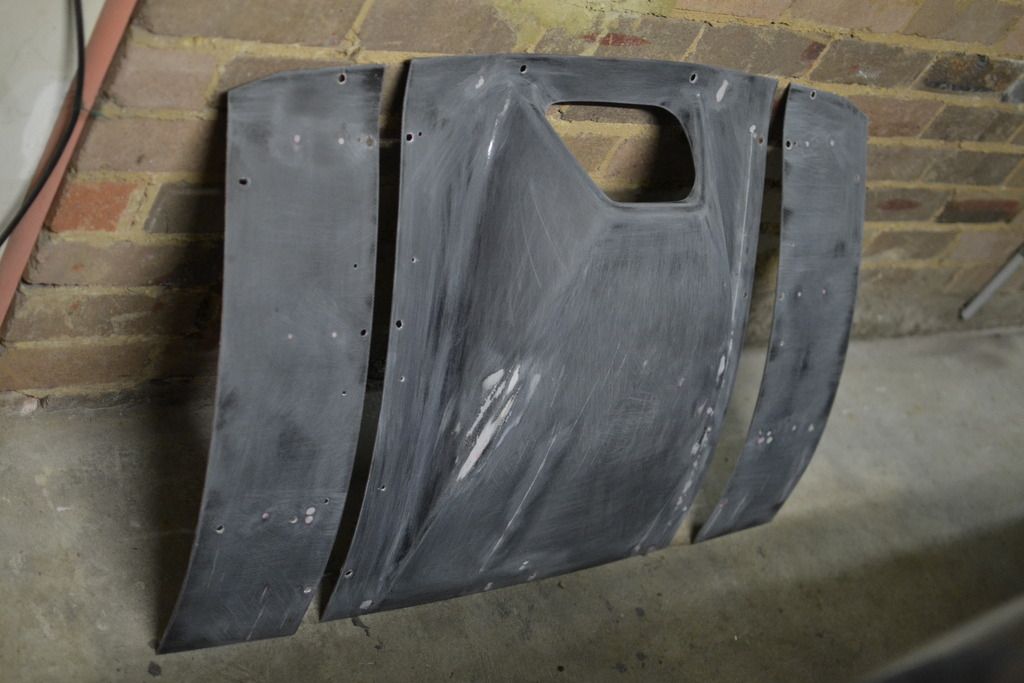
The primer work didn't come out hollywood perfect but I don't really give a shit. Good enough before a pro can finish it.
I was actually glad to cover up the carbon. I **** carbon for carbon's sake when it's just cosmetic. Carbon is cool when it's there because it's strong and light; not just slathered on as a final coating for looks. Unfortunately that's what the diffuser is; fibreglass underneath. The only thing that stopped me ripping off the whole carbon outer layer was the amount of smoothing out I'd have to do afterwards. Besides, the aluminium sections were never going to tie in properly otherwise.

I borrowed a router from a buddy of mine and rounded off all the edges. The bolts on the outside fins were also countersunk.
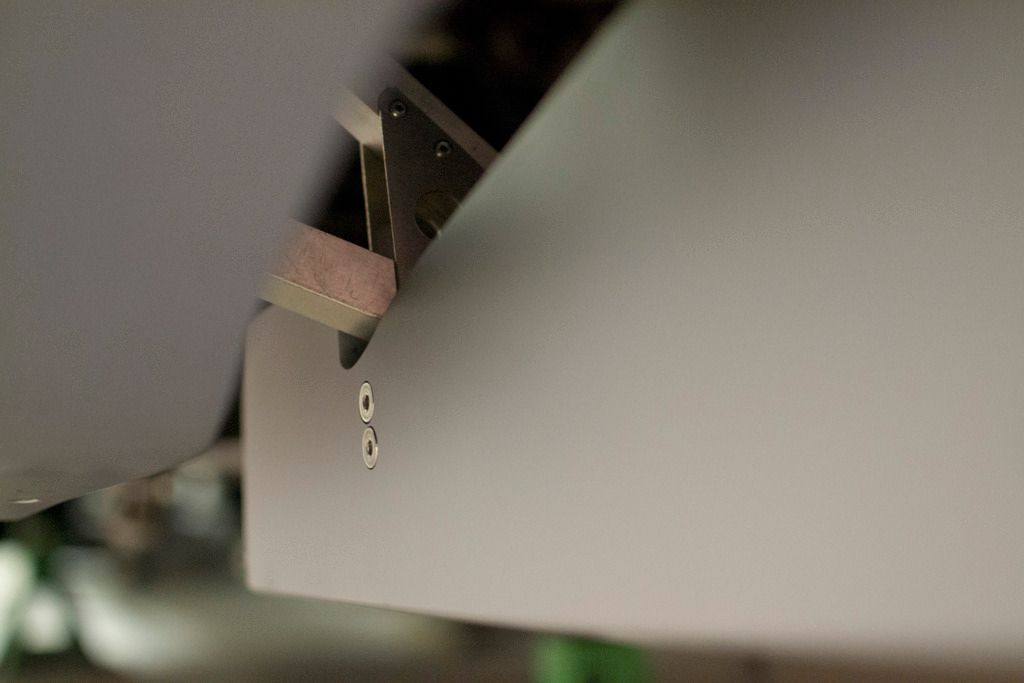
A small pair of riveted on brackets hold up the trailing ends of the outer fins.
And there you have it, done and dusted.
If I'm honest, this project was brutally time consuming and difficult. It is a perfect example of something just taking way too long and by the time I threw the last bolt in I wasn't satisfied so much as I was ready to set the thing on fire. The amount of cutting, shaping, measuring, doing over and even just time spent simply staring at different portions of the vehicle trying to conceive solutions was vexing to the nth degree. A wise man once told me to do one thing until it's finished and I'm glad I did because there were a number of times with this project when I thought I could see the light at the end of the tunnel, only to keep on and realise there was weeks and weeks of work left.
But the end result is something pretty cool. Maybe when a couple of months have passed and I've forgotten the amount of work in it I'll dig it more. Or when I have the car further forward in the garage allowing me to properly take it in, haha. Then I think I'll go about replacing the epoxy'd nutserts in the fins with full length stainless bolts; one of them has already pulled out as you can see on the trailing end of the passenger side centre fin. urgh.
Time to finally move onto other enhancements. At long fucking last.
- ALast edited by anti.engineered; 05-10-2016, 09:13 AM.Leave a comment:


Leave a comment: