Announcement

Collapse
No announcement yet.

1963 C10 Build - Low, Loud, and Moderately Quick

Collapse
X
 
  • Filter
  • Time
  • Show
Clear All
new posts

  • #31
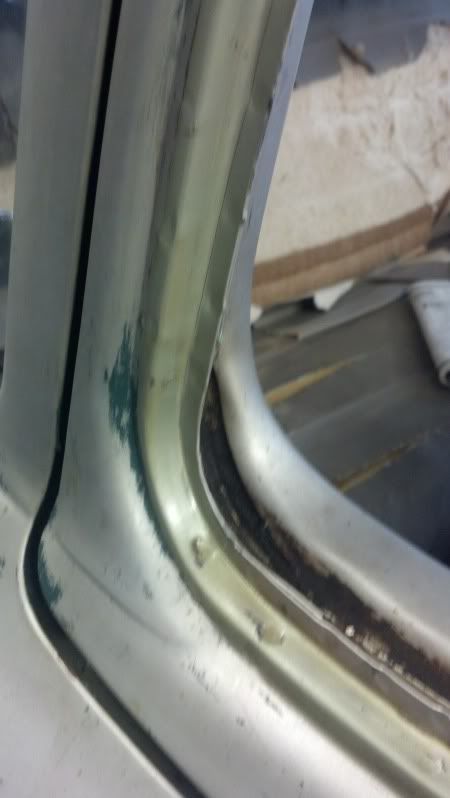
    Thanks for all the kind words everyone. Took it out to take some full shots with the paint stripped. Still needs a lot of little detail work, but I am ready to start taking it apart.


    You can see the original dealership sticker here:


    Ryan

    Comment


    • #32
      Love the patina look. I wonder what would happen if you buffed on that a little bit
      4 Cars, 0 Cupholders

      Comment


      • #33
        great start, I am really looking forward to this as this is my favorite generation of the c10. major props on going with a wrap around windshield model most people are afraid of them.
        IMG_20140729_210811 by MGRAND3, on Flickr


        My build thread.http://www.stanceworks.com/forums/sh...ad.php?t=33607
        Instagram: MGRAND3

        Comment


        • #34
          Made some good progress today. Got the fenders, cowl pieces, hood, and nose panel off. Only broke one bolt. This thing is nicer than I originally thought. This is the first time these panels have even been removed. Factory seam sealer all in tact still. It is a shame that it was resprayed. Doesn't get much more honest than this:

          Relatively clean under the cowl thing piece. Dang mud dobber nests everywhere. You can see in the top right the little u shaped pieces of metal. They are used to space out the panels to make them fit right. I guess they had pretty bad tolerances from the factory:


          The other side has the original factory assembly number on it:


          Wet towel and some scrubbing making it look like new:


          Original undercoating still there:


          Seam sealer still sticky and fresh looking:


          A lot of times this area rusts out really bad and makes everything hard to get right. This is good to go though.


          Cotton in the radiator still. I wonder if they had any slaves.


          Stopping point for the day:


          Sleek and aerodynamic cutting edge technoligies


          Bed comes off in the next few days and putting a lot of those parts into storage. Need to order some seals to redo all the windows and stuff.
          Last edited by csermonet47; 07-13-2013, 06:06 PM.
          Ryan

          Comment


          • #35
            Instagram: Brandon_Schulze
            VWVortex: Brandon_Schulze

            MK4 Volkswagen Jetta. Bagged. Daily.

            ۟rojerks

            Jetta Build Thread:
            http://www.stanceworks.com/forums/sh...ad.php?t=46900

            Comment


            • #36
              ooh now this is going to be great! *squirms in chair at work*

              good luck!
              Originally posted by Jlyons617
              Worst male for male craigslist ad ever.

              Comment


              • #37
                This is rad looking forward to the continued build

                I like em dropped.

                Comment


                • #38
                  I can't believe how rust free that thing is.


                  The Kia has been parted.

                  Comment


                  • #39
                    Thanks guys. Got the bed off and put all the other parts in storage. Cleaned up the frame a bit and looking good. Not much to do until I order my rubber seals and stuff. There is nothing to the rear end of this thing.


                    It is way faster now and does mega burnouts. Maybe have another burnout video in the future ...
                    Ryan

                    Comment


                    • #40
                      Originally posted by csermonet47 View Post

                      Cory loving life:


                      Damn I love life.

                      Comment


                      • #41
                        Got all my rubber seals and stuff in and have started working on that and some other things. Ran into some issues with the window track for the division bar being pretty crappy so had to order some other stuff and do some prep for the new seals. I started poking around at the rust and it as a bit worse than I thought so I ordered some patch panels:

                        (crappy camera in crappy lighting so bear with me)


                        It is really tight in the foot well so I put a cut off wheel on a pneumatic dremel thing (sounds like a dentist drill and makes my teeth hurt) to give me a little more room where I need it:


                        Zip zap rap Dave the turntable slave


                        These big honkin' panels:


                        More zippin' and a zappin'


                        Swoop


                        Not perfect but I am very proud of it for my first patch panel. I don't have any fabrication or rust repair experience at all so I am learning. I am loving it though. Probably should have gone all the way to the sealing surface but I didn't want to drill out spot welds. Gonna make some patch panels for the floor and the bottom of one of the doors and do the other foot well.

                        I also picked out all my old seam sealer and put naval jelly on it to remove any rust. Then coated with POR15 and applied some seam sealer to try to keep the water out. The 50 year old stuff wasn't cutting it. This was just a pain in the ass really. Cleaning out drip rails and stuff.

                        Really nasty stuff to deal with. Went into it thinking I could smear off excess with my finger. Once it gets on the gloves it just doesn't want to come off.


                        Windshield sealing surface was really gross. It was like plumbers putty goopy stuff on everything:


                        Cleaned up nice tho with no rust underneath:


                        Also got the rear glass in with the new seal:


                        Here is the seam on it. It was cut-to-length:


                        Going to tackle the rest of the rust and installing the windshield in the next few days. Been letting it sit in the sun with the seal on it for a while. Supposed to be a massive paint with the wrap around windshield and I might break it but whatever yolo swag 420 blaze it


                        Took the seat out because I almost burned the garage down with it in there. Also trying my hardest to not let my garage get too dirty. Which seems to always happen.

                        Oh and I am in an intro to welding class and this is day two doing stainless on the TIG machine. SO much harder than MIG. Especially aluminum. We won't post any pictures of that:

                        Last edited by csermonet47; 07-30-2013, 09:44 PM.
                        Ryan

                        Comment


                        • #42
                          This is looking awesome! I can't wait to see further progress and the other things that you have in store for it.

                          Comment


                          • #43
                            I am so jealous, I want that truck! My c10 was just totaled by a tractor trailer, so I'm hoping I can find an early 60's to replace it. Keep up the good work!
                            Owner/Head Builder & Tech - Chuck N' Dick's Garage, Richmond, Va

                            Comment


                            • #44
                              This is awesome! Just plain awesome!


                              Instagram - @choadyhighroller
                              Originally posted by nickskater09
                              I think Jody, along with Ashton, like to push the line between "street legal" and "realistically driveable".

                              Comment


                              • #45
                                Nice welding!


                                oh, the truck is cool too.

                                Comment

                                Working...
                                X