Announcement

Collapse
No announcement yet.

1967 Pro-Touring 122 Amazon (Project Volvo X)540 Horsepower LS6/Tremec TKO600 5-Speed

Collapse
X
 
  • Filter
  • Time
  • Show
Clear All
new posts

  • Iamtheonlyreal1
    replied
    Door Mirrors have turned out to be a bit more complicated than I had thought, because there arent too many options out there, especially when I am removing the vent window and running a 1 piece door glass.

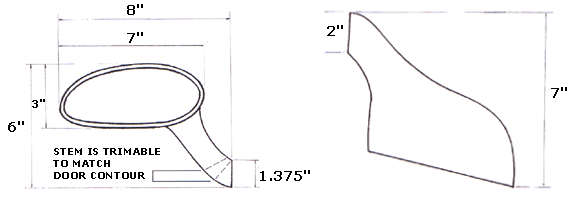
    I found these mirrors, and I think they will be about right.. The are actually not that bulky, but still have a bit of early styling, plus they have the LED turn signal made into them.

    By the measurements, I dont think they will be too big for the car, but the base of them is made to cut to a number of specific specifications and fit, so I should be able to draw them into the door/body as I see fit..


    Leave a comment:


  • jdizzy204
    replied
    Absolutely loving thins build. The fins on the intake cover are genius and really tie the engine bay together. Keep up the amazing work!!

    Leave a comment:


  • Iamtheonlyreal1
    replied
    Through trial and alot of error, I think I finally have the rear air box sorted out, and I think this is the way I am going to run it. It will still need a bit of finish welding and grinding, but it appears it will work just fine.. Now I just need to figure out the coating/paint combination that best fits the build.. I am thinking about having the whole unit powder coated in an Aluminum color, and then having the center painted body color/under hood color.

    It isnt the cleanest thing right now, but it well definitely clean up nicely with a bit more grinding and finish welding.. I actually have to cut it apart in a couple of places to do some final welding internally..


    Last edited by Iamtheonlyreal1; 12-08-2012, 07:51 PM.

    Leave a comment:


  • The Norwegian
    replied
    mind blown!!! this thing looks awesome!!! keep up the good work

    Leave a comment:


  • Iamtheonlyreal1
    replied
    Originally posted by LCG View Post
    I still don't feel those horns going backwards.. have you ever consider just facing the intake backwards to a more cleaner solution?

    And I have been in the LS1 scene since it ever came out and never saw those valve covers before. nice find!
    Facing the intake backwards wont do it, because I would have the have the motor several inches forward, or I would have the Air Cleaner box right by my feet. There is something to be said for them running backwards though, I wouldnt run into to many more at the shows run that way, which completes the being different part of the build.. LOL

    Leave a comment:


  • LCG
    replied
    I still don't feel those horns going backwards.. have you ever consider just facing the intake backwards to a more cleaner solution?

    And I have been in the LS1 scene since it ever came out and never saw those valve covers before. nice find!

    Leave a comment:


  • Hotsauce
    replied
    This is the best thing ever.

    Leave a comment:


  • Iamtheonlyreal1
    replied
    I couldnt stand it anymore, and didnt want to come to the shop tomorrow with a plain situation, so I made some fins up real quick.. I think this might be the ticket, but it will need just a bit of refining. I will make a better close out front panel later, and it will follow the contour of the front engine assembly/intake, which I think will compete the custom fit better..

    The fins can be made real easily by stacking flat bar, and tack welding them together on the bench.. Just stand one up, lay one down, stand one up, lay one down, until you get the fin count you want..


    Leave a comment:


  • Iamtheonlyreal1
    replied
    Here is something I am working on for a template, and I am sure there will be alot of people that will object to this look, but I als dont know how I feel about it yet, because I still think it needs something... I cant seem to find a decent intake cover for the plastic intake, and I am not real big on some of the aftermarket replacement intakes, because they are really just a bulkier version of the original.. It couldlbe painted, or even add a carbon fiber touch, but that isnt really what I am looking for..

    I made this intake cover as a starter, and I think there are several options for it, but it still seems a bit plain or off.. I was thinking about having the intake cover painted body color, while having the intake tubes powder coated in an Aluminum look coating? I could also use the center of the intake cover for some sort of Air Brush logo'ing or badging? I could potentially add some fins that would blend into the valve covers? Not sure yet, because this is just a starter.. I think it has some potential, mainly because it will hide all the injector B.S., along with a bit of wiring and accelerator cable.

    I still have to bring the Filter Box down into the center section, so the rearward part of the cover/filter box isnt completed. The air filter box will more than likely come down to meet the intake cover just behind the valve covers, and this will tie in, and curver around the back..


    Leave a comment:


  • Iamtheonlyreal1
    replied
    I have been struggling trying to find a valve cover setup I liked, and there really arent too many options for the LS motor, other than some Fabricated/Welded Covers and a few various other styles.. I kind of like the old 327 Corvette finned valve covers, so I thought I might like these, because they would fit the era of the car, but I am not sure about them yet.. In order to use them, I am going to have to work out some of the poor cast finish grinding marks, and they are just a bit bulkier than I wanted..

    I ordered them in the Cast form, because I didnt want any polished parts under the hood or painted parts, because I am going for a natural metal finish look. The polished version might be a bit cleaner in the finish work, so that might be the way to go for others that like this style.


    I have the machine shop working on a throttle body attachement collar for the intake tubes, and this collar will be welded onto the Y tube, so I can get rid of the rubber boot and clamp system that is typical here. The collar will have an internal double O-Ring set up that will seal the joint between the throttle body and intake tube.. The whole assembly is hard mounted to the top of the motor, so there wont be any virbration or engine torque forgiviness needed for the O-ring joint.

    Leave a comment:


  • The Norwegian
    replied
    this thred is on fire!!! awesome, keep it upp

    Leave a comment:


  • Iamtheonlyreal1
    replied
    Well I think I got the Air Filter Box set up the way I want it, and it seems to fit the body great.. It will have either one air filter, or individual filters per tube, but I am not sure yet.. Now that I have the body of the air box done, I can take it to my local parts store to see that filters will work, so I can make the baffles and resting points.

    I did my best to make this thing fit the body of the Amazon, so much so, that I actually used curves and contours from the parts off the car.. I normally like to use already existing contours, because you would be surprised how out of place things can appear if you are just slapping foriegn features to the body. I made air box mimic the cowl left to right curve, and also added a compound duplicate curve to the side, so I think it really completes the firewall nicely.. Infact, you can see that the air box rest in the heater box relief of the Amazon pretty nicely.

    The next thing I have to do after I locate air filters, is to figure out a good looking mounting feature for it.. I plan on hard mounting the full assebly to the motor, and then have a boot/gasket that makes the sealed connection to the firewall, sort of like the Trans Am shaker hood mount gaskets. I am not sure if I want to make some sort of closed/solid sides for the inside of the unit, run some straight machined leg style mounts, or build some sort of erector bridge sort of mounting on the side.. I am guessing that I am going to have to stare at this thing a bit, and then deal with that aspect just a bit later.

    Also, I have not trimmed the bottom of the box yet, so it might appear to sit a bit low.. I was waiting until I find out what filters I can run, so I can then determine the depth of the box. I plan on making the filters load from the bottom of the box, so any seams and hardware will be hidden. I dont think I will have any problems making the bottom look satisfactory and functional, after all , it is on on the bottom.

    Here is a bit of the work it took to get this, and I am sure it wont do alot of you any good, because this is a one off piece for this car, but there still might be something to share.. This was all made with the 4in angle grinder, and some basic tools..


    Last edited by Iamtheonlyreal1; 12-01-2012, 08:13 PM.

    Leave a comment:


  • Iamtheonlyreal1
    replied
    Originally posted by Jesus Christ View Post
    forgive my ignorance but i had no idea that there were high end volvo shops out there let alone doing work like this. Amazing stuff man.
    Holy Crap... This is a Jesus approved build, that will go far in the Bible Belt area I live in... LOL

    Leave a comment:


  • Iamtheonlyreal1
    replied
    Originally posted by tha View Post
    why this thread still doesnt have a 5*?
    awesome work man!
    I appreciate that, and I guess no body if voting for it... LOL I am on a few different forums, and I think people drift past the thread, because it is an Amazon build and they dont expect much from it.

    Leave a comment:


  • Iamtheonlyreal1
    replied
    Well it is just my luck.. It looks like I am going to have to re-configure the Air Filter Box, because isnt right in appearance/shape for the intake tubes I have made up. When I did this air filter box, I used the OEM heater flange that connects to the cowl vent because I thought I wanted a factory configuration, but the factory offset is way to far off for what I need to look right.. I will still use the flange, but I will have to build some sort of new box that will center it all out, and will allow my new intake tubes to attach efficiently.. It is much easier to build a new box, than try to configure a secondary intake runner setup, especially when I am just using a Chop Saw and a 4.5in angle grinder to get all this set up right. I am beginning to think that I need to get a bit of new equipment, and learn how to use it, but I dont have the time right now.

    I have done my best to make the Intake Runners flow with the body contours of the fenders, that way everything looks complimentary when the hood is open.. I think this is about a close as I am going to be able to get it, and I wish the need for correct proportions and contours didnt bother me so much, because it would have made this task alot easier. This whole intake unit will be mounted directly to the top of the motor with some nice and hidden mounts, so it should all be very stable and flow well.


    Last edited by Iamtheonlyreal1; 11-30-2012, 06:48 PM.

    Leave a comment:

Working...
X