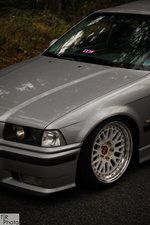
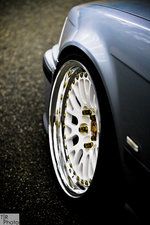
Hey guys, well basically i had these set of 5x120 16x7.5 OZ Vegas around. To me they just looked sad in the shape they were in, and i saw the potential sitting there. The weather was cooling off a bit, and a randomly found some motivation haha so here we go!
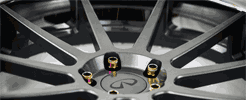
First off you need these sockets, i found them on ebay and was from the only seller in the US, others were in europe. They came in 2 Days! They are 10 Point 8mm/10mm Sockets Cost me $40 shipped

Heres what we are starting with, a bleh set of wheels. Lips needed sanding Badd! what you see is actually not the clearcoat its some weird reaction thats happening on the metal, it will take some elbow grease to get it completely off.


Next start splitting the wheels, i would recommend a drill like you see pictured, i had to split 2 by just using wrenches and it was a back breaker. i begged my friend to lend me his drill and glad i used it, took 5 minutes per wheel. Just be careful and place the bit on correctly, you dont want to strip the bolt. I didn't have any problems.

Put your bolts in pure vinegar for a night or two, it will strip the clearcoat/paint aswell as clean the tarnish on the metal.

The good thing about these wheels, yes they are 3 piece, but you don't have to take off the lip to get the face off! Simply take a rubber mallet and Liberally beat the shit out of the face until it drops haha

I did use paint stripper on the lips but there is only a thin layer of clearcoat.
Now lets start sanding!
I started off with a 320 grit only because i needed to cut through that bad spiderweb looking decay (what you see is after paint stripper so that's not clearcoat)

after some sanding

320 whole lip

400

600

800

1000

1500-2000

Finally 3000

Then i just went over the surface 1 time with Mothers Polish (Not final Polish, final polish should be gone over the surface around 10-12 times)

Next thing i did was Prep the inner gnarly nasty dirty barrel with a 500 grit on my drill

Then painted Black with Rustoleum Black protectant (Make sure to tape off the holes where the face goes, you want a metal to metal contact there)

Prepping the face again with 500 grit ( i also used 400 to get in the spokes of the face by hand)

Tape up around the holes, Again Very important part!

Primered the face, some people say use lighter color primer if you are paint a lighter color paint so it does not show through, but once i was done i could not see the primer through, also it helped me see what areas i missed that needed more paint!

Laying down the White!!!

Final Coat looking good!

When its time to put down the clear coat i would highly recommend this clear coat, NO YELLOWING! unlike Duplicolor which i used to use... never again. This stuff is amazing!

Next is the bolts, once you take them out of the vinegar rinse them off with water, and hand clean them with a paper towel. For painting you want to make sure none of the paint gets inside of the threads so i drilled a small piece of cardboard (30 Holes)

so you have this! now you can paint without worrying about getting paint in the threads

First i Primed them, then went with a nice black

Things are starting to look good!

Reverse mount anyone?

Now carefully align the face from behind and make sure the bolts lign up. Once you place the face in from behind begin to persuade it into place with a rubber mallet

Place your bolts in

i hand tightened all the bolts.

Next comes torquing them down. Start in a + Pattern then go to a star pattern. since i used old bolts i went with 22lbs of torque.
Watch this video for a DIY [ame="http://www.youtube.com/watch?v=M7FqNluXsY4"]Refinishing 3 Piece Wheels - Assembly - YouTube[/ame]

Below ill include some pictures of them assembled,
NOTE: Ill be done with them around tuesday, need to put Mothers Polish on the lips 10-12 more times to get that mirror polish! ill update it then!
First off you need these sockets, i found them on ebay and was from the only seller in the US, others were in europe. They came in 2 Days! They are 10 Point 8mm/10mm Sockets Cost me $40 shipped

Heres what we are starting with, a bleh set of wheels. Lips needed sanding Badd! what you see is actually not the clearcoat its some weird reaction thats happening on the metal, it will take some elbow grease to get it completely off.


Next start splitting the wheels, i would recommend a drill like you see pictured, i had to split 2 by just using wrenches and it was a back breaker. i begged my friend to lend me his drill and glad i used it, took 5 minutes per wheel. Just be careful and place the bit on correctly, you dont want to strip the bolt. I didn't have any problems.

Put your bolts in pure vinegar for a night or two, it will strip the clearcoat/paint aswell as clean the tarnish on the metal.

The good thing about these wheels, yes they are 3 piece, but you don't have to take off the lip to get the face off! Simply take a rubber mallet and Liberally beat the shit out of the face until it drops haha

I did use paint stripper on the lips but there is only a thin layer of clearcoat.
Now lets start sanding!
I started off with a 320 grit only because i needed to cut through that bad spiderweb looking decay (what you see is after paint stripper so that's not clearcoat)

after some sanding

320 whole lip

400

600

800

1000

1500-2000

Finally 3000

Then i just went over the surface 1 time with Mothers Polish (Not final Polish, final polish should be gone over the surface around 10-12 times)

Next thing i did was Prep the inner gnarly nasty dirty barrel with a 500 grit on my drill

Then painted Black with Rustoleum Black protectant (Make sure to tape off the holes where the face goes, you want a metal to metal contact there)

Prepping the face again with 500 grit ( i also used 400 to get in the spokes of the face by hand)

Tape up around the holes, Again Very important part!

Primered the face, some people say use lighter color primer if you are paint a lighter color paint so it does not show through, but once i was done i could not see the primer through, also it helped me see what areas i missed that needed more paint!

Laying down the White!!!

Final Coat looking good!

When its time to put down the clear coat i would highly recommend this clear coat, NO YELLOWING! unlike Duplicolor which i used to use... never again. This stuff is amazing!

Next is the bolts, once you take them out of the vinegar rinse them off with water, and hand clean them with a paper towel. For painting you want to make sure none of the paint gets inside of the threads so i drilled a small piece of cardboard (30 Holes)

so you have this! now you can paint without worrying about getting paint in the threads

First i Primed them, then went with a nice black

Things are starting to look good!

Reverse mount anyone?


Now carefully align the face from behind and make sure the bolts lign up. Once you place the face in from behind begin to persuade it into place with a rubber mallet

Place your bolts in

i hand tightened all the bolts.

Next comes torquing them down. Start in a + Pattern then go to a star pattern. since i used old bolts i went with 22lbs of torque.
Watch this video for a DIY [ame="http://www.youtube.com/watch?v=M7FqNluXsY4"]Refinishing 3 Piece Wheels - Assembly - YouTube[/ame]

Below ill include some pictures of them assembled,
NOTE: Ill be done with them around tuesday, need to put Mothers Polish on the lips 10-12 more times to get that mirror polish! ill update it then!


Comment