Announcement

Collapse
No announcement yet.

The Roundie - 1973 BMW 2002

Collapse
X
 
  • Filter
  • Time
  • Show
Clear All
new posts

  • bwwaaaa
    replied
    Originally posted by Fruttolo View Post
    While the engine is out you could get the valve/belt covers painted and everything else cleaned up, you know you want to do it LOL
    Also main seals, worth doing once more than less
    I did do the valve cover a while back, so I guess may as well do everything else

    Originally posted by gnmzl View Post
    Great progress. You are at the point of no return, but it will be totally worth it at the end.
    A piece of advice - do not powdercoat the pulleys, especially the crankshaft timing pulley, the big toothed one. There is a rubber layer inside of it, to smooth out vibrations. If you powdercoat the pulley, the rubber part gets caked and the timing doesn't work correctly. Ask me how I know.
    The true and tested "degrease, scrub and rattle can" method will do you good on this one.
    Also, when I powdercoated the waterpump pulley it started rubbing slightly on the crank timing pulley and also the water pump/alternator belt started slipping because of the super glossy surface of the powder coating.
    Noted, and thank you for the heads up! Paint it is, that's considerably cheaper anyways haha. Ultimately the pulleys are pretty hidden anyways, so as long as they aren't gross, I'll be happy with them.

    Originally posted by Benwalsh91 View Post
    this car is incredible. its the inspiration i needed to start mine off.

    amazing work, wish i could have seen it when i was in the area!
    Thank you! Next time you're in the US, you're more than welcome to come check it out

    Leave a comment:


  • Benwalsh91
    replied
    this car is incredible. its the inspiration i needed to start mine off.

    amazing work, wish i could have seen it when i was in the area!

    Leave a comment:


  • Fruttolo
    replied
    Originally posted by gnmzl View Post
    Great progress. You are at the point of no return, but it will be totally worth it at the end.
    A piece of advice - do not powdercoat the pulleys, especially the crankshaft timing pulley, the big toothed one. There is a rubber layer inside of it, to smooth out vibrations. If you powdercoat the pulley, the rubber part gets caked and the timing doesn't work correctly. Ask me how I know.
    The true and tested "degrease, scrub and rattle can" method will do you good on this one.
    Also, when I powdercoated the waterpump pulley it started rubbing slightly on the crank timing pulley and also the water pump/alternator belt started slipping because of the super glossy surface of the powder coating.
    Good call on the main pulley as I was falling for the powdercoating mistake too, thanks
    Services pulleys, it is always best to mask the mounting surface and the channel the belt goes into in order to avoid uncentered/slipping belts issues

    Leave a comment:


  • gnmzl
    replied
    Great progress. You are at the point of no return, but it will be totally worth it at the end.
    A piece of advice - do not powdercoat the pulleys, especially the crankshaft timing pulley, the big toothed one. There is a rubber layer inside of it, to smooth out vibrations. If you powdercoat the pulley, the rubber part gets caked and the timing doesn't work correctly. Ask me how I know.
    The true and tested "degrease, scrub and rattle can" method will do you good on this one.
    Also, when I powdercoated the waterpump pulley it started rubbing slightly on the crank timing pulley and also the water pump/alternator belt started slipping because of the super glossy surface of the powder coating.

    Leave a comment:


  • Fruttolo
    replied
    While the engine is out you could get the valve/belt covers painted and everything else cleaned up, you know you want to do it LOL
    Also main seals, worth doing once more than less

    Leave a comment:


  • bwwaaaa
    replied
    M20 Out, Build Anxiety In

    Ever reach a point in your build where you start to wonder if it's ever going back together? This was that point for me. Totally necessary step, but kind of daunting all the same. Last weekend we pulled out the M20. We tried once before out the top of the car, and that proved to be literally impossible. The M20+G260 combo is simply too long to come out the top of the car. So we dropped it out the bottom with the subframe.


    Per usual, I just didn't take many photos. I was too busy scrambling around the car to document the sketchiness. But I can tell you, we may have gotten a little dangerous with how we did this. Step one, unbolt the subframe while connected to engine hoist. Step two, lower the engine and front subframe onto dolly and remove chain. Step three, attach chain to new front crash bar. Step four, lift the whole body up and slide engine out. The whole process took maybe an hour, and lifting the body by the new crash bar was a little nerve wracking. But, it worked flawlessly. Next time I do this, I'd really prefer to have a lift though.


    Now my fabricator can finish up some small details in the bay, and clean up a few cuts. We're also potentially looking at redoing the trans tunnel, depending on what we find as we grind away at the unsealed metal. Hopefully nothing cancerous underneath.


    I'll probably take the opportunity to clean up a few things on this M20 while it's out. I'd like to get the pulleys powdercoated, and probably replace a few seals/belts that are easy to get to while it's out. I also want to figure out a way to make the alternator nicer to look at. I'm debating buying another one, removing the casing and having that powdercoated black. It doesn't need to be polished perfection, but the dull stock one will really ruin an otherwise nice bay.

    Despite all the worry about actually ever finishing, it feels so good to work on this car. If you've seen my other build thread, I've only been wrenching on a Miata lately, and I don't particularly enjoy that. The 2002 is so simple, it makes the whole process very enjoyable. With any luck, we're in the final stretch with the fabricator and I can bring it home to finish the fun stuff.

    Leave a comment:


  • mason4
    replied
    Amazing changes! Keep going on!
    By the way, what insurance company do you use for your baby? I take a look at www.cheapautoinsurance.com, but maybe you know a better one?

    Leave a comment:


  • bwwaaaa
    replied
    Originally posted by white out View Post
    Great update. I like how you didn't skimp on the front crossmember.
    Thanks! I figured it was definitely worth the added rigidity on the chassis.

    Originally posted by DawsonLiri View Post
    Great job with that reinforcement, I didn't you had to cut so much for fitting a M20.
    Yeah, it's wild how much has to come out for the M20. A few people have actually swapped M20s in without cutting the nose, but that means you have to do significantly more trans tunnel cutting. No matter how you do it, you're going to have to slice the car up, so may as well cut the nose up and make it easy haha.

    Leave a comment:


  • DawsonLiri
    replied
    Great job with that reinforcement, I didn't you had to cut so much for fitting a M20.

    Leave a comment:


  • white out
    replied
    Great update. I like how you didn't skimp on the front crossmember.

    Leave a comment:


  • bwwaaaa
    replied
    Front End Work

    With all the Miata updates in my other thread, it’d be fair to think I forgot about my 2002. I haven’t given up on this car, it’s just been slow going. My friend, and fabricator for this leg of the project, got injured at work and was out of commission for a few weeks. So priority was low on this project for a while. However he’s knocked out some stunning work so far.


    Front end out of the car

    The biggest thing he’s been working on is this new front end support. 2002s have a structural portion in the nose of the car, and it’s required to cut it out to fit an M20 in the car. The previous owner had cut the structure out, however didn’t put any new reinforcement in. Most M20 swapped cars put a simple bar across the top and call it good, but... I didn’t want simple.


    In place

    My biggest request was to have the support be bolt in. The logic being that having it be removable will make future engine service be easier. By removing the whole support, it clears up a lot of room to pull an engine out. Realistically, I know the engine will be out a few more times over the course of this car’s life, so it’s best to plan for that sort of thing.


    Center tie ins

    Another thing we discussed was adding the frame rail tie-ins. The stock sheet metal did run down to the frame rails and although you really only need to brace the towers together, it felt like a missed opportunity not putting the center supports in as well. This width allows for the radiator to sit in between as well. This gives the whole front end a great deal more strength.


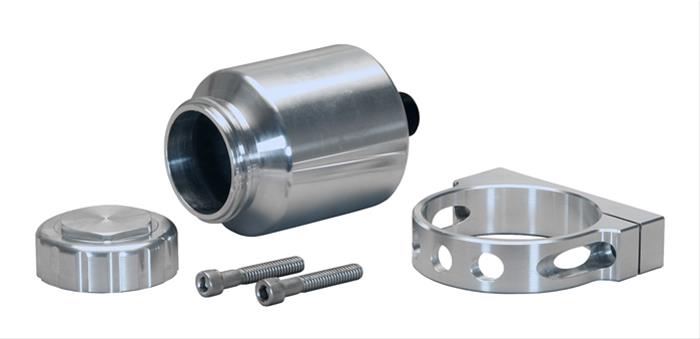
    He also took the opportunity to make a new bracket for my clutch reservoir bottle. I’m moving to this Wilwood unit, but the mounting hardware was just a hair too big for the stock bracket. He made a new bracket that mounts in the same place, and even has the same weld patterns. Once painted you’d hardly know it wasn’t the stock mounting location.


    He also removed one of the rear brackets on the firewall. This held some useless relays that were no longer used on the car. They interfered with the rear most trumpet on my ITB setup, he chopped it off.


    This week the trans mounts are getting addressed and I think the engine is finally coming out. The hood will be brought to him to work on the latch supports, and some other bits will be shaved/reinforced. Once this is all taken care of, it’s back to my house for some other improvements before I send it off to get the bay painted. Whether or not the rest of the car gets painted yet, that’s TBD. It will eventually, but life priorities>dream car sometimes. I don’t like it either but a clean bay and ratty car is better than nothing at all!

    Leave a comment:


  • Nike_100
    replied
    I love these old Bimmers, very nice build!

    Leave a comment:


  • CH00k
    replied
    I just read through this entire thread. Looks really good man!! I need to get started on my sahara roundie.

    Leave a comment:


  • bwwaaaa
    replied
    Originally posted by bianchini View Post
    What radiator is this?
    I replied to your PM as well, but in case anyone else is interested:

    Free Shipping - Wilwood Master Cylinder Remote Reservoir Kits with qualifying orders of $109. Shop Master Cylinder Reservoirs at Summit Racing.

    Leave a comment:


  • bianchini
    replied
    Originally posted by bwwaaaa View Post
    Worse Before Better

    The solution? Capped radiator. Since I am deleting the heater, the expansion tank loop becomes a bit redundant. Some measuring and scrolling through Summit later, and I found this unit. I couldn’t tell you what car it normally lives on, but I can tell you it fits perfectly between the frame rails of a 2002.

    What radiator is this?

    Leave a comment:

Working...
X