Announcement

Collapse
No announcement yet.

Scissor Scraper

Collapse
X
 
  • Filter
  • Time
  • Show
Clear All
new posts

  • #61
    EBAY ARMS RUB SUBFRAME AND MAKE HORRIBLE SQUEAK ALL THE TIME / BANG ON BIG BUMBS.

    If you plan on going 45mm from pinchweld to ground thats what i am. it squeaks.
    Look on flyinmiata for the paco motorsport arms, i had exact same setup as you and it was just disheartening squeaking down road, and notching subframe is quite a silly idea.
    Canadian eh,

    Comment


    • #62
      Replies and updates!

      Originally posted by PassionGarage View Post
      yea dude, when you posted it on fb man i was straight onto here to see how u went with it all!!
      looks so rad mitch !!
      drop it asap though and tuck those rears brother !!!!
      fuck haha its actually rad !!!
      Thanks man, I really appreciate it, I'm pretty stoked with it too!
      You are very right ahaha, the whole car needs to come WAY down but unfortunately I've maxed out the coils I have a solution though so you'll have to wait and see what happens ahaha!

      Originally posted by ExpelI View Post
      EBAY ARMS RUB SUBFRAME AND MAKE HORRIBLE SQUEAK ALL THE TIME / BANG ON BIG BUMBS.

      If you plan on going 45mm from pinchweld to ground thats what i am. it squeaks.
      Look on flyinmiata for the paco motorsport arms, i had exact same setup as you and it was just disheartening squeaking down road, and notching subframe is quite a silly idea.

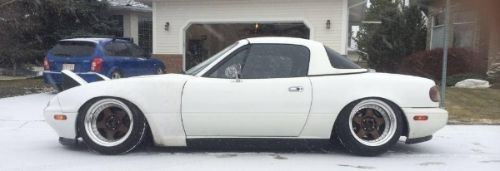
      Mine haven't done that yet thankfully ahaha if they start I'll definitely need to do something about it, I thought the metal spacers would be an issue, oh well!

      Well to be honest the arms were mostly to build a jig and only a temporary thing, I'm definitely looking more into building a proper pair of chromoly adjustable arms to replace them but for now, eBay had to rescue me ahaha! Thanks for the heads up though, at least when/if it starts squeaking I'll know what it is!

      ON TO THE FUN STUFF

      The day after she was all together I went back just to check over everything as anyone should after working till late at night! You never know if you were too tired and may have missed something! Luckily all was good, except for the fact that I couldn't get my jack under the car to get it off the ground! I had to drive it up on a piece of wood and I ended up doing a tiny skid on the floor which made me realise just how much camber I was running..


      I ended up bumping the camber back out to give me a bit more tyre on the road (it was raining and I have to do 100kph down hill to get home) and to just make that rear fitment a bit tighter as without the spacers its a bit sad ahaha!

      I had a small charity event I was invited to so I used the drive is a bit of a shake down to make sure it was all okay and feeling good to drive.. The stares I got driving to and from the event were hilarious.. Kids loved it and parents shook their heads.
      Here's a few photos a friend of mine, Mike Bell, took at the event on his phone!


      Once the event was over it was time to get back to work on the roof!


      This is the original hard top sitting in the outside mould and upside down! Time to do the inner half and then it's time for the fun bit!

      Speaking of fun bits?
      Look what turned up


      THIS is the beginning of a VERY long road to start chasing some serious power!
      You didn't think I was JUST building a car to sit in car parks did you?
      Everyone, meet my new TD04 Kinugawa turbo!


      Now, I've already had a lot of people asking just as you may be, why the f*ck would I buy a TD04? So small and pathetic.
      Well, you're right, it is tiny but it's also perfect for what I want to do with it. I have a MASSIVE background in racing and dealt with all sorts of motors, but never have I dealt with turbos nor ever owned a car with one let alone built a car to take one!
      I figured a TD04 would be the perfect starting ground to learn what it takes to build the physical set up for one and to learn how to tune for it and drive with it. I've always thought turbo's had a very non-linear power curve which is what turned me away from them, but since talking to a few people apparently that can be over come with your tune and setting your turbo to hit different boost pressure at different points in your rev range!
      At this point I basically need to beg you for any warnings you may have ahaha!

      My engine still blows a bit of smoke so I'm going to suss the head, do a compression test and do a bottom end rebuild, whilst I'm at it I'll be throwing in some forged rods and maybe getting the block honed and cleaned up. I've also been looking into a few other things like building the system to handle e85 and a few other things!

      Yes an LSD is a definite, heard way too many horror stories about the pissy 1.6 attempt at a diff, and yes I am looking into the Mega Squirt stand alone ECU option.

      Basically with this turbo I'm only chasing around 250hp at the wheels (185ish kw), in the future I'd love to be pushing closer to the 300 (225ish kw) mark which is why I am planning on throwing the forged rods in whilst I have the engine out of the car. I feel like that'd be definitely enough to scare the shit out of anyone who gets in the car and provide a good run for anyone at the track! If it turns out to be too much power, I can always dial it down!

      Comment


      • #63
        Nice! Honestly a TD04 is a perfect sized turbo for this size engine. I'm excited to see how this turns out.

        Comment


        • #64
          Originally posted by I_Haz.:R32 View Post
          Nice! Honestly a TD04 is a perfect sized turbo for this size engine. I'm excited to see how this turns out.
          That's what I figured, though I'd really love a TD05 purely because they just look better ahaha!

          Comment


          • #65
            A night of wire tucking!

            A pretty reasonably sized meet was coming up hosted by Slow Life (the no.1 car page in SA) so I decided to do a bit more work on the car to prepare it for its proper debut to the public. A lot of people who were going to the event had been keen to see the car for a while so I thought I should make it worth the wait!
            I started with a very minor wire tuck on the bay for 2 reasons, 1, I'd never done it before and I wanted to learn, and 2, I will need to do it on my other project so why not get the practice in now? I had read a lot about it for years and everyone was saying it's not easy and you need to know a few things and get creative with how you do stuff which scared me a bit but to be honest, it was probably one of the most fun things I have done on any car to date.
            Just for reference of what I got done here's the photo from the start of my thread of my engine bay 100% stock (bar the NOS line/solenoid's).


            Because of how big of a task I made this out to be in my head I made a small plan on how I was going to attack this which I HIGHLY suggest if anyone else is going to try doing this. It's very easy to become distracted and end up with a car with a lot of cut wires and you are left unable to drive it anywhere ahaha.
            My plan was to remove a few small easy things from around the bay and mainly focus on tucking the right side (as you look at it). I chose to do it this way because I figured if it was going to be my first time I didn't want to make it overly complicated with all the fuel/brake lines, fuse box and overflow tank being in the way and having to be removed or hidden.
            The right side was mostly just a small loom and a washer bottle so it was perfect to learn on! Here goes..

            The first step was to take off the guard and I was already distracted, I don't know why but I love the look of the car without the front fenders so a million photos were taken and everyone was snapchatted (mitchh37 for anyone who is interested) before going any further!


            Hood was popped and to start with I took the carbon canister and washer bottle out, both are very easy to do and there are a heap of forums on how to do it so I won't go into any detail about that! Onto the wiring! I traced the big loom around the bay and unplugged everything I could find attached to it. This basically consisted of the right headlight, horn, MAF sensor, and a few other sensors. Unfortunately what was also connected was the little (rather big) plug for doing scans and shit which caused a few small issues but nothing major.
            Here's everything unplugged.


            Turns out these cars are basically built to be tucked.. This is a hole for the indicator wire that is sitting only 40mm maybe form the fire wall and hidden quite well, I started pulling the loom through that and it was perfect. I did have to grind it VERY SLIGHTLY just to fit a few of the bigger plugs through but it was nothing major, a few mm if that.


            This is where I came to my first hurdle, the scan plug thing. It was FAR too big to get through the hole and I didn't want to make that hole any bigger let alone big enough to fit this box. My only solution? To cut and rejoin on the other side of the bay. It wasn't a big deal or very difficult, just time consuming. I got my dad to help as I'm not the cleanest with soldering irons ahaha.


            With that cut and rejoined to the loom it was all through the hole and ready to fasten to the chassis and to begin the reroute!


            I found a good place for the loom to reenter the bay just next to the headlight, DO NOT DO THIS WITHOUT CHECKING! I cannot stress this enough, this is definitely one of those "measure twice, cut once" times. If you put the hole too high or low or in the wrong spot the headlight will foul on the loom!


            Time to fasten the loom out of the way of the wheel!
            I literally just used a bunch of cable ties to tighten it to the chassis, I also cut off a few plugs that did nothing and put some heat shrink over them to avoid them shorting on anything or water getting in.


            I really couldn't get a lot of photos of the next part because it was all in such tight and awkward areas.. Basically everything runs under the headlight and is held down with more cable ties out of the way. This step does take a lot of time and the light was up and down constantly just to check clearances. Obviously the battery was unplugged before I started but I chose to keep it unplugged for this part and manually wound the lights for 2 reasons. 1 being I didn't want to wear out the motor but putting them up and down 1,000,000 times, the other reason being that manually controlling it meant I could adjust the light very slowly and watch where it was catching or fouling on anything. It is a very long process and you have to be pertinent with this, it also helps to have 2 people just because you will be in awkward positions trying to hold wires and winding up the light and you don't know where anything is hitting. Again, take your time with this and don't get frustrated and say "it'll do", if the light is catching on a wire and you just leave it you could very easily either strain the motor trying to pull past it or break the wire completely which isn't safe.. Just play some good music and have a good time with it.


            Here's basically how it ended up!


            The wires hanging from the back of the headlight weren't connected yet nor was the back corner tidied up! The wire hanging over the top you can just see is for the AFM, you can't tuck that without tuning your car to get rid of the whole part which I will be doing in the future!
            This is how it will look with the turbo which I am super stoked with!


            And finally, all back together.


            There's another loose wire just resting on the chassis which I ended up hiding, but that white thing full of ground wires is still currently there, I didn't get to relocating that, I had kinda had enough by this point.. By this time a full night and half a day had passed, it wasn't a quick job! but it's much cleaner an worth all the time spent.

            Comment


            • #66
              Up skirt, down skirt, back skirt, side skirt!

              I have wanted to buy side skirts since day one but what has always bothered me was how sh*t they all are.. If any of you have MX5's or Miata's you'll know how common it is to see them with wavy and just bad skirts. I spoke to omgpham about this and apparently some of them just come out of the box like that. So what do you do when you are faced with poor quality products and have the facilities do it ten times better? You do exactly that.

              I started with a piece of 3mm MDF to get the initial dimensions I wanted which ended up looking like this..


              I think it was something like 1560x120x3mm? I would have to double check that though. The next part was making a small step, this was the same length as the original piece but only 50mm wide and I used 9mm MDF. This was then stuck to thinner piece with PVA.


              The clamps and aluminium tube was to make sure it was held tightly the whole way across the length of the skirt. I also put a radius on the 3mm just so it wasn't so sharp.
              Once that was dry I made a small step under the skirt just to give it a bit of rigidity and thickness. This was again done with 9mm thick MDF and I think the strips were like 30mm wide and stuck with PVA.


              The edges were all rounded off and I filleted the step with some body filler.


              I quickly painted the shape black and held them up just to see how I liked the shape!


              Pay no attention to the shitty white tyre writing, I did it properly later ahaha.
              Unfortunately the weather got a bit cold and wet so I put the shapes aside but now that I have them the way I like, the next step will be to paint them in special epoxy paint, wax them up and make carbon copies! Another option for people who don't have those sorts of resources is to just fibreglass wrap your MDF shapes and paint them, just as effective!
              When I get to making the carbon ones I will update again but for now the skirts will just sit in limbo till I get to it because the weather will just destroy the MDF if I run them as is ahaha!

              Comment


              • #67
                Weld Porn

                Prepare yourselves with a box of tissues because these next few photos are simply porn.

                As you all know the turbo came a couple weeks ago and so I began hunting for the fabricator(s) I wanted to use to make it all happen. It came down to 2 guys, one who specialised in manifolds and the other who didn't touch them but was next level with everything else.
                So I paid a visit to the second fabricator to see what he was like to deal with. I was not disappointed. His name is Nathan and his business name is NDR Fabrication and Mechanical, this guy is just unreal. He was amazing to deal with and once he'd finished the small job I gave him I literally didn't even want to put it on my car.
                I just wanted a set of exhaust tips exactly like the ones I originally started to make and ran out of time/skill to finish.. Nathan fit me in almost immediately even though the job was small, he was more than happy to do everything I wanted and upon picking the car up was happy to adjust it if I wasn't happy with it. Just an awesome guy. But enough fan boying, time to show you the goods.


                NOW TO EXPLAIN..
                People asked me why the hell I spent so much making tips for an exhaust that will become redundant anyway.. Firstly, I wanted to know what he was like to deal with, how reliable he was, and to see if he was right for job when it came to the time. Secondly, the tips will not become redundant, if you look closely the twin tips come out of the 3" section and all flanged, so although it is currently on my 2" pos exhaust, it will be incredibly easy to put straight on the 3" stainless straight through once the turbo is done!

                For any of you who want to drop a load here is his link: NDR Fabrication and Mechanical

                Comment


                • #68
                  Slow Life SempTTember

                  Time for the event! Not really an update, just photos from the weekend!
                  Although I did resticker my door cards and was really happy with them and also got the inner mould for the hard top done.


                  Anyway, onto the good stuff!
                  I was cleaning my car and realised I had a spoon drain at work, so of course I had to park in it so I looked lower than I was.. Some kid snapped his neck so hard he nearly fell off his motorbike, then came back to tell me it looked rad and gave me the thumbs up, was pretty funny ahaha.


                  Oh yeah, I also resurfaced my old HOLY COW plates!

                  VIP parking at its finest, didn't even have to park on the road!


                  Then we cruised to the next meet point which nearly ended in tears when the cops had a go at me for parking diagonally in a disabled space.. Thankfully he didn't claim my car as unroadworthy despite the -8 degrees of camber and 40mm of ground clearance..


                  Cameron Lake Photography beautifully captured the pain in the ass of having white mesh wheels.. Everywhere we stopped I had to clean every single wheel, but made for some awesome photos so it was worth it! :')

                  All in all the weekend was great and worth the time I took to try and improve my car for it even if the side skirts didn't quite get done in time!
                  I'll finish off with one of my faves from the night, a shot from Explosive Curiosity of a close friend and part of the Groundbreakers squad and I moments before the police arrived!

                  Comment


                  • #69
                    NB Brake Upgrade

                    Sorry it's been a while again, and unfortunately this is only a minor update again, but I figured I'd do it just for anyone interested in doing the same thing.

                    So, the wheels are off and I'm now focusing more on the speed of it and getting it more into track work.. it was annoying me how much fun I was having driving it but just couldn't do anything because of how ridiculous it was, plus I have another stance build anyway so its time for a track car!

                    With the direction I'm taking toward the turbo route I figured the first thing I should do is replace the brakes and upgrade them. I originally wanted Wilwoods but they are stupid money and at the moment, overkill. Instead I opted for an OEM upgrade, I was looking for the NB8B brake set but couldn't find any so settled for the NB8A/NA8 set, which are still a good 15-20mm or so bigger in rotor size than the NA6 set on the front.

                    Here's what I started with, my original front brake set up.
                    Hadn't touched even the pads since I bought the car back at the beginning of the year!


                    And this is the new set of front brakes I will be putting on from the NB8A.


                    I have a big thing on safety and firmly believe brakes/rollcages/seats are a far higher priority than power.. Why build something stupid fast if you can't survive to rebuild it if you crash?
                    So the first thing I did was get the callipers completely rebuilt. I went through a place called ABS (Auto Brake Services) in Adelaide to get this done, they completely pulled them apart, cleaned them up, replaced all the seals, machined it all, and reassembled with new paint. I chose silver because honestly, they are just OEM callipers, they are nothing to brag about and I never liked the look of red brakes.
                    This is how they came back, the guy who rebuilt them reckons they are now better than they were new.


                    While that was being done, I had ordered my new rotors and pads and I already had some braided line laying around!
                    I went for the DBA 255x20mm T3 slotted rotors, these are basically one step below DBA's full track spec option, and Bendix Ultimate DB1282 ULT pads.
                    Thankfully they rocked up Friday arvo ready for a weekend install! Perfect timing and perfect weather for it too.


                    I didn't take any photos of the install because it was all very straight forward, there are no fitment issues at all, or anything different you need to do, just straight up bolt it all together like normal. I realised half way through that I didn't have the right fittings for the mx5 brakes so I didn't bother putting the braided line on, but the OEM line reaches just fine without any issue. However I've heard that if you go for the NB8B instead of the NB8A, you need new lines as the banjo bolt isn't in the same position and requires a longer line to reach, so that's something to think about if you decide to get the 8B brakes instead.
                    Here's how they look now!


                    I bled them through with Super Dot 3 Bosch brake fluid and went for a small drive to bed everything in. If you have never worked on your own brakes before, it's not hard but PLEASE remember to drench everything in brake cleaner before you go ANYWHERE, you don't want any brake fluid on pads or rotors and them not working while you are driving around.

                    I had a bit of trouble with the front left locking up and it took me a bit to work out the issue. I checked everything involving the brakes and couldn't find a thing so I measured all the spring heights and they were dead on. Turns out it was a dampener issue. I had one corner a couple clicks out and it was causing the opposite wheel to lock up due to weight transfer.
                    I've been racing cars and playing with racing cars, suspension and brake set ups for 16 years so if you get me talking about geometry and brake set ups I will not shut up but basically your car is balanced diagonally, front left to rear right and vice versa.
                    How this affected my brakes, was the stiffness of the Rear Left (RL) shock was alot firmer than the Rear Right (RR) aswell as the Front Left (FL) and Front Right (FR).

                    This meant under brakes, the Rear Left (RL) unloaded faster than the Rear Right (RR) and shifted all of the weight diagonally from the Rear Left (RL) to the Front Right (FR). This was causing the Front Left (FL) to lock up due to the lack of weight on the wheel.


                    I'd draw more diagrams and explain it better but this isn't a suspension thread so I won't, it's just good to keep in mind that when it comes to handling in all aspects, your issue may be caused by something completely different. Most people wouldn't think suspension loads or dampening could affect a lock up but it does happen! So if you ever come across a problem like this, before you go pulling everything apart to check if anything is seized or warped, check your shocks first!

                    As a slight review on the brakes themselves; I've had them in for a week now and I love them. I forgot to measure but I think the piston size is a bit bigger than standard NA6 callipers which means I lost a bit of pedal pressure due to the brake booster/master cylinder being wrong but other than that they are great. A lot of performance/track rotors and pads squeal when cold but I haven't had that issue at all and they seem to work really well cold too.
                    I'll keep you all up to date with how they handle a spirited drive through the hills and then when I take them to a track and give them a good beating!

                    This whole process cost me a bit more than it could have mostly because of the rebuild, but it's definitely good upgrade to do if you want a bit better stopping power!
                    My pads and rotors were just over $400 for the pair, the NB8A stuff was like $60, like $30 in brake fluid and the brake rebuild was $375 including paint. So it was just over $850 for a full front brake upgrade/rebuild and they are currently so good my tyres can't handle how quickly they stop and lock up without me even trying to brake that hard, I'd definitely recommend this to anyone looking to make a bit more power and head to the track!
                    Last edited by high.classhole; 11-03-2016, 08:55 AM. Reason: grammar

                    Comment

                    Working...
                    X