 Tweet
Tweet
This is crazy! Love what you're doing to this little car, and the wheels came out awesome
-
-
I love the composite work going on, also subbed for the floating center caps. Doesn't Rolls Royce use a similar idea for their wheels?
I/G: DeltaAlpha9Comment
-
DUB uses them but theyre not exactly center caps. Its like one arm that stays pointed down while driving. Same concept ?
Comment
-
Ahahaha! Unfortunately I have a partner at work who I doubt will approve of those names but hilarious nonetheless!Originally posted by CDeez5 View Post
Thanks man, it's just what we do at work, definitely a very handy skill to have! I am planning on doing a few more things down the track, probably a carbon hood at some stage, maybe a front bumper and some other small things around the place. I **** how all the normal MX5 side skirts you see are warped so maybe some of those in carbon might go alright :POriginally posted by hinrichs View Post
Thank you, I'm heaps happy with how they are too, thankfully I ended up finding some 4x100 centres so no need to run adapters now! I'll post about them soonOriginally posted by fackinsteve View Post
Thank youOriginally posted by DeltaAlpha9 View Post Yeah Rolls do exactly what I'm trying to achieve, I found guy who managed to split his RS caps like I was trying to with boiling water, mine didn't seem to work as well though  Might need to start looking into another way of doing it!
Comment
-
Update
I figured the soft top could do with a bit of love while the hard top was in progress, just a bit of vinyl paint and it came up good as new! The whole car needs to be a bit lower and I cannot wait to get rid of those wheels!


Comment
-
RS Rebuild pt.7
Not really a rebuild update but I realised I hadn't posted any decent photos of them finished yet not taken with a potato ahaha!


I actually managed to find some RS001's that are 4x100, not redrilled and in need of some love so I bought those and am in the process of painting them white, the wheels will look exactly the same as they do now, I just won't need adapters to put them on the car! I also used an acrylic paint out of a rattle can to do the original set I got and the RS001s are now done in a poly urethane and will be much glossier and harder wearing which is perfect! I'll post a few photos once they are done but it's literally exactly the same as the process I originally went through! I also changed my mind on the barrels, so instead of a very logical and easy to keep clean black? They are now white.. Stupid I know, but they look amazing! I apologise for yet another potato pic ahaha

Comment
-
Nice to see some RS on a Miata, and not the usual RM


Comment
-
Nice, always glad to see a miata treated well and youve got some sweet plansrespect all enthusiastsComment
-
Can't wait to see this thing with those wheels on!TWMPerformance.com | TWMShiftKnobs.com | GodSaveTheManuals.com
sigpicComment
-
-
Busy weekend!
Absolutely full on weekend!
I have had this on going issue that was starting to get worse and worse that seems to FINALLY be fixed and cost SIGNIFICANTLY less than what I thought it would!
In the mornings and ONLY in the mornings the car would smoke an absolute fuck tonne for about a minute and then clear out. I thought it was valve stem seals initially because it never did it any other time and the car had to be sitting still for hours on end. I mean even after work it never did it, had to be 8+ hours before the smoke would happen, was very odd.
Turns out it was as simple as changing the PCV valve and I figured I'd take some photos in case any one else had a similar problem.. It's a very cheap way to eliminate one of the causes for blowing a lot of smoke. I think the PCV cost me $23aud.
Old vs. New and where it goes, it legit just pulls out of the valve cover and the new one pushes back in, its a 10 second job!


I also got around to throwing another coat of white on the RS001s, SO much happier with these than the previous set, and this is a FAR stronger paint.


I can already hear the masses telling me I was retarded for painting my barrels white, but come on, they looks SO damn good, white is the best! They just look far cleaner than the black barrels I originally had. That's ironic because the cleaner look is going to look so much worse the second I drive on them ahaha but I'll cross that bridge when I get to it!
In other news! My new dash came

I also have a few more very exciting things on the way which should be here later this week, including the tyres, camber parts and some more power
Also, a MASSIVE thank you to all the kind words and support, means a lot to see people enjoying my little build if you could even call it that yet!Comment
-
So you're driving it up here on the weekend?Comment
-
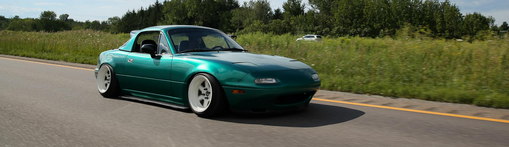
BIG weekend no. 239408
I know I said last weekend was full on, but it looked like a walk in the park after this one..
Nothing like working on your car till 2am then getting up at 8am to finish it off the next day!
Looking back through the last couple of posts I realise it's a bit confusing, so, time to explain it all with the wheels.
The high quality photos of the wheels "done" aren't actually done, they were the original 5x114.3 centres I got and painted then put them together (without silicone) just to see how they looked on the black barrels. Weeks later a guy offered me a set of 4x100 RS001s so I bought them, round 2 began.
The white barrels posted earlier were the ones I originally painted black and decided that made TOO much sense and had to be more impractical. So I stripped them back and repainted them with a poly urethan gloss white to match the new 4x100 centres. The test fit photos in the previous post are just the black barrels before I painted them on the 4x100 centres. The whole thing was very messy and I'm sorry ahaha.
BUT NOWWWW they are actually 100% done and with tyres on and on the car so that's what this post is about!
So! Step one..
I searched and searched for a dead set answer on what to tighten all the bolts to and couldn't find anything consistent so I just ball parked an average based on what a few people were saying. I was reusing the old bolts as they are original BBS so I didn't want to tighten them too much as there have been cases of them breaking but I decided about 35lb/ft sounded like a nice number ahaha. I'm not going to go through me building every wheel because there's a hundred other threads out there that teaches you how to do it! There's a few different methods to do it though, I put my bolts in, tightened them up enough just to pull the pieces together then put the first bead of silicone down, let that set for 12 hours (24h curing time), then torqued them all up and put another bead of silicone down.

Then the hardest thing I've ever done had to happen. The hole for the tyre valve.
The reason I'd put it off for so long was simply because I didn't know where I wanted to put it, but I finally decided that I loved the look of the clean lips and mounted it in the barrel.. To do this I mounted a front and rear wheel on the car and just looked for where the best place for them was to clear everything. For my specific set I put my valve 60mm in from the rear lip..

Tyres were up next and my god was that a head f*ck..
I was specifically after 195/45R15 Toyo T1R's.. Turns out the only damn tyre I wanted, doesn't exist anymore, but I FINALLY found a set online, ordered them Monday and paid for them.. WEDNESDAY I get a call saying they are out of stock and can't send them and the size is actually discontinued so they can't even get any more in. They instead offered to send me Kuhmo KU31's, didn't have much other choice as finding a nice looking 195/45R15 is near impossible so I said yes and hoped they'd stretch okay.. Hadn't seen many people use them before and couldn't find any info about them being stretched online so I was a little worried but it was out of my hands.
The Tyre shop struggled a bit but they finally managed to pull the tyres on the 9 and 8.5" wide wheels.. This is a shot of the 15x9.


I was fucking stoked, and better yet, not a single mark on the wheel from fitting, could not more highly recommend Dale from Tyres Today (Adelaide) if I tried.. He's a god damn wizard.
Back to work I headed full of smiles but nervous to see them finally on the car.
I don't think I mentioned it earlier but I picked up some extended wheel studs and 12mm spacers just to cater for the lip size.. When I ordered the lips I was expecting to have to run adapters for the 5x114.3's so now that I have the 4x100's they weren't going to sit out as far as I wanted, spacers to the rescue! This turned into a mission and a half ahaha.
First thing was first though, ultimate eBay spec camber arms!
These were easy as hell to fit so I didn't really take any photos, quite literally 3 bolts, and it's in. People say the original arm is far lighter but honestly I couldn't feel much in it..


Once they were in I decided it was time to do the extended studs.. Seemed pretty simple right? Brakes off, smack the old ones out, new ones in, tighten to pull them back into place? I was wrong. So very, very wrong.
The fronts went smoothly and unfortunately I didn't get any photos, but the rears? Well, it turns out pre-1993 miatas have some design flaws.. The rear hub needed to be pressed out in order to get the studs out as they fouled on the actual upright/knuckle.. It was suggested on a few forums that you could grind a flat/notch in the studs to slip it past and I tried that but gave up pretty quickly, I realised if it took grinding the original studs to get them out, getting the new ones in which are 30mm longer was just never going to happen. So I'll drop the car into a mechanic and let them do it with a bearing press later.
Turns out the new studs were TOO long which I had suspected but that meant trimming them back.. which I again, got no decent photos of but basically I put the new wheel on, worked out how much thread I needed, marked it, took the wheel back off, put a nut on, then another nut on the mark and tighten the two against each other so it wouldn't move. I then just cut straight down the face of the nut with an angle grinder.. Made for some pretty impressive photos from a few friends/my girlfriend.


Once the studs were cut I refit the wheels to make sure it was right and continued to the next thing.. I didn't know if I needed a heap of camber on the front of not but I ordered a set of the Garage Star lower ball joints just incase.. I didn't put them in because I didn't have a pickle fork and the old "smack the joint with 2 hammers" trick wasn't working.. Thankfully I didn't actually need the balljoints at all. I had to adjust the caster for some clearance which in turn gave me the perfect amount of camber anyway!
Anyway, it was time for the wheels to go back on and for it to be dropped on the ground! A very exciting moment for everyone and especially me!


Unfortunately the rear tucked just a TAD too much thanks to the lack of spacers/extended nuts.. Damn. I ended up reducing some of the camber to tighten that gap up.


The next day was mostly spent trying to work out the wheel alignment as the front left was toeing in like a bitch.. But all is fixed now and it's sitting sweet. Took it for a good drive Sunday and it doesn't rub at all even on full lock so I'm stoked. I'd love to come down another 50mm but I will be raising the engine before that happens ahaha

Comment
-
That's hell cute man, would've been epic if you drove it up here today.Comment
-
yea dude, when you posted it on fb man i was straight onto here to see how u went with it all!!
looks so rad mitch !!
drop it asap though and tuck those rears brother !!!!
fuck haha its actually rad !!!Comment


Comment