-
Thank you! It really was a lot of work. I really need to get my ass into gear and figure out a way to install the mtech1 skirts, these should complete the looks. Sadly, a bronze front windshield is no longer available, so I'm stuck with a green one, which ruins it for me big time. Maybe I'll get a clear one, if this one gets chipped or something. -
Yoo, this was a great read. So much work gone into this, I admire your perseverance! All the aesthetics and wheels is spot on, definitely something timeless about the E30s.Leave a comment:
-
I realized I never shared how the 3d printed piece for the oil pressure gauge sat.

Back in May, my brother and I took the car to the track again.

My brother next to it

Unfortunately, the car developed yet another issue on the track, that took me some time to resolve. From 4000 RPM and upwards, the power went down instead of up, it felt just as fuel starvation. I spent about a month chasing that around, replaced the fuel pressure regulator, removed both stock fuel pumps and put in an AEM one with 270 litres per hour. Nothing helped, took it to the tuner and he said the knock sensor is registering the increased engine noise as pings. Not sure what caused the engine to be noisier, we increased the threshold for the knocksensor and everything went back to normal. Apart from my O2 sensor controller - it went whack, showing either too rich or too lean with a full unit off, when the car had the ratio just fine. So we switched off the correction and now I need to change the O2 sensor and controller and make use of the one built into the ECU master.
A buddy and I decided to use the opportunity and while both our cars are running, take some photos of them together.


And finally, my attempt at a picture with a fancy filter.

Things to do on the list:
- switch O2 sensors and remove O2 controller in favor of the built in one.
- put back stock fuel pump setup, as the AEM fuel pump is super loud.
- figure out how to mount crooked mtech 1 skirts
Currently working on my other project 325e, so that may take a while to complete.
Until then!Leave a comment:
-
Oh look it's a car!
It's awesome, love it, now it's finally time to enjoy itLeave a comment:
-
Hey guys
Swapped the diff to a shorter gearing ratio, from 2.79 (original one) to a 3.25 and what a difference it made.
Gave it a good drive around town and took some pics. Ignore it being dirty, it was a damp day.


Now onto some cosmetics and throwing in an LSD case into that 3.25.Leave a comment:
-
Yesterday was dyno day!
We used a different dyno, but it was callibrated exactly as the one we used before, verified by strapping on different cars that were initially tuned on the original dyno, then showed same results on this one.
Here's what we were interested in:
Schrick 288 with air filter.

Dbilas 292 WITHOUT the air filter. (before failure)

When I removed the air filter this time, with the Schrick 288, whp bumped up to 213, torque remained almost the same. No pic though, si it didn't happen, right?
Schrick 288 has more torque at revlimiter, torque comes just a tad later than with the dbilas 292, but we need to keep in mind the cam wheel is now 4 degrees retarded.
All in all, both cams appear to be very similar, however on the road the Schrick 288 makes all the difference. No jolting while cruising with light trottle around 1500 rpm, power is delivered smoother and I can't explain why, but that dip at 2900 rpm is not that noticable while driving/accelerating. It's still there but not that noticable and not annoying. Car feels somewhat quicker than with the 292 dbilas. Idle is also better.
One thing to note is that now the vacuum is significantly less at idle, maybe the lobe separation is not exactly as advertised on the dbilas 292 (it's bigger in reality) and hence the difference.
So, there you have it - don't buy dbilas, buy Schrick. You'll have a better driving feel and you won't have oil starvation.
Pic on dyno

Leave a comment:
-
Yeah, they were quick to blame the issue on the rockers, where half the world has been using the IE HD ones long enough. And the german guy sent his along with his camshaft to Schirck, when he first reported this issue to them - Schrick said the rockers are in par and it was their product's fault and corrected it.
Anyway, water under the bridge. It's not the last money I loose on this car.
Bottom line is: don't buy dbilas stuff!
On a more exciting note, just passed technical inspection:

The letters say GOD
Dyno session is next!Leave a comment:
-
Yay finally! So happy you solved that issue, big BOO to dbilas for their shit attitude tho, I could have understood if they recognised the issue but told you warranty expired so no refund, but completely negating the problem's existence is a dumb ass moveLeave a comment:
-
Hello to everyone still reading forums.
I would like to start with the fulfillment of a promise I made a while back to Miroteknik, post a picture of the whole car once the engine rattle issue is solved.

I know, I know, it still hasn't come out the workshop yet, but hey it's something.
Here's what has been going on:
So in summary: I sent and exchanged a bunch of emails with dBilas, Schrick and Gladen Motorsport (Schrick official retailer). Schrick answered within a week, stating and assuring me the oil passage placement was corrected and no longer an issue. So far so great - sent an email go Gladen Motorsport to ask them if there was any chance for me to get an old stock cam with the issue. No answer up to this day. Emailed dBilas to notify them about the issue. What they did was reply very quickly and remained engaged throughout but they blamed the damage on the cam and rockers on the rockers themselves and offered me to fix the placement of the oil passage and all the lobes for the total price of (shipping included) ..... 240 euro. New, the cam costed me 350 plus 10 euro shipping. Didn't make any sense to me, so risked it and ordered a Schrick 288 from Gladen MS, which arrived last week.
My car had a birthday on March 8th and turned 35 years old. So it was the most appropriate day of all to make it run again.
Started by unboxing the Schrick 288 (very nicely packaged)

Immediately stuffed it in my cracked 885 head

Oil passage looking good enough despite being off ever so slightly:

From here on, I didn't take pictures, since I wanted to get it done. But basically the order of events:
Put the Schrick 288 in the engine, slap on the mockup rocker with the cut shaft and set clearance to zero - do the solder iron test again. Results were 1.4 mm with the cam wheel set to zero and a smidge over 1.9 with 4 degrees retardation. Left it with 4 degrees retardation and started working on making the eccentrics fit in the rockers. Took a deburring tool as per digger's advice and a 400 grit sandpaper - all went smooth and not much was actually needed to make em fit. Installed them and verified timing 3 times. Next on the list was priming the oil pump really good and I made sure oil was coming out of all orifices AND I rotated the engine to see if it would come out the tube as well. It did, so it was time to quickly put everything together, prime the oil pump once more and slap the cover on it, followed by the air box.

It cranked a bit longer than expected but in the end it started and roared into life, did the "break-in procedure" for new camshafts. Was a bit skeptical about it and peeked under the cover afterwards to make sure all went well - it did.
Apart from the casing of the MAP sensor melting due to prolonged heat exposure all went well and by the sound of it, I think the engine will be happier with this camshaft. Melted MAP sensor:

In the past few days I figured out a way to route a vacuum line without drilling the firewall so I can use the Ecumaster's built in MAP sensor and took the opportunity to tidy up the wiring mess and hang the EMU properly. Look at this mess I started with:

Used an old m21 fried ECU to take the bottom part of its casing and also it's hanger style brackets for the original mounting points. You can also see my utilization of the connector locking plate, which I converted to a holder for the vacuum line using the internal MAP sensor of the EMU.

All tidied up and test fitted:

And mounted securely.

Once we do the dyno runs to tune the car, the O2 sensor controller will be moved a bit up and further back to allow for the glove compartment plastic trim to be mounted and everything will look OEM.
Now I need to make it through tech inspection so we can do the dyno tune, granted the tuner has a time window on Saturday.
Excited to see what difference in the powerband it will have with the Schrick 288 vs the dBilas 292. I'm guessing it will make less power but with a better curve.
To finish off, yesterday did a small fender roll and pull to get rid of my front wheel rubbing on the fender lip when I drive over road imperfections.

Mtech skirts still don't fit, thought they'd fix themselves by staring at them angrily but didn't work. Sigh. Guess I'll have to take care of them at some point too.
Till next time.Leave a comment:
-
Right? I felt so enjiner while doing thatOriginally posted by Miroteknik View Post

Same here man, and that's obviously with all the reputable brands. For the record, I still don't have a reply by Schrick about this. Their official reseller also hasn't replied yet.Originally posted by Fruttolo View Post
Currently thinking about just ordering one from the cheapest vendor and machining it myself.Leave a comment:
-
Solder trick is...well, trick
I am in disbelief about how poorly those cams are machined, how can they have missed a hole by 2/3mm in a part that's supposed to be super precise to the .00??Leave a comment:
-
Hello people,
I figured this thread is due for an update.
Here's what has been going on recently:
First thing I wanted to do was to make sure I didn't mess up the P to V clearance measurement the first time around, when I was assembling the engine. That piston to valve contact I had found earlier was bugging me big time.
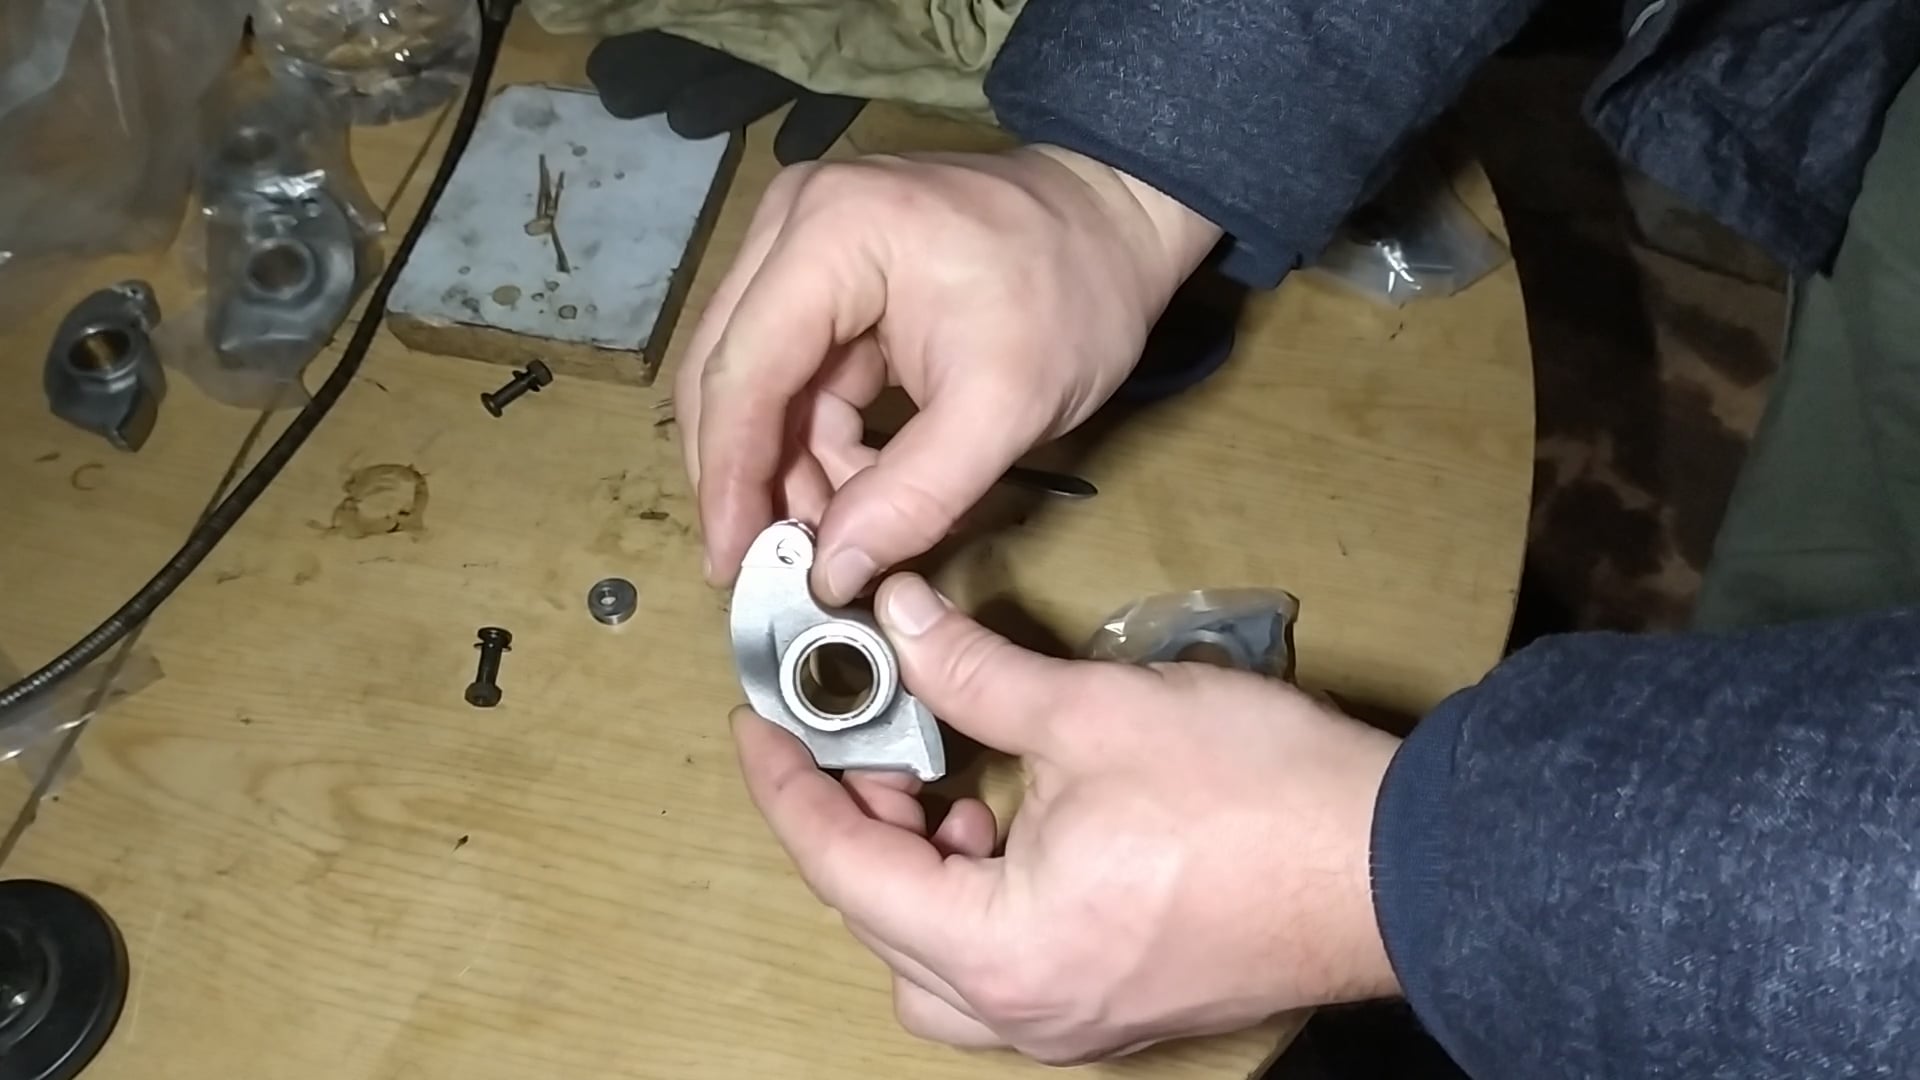
Slapped a 3.0L crank in a stripped m20b27 block, put in a conrod and the prototype piston we used when plotting out the engine with some clay on top, torqued down a cracked head with valves, slid in my ruined dbilas cam with two brand new IE Rockers, timed it and rotated the crap out of it. Then took the head off again to check P to V clearance.
I did this four times - twice with the cam wheel to zero, twice with 5 degree retardation. Sure enough - Intake 2,2mm clearance with the camwheel on zero, 2.6mm with the cam retarded 5 degrees. Exhaust has the opposite, 2.6mm on zero, 2.2 on 5 degree retarded. That's with 0.25 clearance on the rocker.
Another piece of bad news: my second set of IE rockers is obviously not up to spec. I popped two rockers out the package to measure the cam as someone on r3v explained, but the part where the eccentrics go in is so tight, I could barely make them fit and adjustment was a real pain with the nut and bolt fully loose. And one out of the two has a casting imperfection on it.
Here's the imperfection I am concerned about. That's one of my brand new IE rockers, never used set.


Here's a short video of how tight they are compared to the other set I used up until now in the engine.
Note, that the eccentrics were bought brand new from a BMW dealer, I tried this with a used set too and the result was the same.
In the video, the rocker I take out the eccentric of is one of the ones that got damaged with the cam and I unpack one from the brand new set, just to prove a point it hasn't been messed with.
As you can see, that's VERY tight, I can barely fit the eccentric in it.
Even if I shoot out an email to IE, I doubt that they would refund or do anything about it. These were purchased back in 2015 by a friend's brother in the States, then shipped over here to another friend, who held on to them until he decided he wasn't building his m20 and sold them off to me in the original unopened package. It was different from the one I received my other ones in, but both sets were bought directly from IE. My original set came in a big plastic bag, which was then hot pressed over each individual rocker, you can see it in the only picture I have from back then

These rockers were all packaged separately in plastic bags which in turn were all thrown together in a big plastic bag.
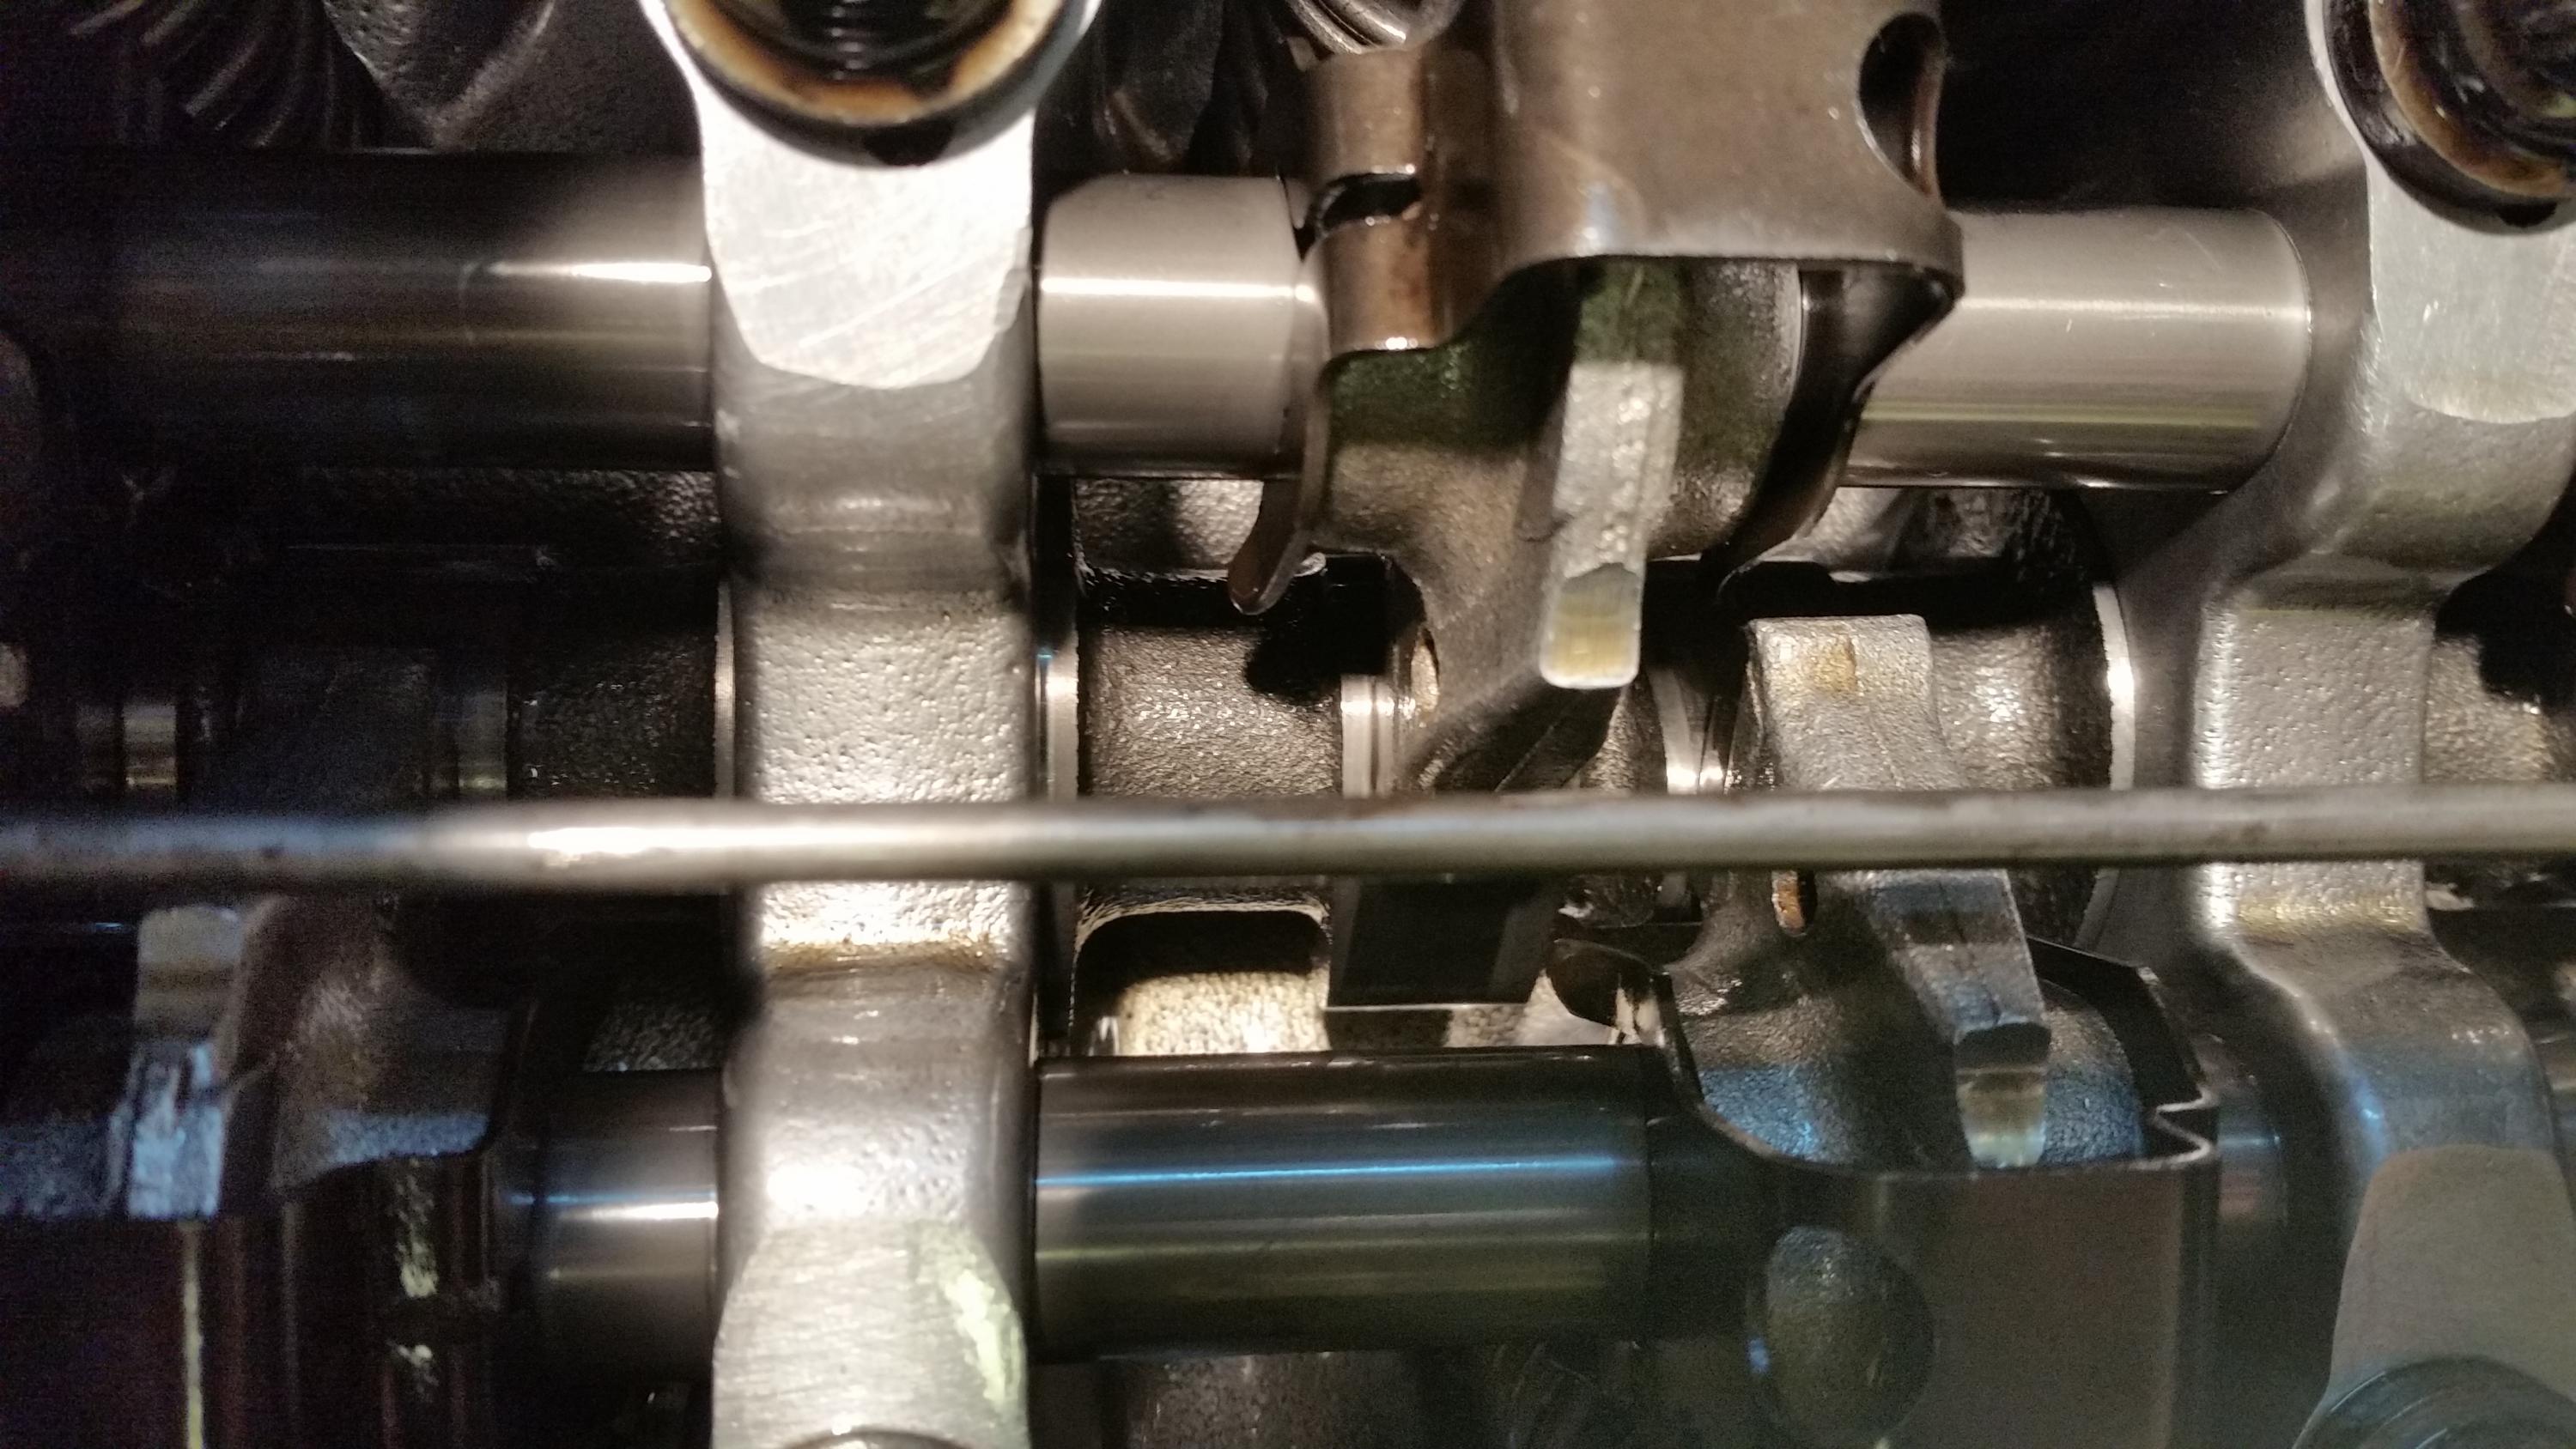
Another piece of "great news": While doing research on m20 oil starvation in the head, I stumbled upon this topic in a German forum:
Post number 6 contains the important pictures. Long story short - the Schrick cam the guy used has the oil grooves on the back of it set off to the side about 2.5mm, blocking half of the oil passage for the spray bar as a result.
As panic settled in, I rushed to the workshop the same evening to check if this could be true for aftermarket cams overall.
Guess what?
This is my dbilas 292 (take a good look of the hole in the center of the picture, the groove is only half visible, kinda hard to see)

This is a catcams 304 I have access to.

As you can see, the dbilas is set off towards the front of the car and the catcams is set off in the other direction, both not exactly on spot.
I am yet to hear from Schrick and one of their re-sellers if this issue has been corrected since that German guy and at least one more German guy I found after that reported it to them.
Next, I wanted to get back to the topic of Piston to Valve clearance, as the results I got from the mockup engine were telling me the valve should not kiss the piston, even if the belt is loose, as long as it doesn't skip a tooth (which it hadn't)
So I discovered the great world of a method called solder wire P to V check. Here's what I did
First off, I made several identical pieces of 3mm thick solder wire, using one of the cracked heads laying around.


Then I cut up a ruined old rocker shaft and used the good part of it to make this jig. Clearance

Stuck the solder wires in the spark plug hole and here are the results
Cylinder 3, cam wheel retarded 4 degrees

Cylinder 1, again 4 degrees retarded

Now Cylinder 1 with zero degrees on the cam wheel

Aha! Finally some real results that correspond with reality
Either one or both of the below statements can be true
1. The pistons were not machined 0.25 more as I thought they are, in fact the machinist may have understood to leave 0.25 more.
2. My head and block were skimmed a bit more than I asked
That will make it much more easier to have piston to valve contact when the cam wheel is set to zero (which it was, up until when I started troubleshooting the engine), in the event of a loose timing belt. Which occurred for some reason, I suspect i didn't tighten the tensioner good enough.
Either way - all of the events described previously and in this post plus user error for letting these happen has lead to premature cam and rocker failure.
To remedy this, I will buy a new Schrick 288 camshaft once I get a verification from them that the groove problem was solved.
Let's top it off with another piece of bad news.
Yesterday eve, when I was at the workshop and had nothing further to troubleshoot, I decided to try and mount my mtech 1 sideskirts finally. Turns out they are warped and don't fit on the car even loosely. Not sure what I'll do about that yet, but needless to say I'm soooo pissed off right now.
Till next time.Leave a comment:
-
Great write-up and photos, glad to see you've found the issue. Hope someone can answer your questions about the polish, camshaft options and oil additive, cause I can't. Looking forward to the next updates.Leave a comment:
-
Happy New Year everyone!
Yeah, the more I think about it, the more it makes sense to me.Originally posted by bwwaaaa View Post
Feel free to use it, I stole it from a gangster movie anywayOriginally posted by Fruttolo View Post
Let's continue this ordeal.
Here are some topics that I think on, your input is welcome on any of those
1. I called around and talked to a reputable guy involved in rally racing teams around here and he says there isn't such a place in our country that can salvage the camshaft or polish the rocker pads.
Polishing the new set of rocker arms would make sense to me and I would do it myself, but I was told that needs to be done square and not to make the finish too smooth.
My question is - what is meant by "don't make the finish too smooth" Is that possible? Pending answer from the person who shared that with me as well.
2. I am contemplating on getting a different cam. Here is the camsheet of the dbilas unit that was in the engine, the one from the above pictures.

It is a bit different than advertised in their catalog, difference being max lift is supposed to be 11.5 and valve lift 2.8 but according to the camsheet it's 11.1 and 2.6 respectively.

I'd say I trust the camsheet, since the cam was bought through a re-seller and they may have had the older cam version in stock or just misadvertised the one in stock. Not sure, but I would trust the camsheet that came with the cam. Thoughts on that?
The cam I am currently eyeballing is the catcams 291

The way I see it, please correct me if I'm wrong:
The catcams cam will sacrifice a bit lift at TDC, which in turn will reduce the possibility of another valve-piston contact. In the same time it has more max lift, which should compensate for the smaller lift at TDC. The bigger lobe separation will give me a slightly better idle.
What I can't figure out is how it would affect the powercurve. Dynosheet prior to rocker failure, in case you forgot:
3. What about adding an oil additive - currently I'm eyeballing the Liqui Moly Molygen Motor Protect product. It's supposed to create a thin "deformable" layer on the engine rotating surfaces. Anyone have any experience with that and/or comments?
I know this isn't a technical discussion forum, but I like to get all sorts of opinions before making my decision.Leave a comment:

Leave a comment: