 Tweet
Tweet
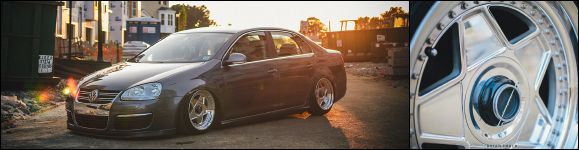
So Ive made some progress on the car since my last post.
With the main focus being the new front arches.
I decided that I wanted to fab my own arches and thought that the best way for me to do that was by building up a skeleton of the outer shape.
So I bought some 6mm steel bar and went to work!
To make sure I wouldnt have any rubbing issues, I started with the lower shape of the arch
 IMG_3688 by Josh Parker, on Flickr
 IMG_3698 by Josh Parker, on Flickr
Once I had the lower shape nailed down (which took ages!) I made a Jig for the opposite side and copied the shape.
Then I moved to the top of the arch, and welded that into place.
 IMG_3701 by Josh Parker, on Flickr
 IMG_3702 by Josh Parker, on Flickr
 IMG_3705 by Josh Parker, on Flickr
 IMG_3706 by Josh Parker, on Flickr
Once that was done, I and I was happy with the overall shape of the new arch I was abel to start building up the arch itself.
 IMG_3709 by Josh Parker, on Flickr
 IMG_3711 by Josh Parker, on Flickr
 IMG_3712 by Josh Parker, on Flickr
 IMG_3716 by Josh Parker, on Flickr
 IMG_3717 by Josh Parker, on Flickr
 IMG_3719 by Josh Parker, on Flickr
Its slow work - But it seems to be heading in the right direction and I really like the aggressive stance.
 IMG_3773 by Josh Parker, on Flickr
 IMG_3777 by Josh Parker, on Flickr
 IMG_3778 by Josh Parker, on Flickr
Finished shaping the front arch
 IMG_3788 by Josh Parker, on Flickr
 IMG_3789 by Josh Parker, on Flickr
 IMG_3790 by Josh Parker, on Flickr
 IMG_3791 by Josh Parker, on Flickr
 IMG_3792 by Josh Parker, on Flickr
 IMG_3797 by Josh Parker, on Flickr
 IMG_3798 by Josh Parker, on Flickr
With the main focus being the new front arches.
I decided that I wanted to fab my own arches and thought that the best way for me to do that was by building up a skeleton of the outer shape.
So I bought some 6mm steel bar and went to work!
To make sure I wouldnt have any rubbing issues, I started with the lower shape of the arch
IMG_3688 by Josh Parker, on FlickrIMG_3698 by Josh Parker, on FlickrOnce I had the lower shape nailed down (which took ages!) I made a Jig for the opposite side and copied the shape.
Then I moved to the top of the arch, and welded that into place.
IMG_3701 by Josh Parker, on FlickrIMG_3702 by Josh Parker, on FlickrIMG_3705 by Josh Parker, on FlickrIMG_3706 by Josh Parker, on FlickrOnce that was done, I and I was happy with the overall shape of the new arch I was abel to start building up the arch itself.
IMG_3709 by Josh Parker, on FlickrIMG_3711 by Josh Parker, on FlickrIMG_3712 by Josh Parker, on FlickrIMG_3716 by Josh Parker, on FlickrIMG_3717 by Josh Parker, on FlickrIMG_3719 by Josh Parker, on FlickrIts slow work - But it seems to be heading in the right direction and I really like the aggressive stance.
IMG_3773 by Josh Parker, on FlickrIMG_3777 by Josh Parker, on FlickrIMG_3778 by Josh Parker, on FlickrFinished shaping the front arch
IMG_3788 by Josh Parker, on FlickrIMG_3789 by Josh Parker, on FlickrIMG_3790 by Josh Parker, on FlickrIMG_3791 by Josh Parker, on FlickrIMG_3792 by Josh Parker, on FlickrIMG_3797 by Josh Parker, on FlickrIMG_3798 by Josh Parker, on Flickr
 [/url]


Comment