Announcement

Collapse
No announcement yet.

76 Build - The story of a BMW 2002

Collapse
X
 
  • Filter
  • Time
  • Show
Clear All
new posts

  • 76 Build - The story of a BMW 2002

    So i'll start off with some background:
    I'm 25, live in the UK, always been all about cars and have modified a few but never had the time/money or space to build one...
    I Finally decided that was no longer acceptable! so back in 2013 I went and bought the little 2002 you see will see below.

    Like I said, Ive never done this before - So with little to no welding experience, a modicum of mechanical knowledge and huge amount of ambition this is what happened:

    Day 1:
    [IMG]IMG_0677[/IMG][IMG]IMG_2604[/IMG][IMG]IMG_0699[/IMG][IMG]IMG_0700[/IMG][IMG]IMG_0701[/IMG][IMG]IMG_0705[/IMG][IMG]IMG_0710[/IMG][IMG]IMG_0711[/IMG][IMG]IMG_0713[/IMG][IMG]IMG_0723[/IMG]


    Because of the never ending constant change in weather in the UK. I decided I should probably work in.
    IMG_0741
    IMG_0743
    Complete with parts room!
    IMG_0715

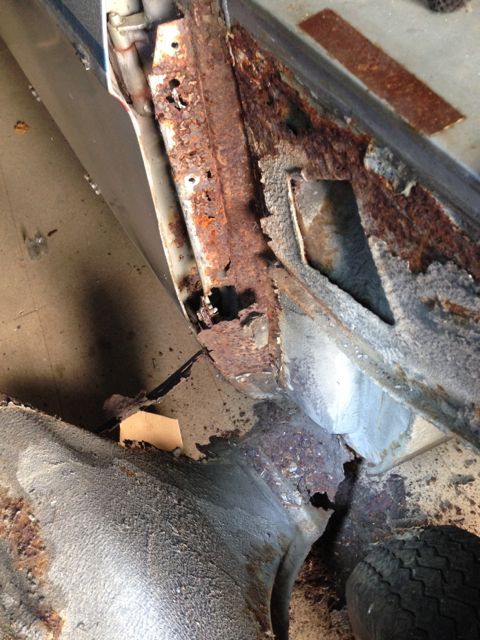
    Time to get my hands dirty and strip the car down and uncover A LOT more rust!
    IMG_0727
    IMG_0795
    IMG_0797

    So when I bought the car it did run.. not well or for very long! But technically it was a "runner". So I knew it would need some major work.
    The thing that really confused me was that it was sold to me with a carb... It was/is supposed to be a 2002 tii Lux. With tii meaning injection... so the carbonation confused me!
    I assumed that the initial owner had a problem with the mechanical injection system in the car and had a carb retrofitted because of ease and cost.
    Sadly that wasn't the case, at some point in its life the original engine had been taken out and replaced with a 1600 engine.
    That wasn't going to cut it!
    IMG_0887
    IMG_0888
    IMG_0900
    IMG_0889

    Picked up a new hoist and pulled the engine
    IMG_0916
    IMG_0927
    IMG_0923
    IMG_2613
    IMG_2617

    Time to have a look at how bad the sills were.
    IMG_2619
    IMG_1034
    IMG_1038
    IMG_1037
    IMG_1036
    IMG_1042

    In need of hardcore rust repair!
    IMG_1046
    IMG_1065
    IMG_1069
    IMG_1070

    Because the car is likely to see some punishment and the sill was already off. I thought it would be a good idea to add some additional strength. So welded in some box bar before the new sill went on.
    IMG_1074
    IMG_1075
    IMG_1080
    IMG_1081
    IMG_1088
    IMG_1100
    Then repeated the whole process on the passenger side.

    Found more rust more rust in the driver and passenger foot wells...
    IMG_1128
    IMG_1137
    Cut it out, made up some patch panels and welded it all up
    IMG_1254
    IMG_1253

    A few more panels that needed repairing/replacing on both sides.
    IMG_1310
    IMG_1311


    Eventually got bored of replacing old bits of rusty metal with new ones...
    Considering i had to cut into the car so much, 3 of the 4 wheel arches needed replacing and the car was never bought to be concours.
    It was time get creative! Bought some MK1 golf arches and test fit with some 15 x 8"
    IMG_1313
    IMG_1314
    IMG_1315
    IMG_1316
    After a Sh*t load of measuring and cutting, I welded them on.
    IMG_1319
    IMG_2623
    IMG_2624
    IMG_1324
    IMG_1403
    IMG_1405
    IMG_1408
    IMG_1409
    Super happy with the result.
    Big thanks to Heist and Chubby for their build threads! I dont think I could have done the arches without them paving the way!


    Then for some subframe refurb and suspension work
    IMG_1309
    IMG_1393
    IMG_1392
    IMG_1507
    IMG_1508
    Hella Dirty and in need of some TLC but in pretty good shape all things considered
    IMG_1509
    IMG_1517
    IMG_1519

    polyurethane super flex bushings all round. And full GAZ coil over upgrade to get it nice and low
    IMG_1394
    IMG_1396
    IMG_1398
    IMG_1529
    Got her back on the ground. Much better! but still not low enough. in need of some camber plates and more stretch!
    IMG_1554
    IMG_1558
    IMG_1555
    IMG_1552
    IMG_1556


    So moving on to the back of the car... It was trashed! So rather than spend money buying a new rear panel. Just to piss off the purists a little more. I thought it would be a good idea to try to convert the back of the car into a roundy.
    IMG_1426
    IMG_1428
    IMG_1429
    IMG_1448
    IMG_1449
    IMG_1452
    IMG_1454
    IMG_1455
    IMG_1461
    IMG_1462
    IMG_1464
    IMG_1465
    IMG_1466
    IMG_1577

    Decided I wanted something a little different. So I frenched in the number plate
    IMG_1587
    IMG_1586
    IMG_1588
    IMG_1591
    IMG_1592

    Moved onto some engine work..
    Happened across an M20b25 someone was selling. came complete with gearbox, prop all the ancillaries. decided to go for it, make some engine mounts and see how I was going to make it all fit!
    IMG_1707
    IMG_1706
    IMG_1724
    IMG_1726
    IMG_1723

    Eventually I got really bored of having to pull the engine up and over the front of the car while test fitting. So I decided that it would be a better idea to cut the front of the car off and make a removable front clip.
    A few hours of careful cutting/welding later and I had just that.
    IMG_1732
    IMG_1733
    IMG_1740
    IMG_1743

    So much better!
    IMG_1752
    IMG_1791

    Then for the engine and gearbox to go in together. Safe to say they didn't!
    Made a custom gearbox tunnel
    IMG_2003
    IMG_2009
    IMG_2008

    Once everything was in, and there was some weight on the front subframe. I got some more lows
    IMG_1900
    IMG_1903
    IMG_1911

    Now that the engine and gearbox were finally in. It was time to focus on the manifold! Not as easy as I thought it would be...
    Although the 6 does go into 2 guide was very helpful in certain areas (wiring, plumbing, Engine mounts etc) my 2002 is right hand drive, and the 6 into 2 guide didnt work so well for me in other areas.
    No matter what I did, the factory exhaust manifold was hitting the steering box. Naturally I tried to source an E21 rack and do a conversion. But as hard as I looked, I couldn't find one! So the only other option was to fabricate a custom manifold for the M20.

    So I bought a stainless 6 branch manifold for the M20b25 hoping it would fit... It didn't!
    Time to get creative!
    I flipped the manifold over, cut off the mounting tab, fabricated a new one, did some "maths" (tried different angles until it worked!) welded everything together and ended up with a mad looking 6 into 1 manifold...
    IMG_1895
    IMG_1828
    IMG_1898
    IMG_1896
    IMG_1897
    IMG_2001
    IMG_2002


    Time to see if this SOB would start!
    Parts!!
    IMG_1769
    IMG_1770

    After many attempts and a lot of swearing, I finally got everything together and got it to start! was super loud (only had a manifold) sounded a lot like a tractor and was Hella Smokey!
    IMG_2130
    IMG_2138
    IMG_2132
    IMG_2134
    IMG_2140
    Heres a link of what it sounded and looked like:


    After running it a few times, the smoke only got worse...
    Then I found coolant pouring out of the manifold. Never a good sign! Pulled a spark plug and coolant poured out.

    So considering the engine came out of a 80's car with over 100,000 miles on it. I decided/hoping it was the head gasket.
    So that had to be changed! Along with the water pump and timing belt. Not exactly a small job!
    Many hours later I got it going again - no improvement!
    The head was shot! I was livid!
    Essentially Id bought a £450 engine/gearbox that needed a new Head...
    That wouldn't of been so bad, except a new head was going to cost me around £700.
    Didn't really fancy that and I decided that money would be better spent on a new engine
    Time to start looking for a replacement!

    After all of the problems with the engine, worked slowed quite a bit and I decided to take the christmas brake to think about what I wanted to do. And hit it hard in January!

    So thats the cars story up unit December 2014... A lot has changed since then, but I will upload that another time.
    Last edited by pinkboxxjoshua; 01-06-2016, 09:03 AM.
    [/url]

    Check out my BMW 2002 build thread

    Instagram: 76build

  • #2
    Nice thread and awesome work, I cant wait to see more of it.

    Comment


    • #3
      Really cool restomod! Great work so far!

      Comment


      • #4
        I like this a lot,

        It is a similar project I want to take in a few years.

        Looking forward to more posts!

        Comment


        • #5
          great works! it's a pleasure to see this!

          Comment


          • #6
            This looks like it will be a really cool build. Great work so far!

            Comment


            • #7
              Thanks guys.

              While I've got some time I thought id try and catch the build up to present.

              So after I found the engine was a large greasy paperweight. I considered going in another direction. Possibly trying to find an engine and gearbox from an S2K, doing a 2JZ swap. But I really liked the idea of being loyal to BMW. and because of all of the work i had already done to get the M20 into place. I decided to try again and find another M20 to replace it.

              Considering I was going to have to spend money on a new engine anyway. I decided to spend a little more on something special.
              I managed to find a guy that was selling a recently rebuilt M20 2.7l stroker that Rally prep had done for his track car. the engine was completely stripped down and rebuilt by Rally prep to get as close as they could to the Alpina B3 engine as they could.
              Complete with: Competition cam, Magnecor leads and Alpina B3 chip, the thing was a bit of a beast and only had 500miles on it since the rebuild!

              While the old engine was out I decided to take the gearbox off and change upgrade the clutch.
              So I upgrade to a stage 1 clutch to better deal with the additionally power the new engine would have.
              So with that done, I went and picked it up and dropped it into the 2002.
              Unfortunately, I don't have any pics on the install, just the finished article.
              IMG_2778
              IMG_2779
              IMG_2780
              IMG_2788

              Now that the power plant was in and running like a dream. I needed to get the car back on the road ASAP!
              So time for some Brakes!

              The whole system was shot! Reservoir, masters, brake boosters, all the lines, callipers and drums...
              Wasn't going to be cheap to restore, even more to replace.
              Time to throw it all away and upgrade to something better!
              Found a guy selling a 2002 ti disc brake upgrade and thought I could make that work. Despite mine being a tii.
              So I bought them off him and got the kit shipped to my house.
              Didn't arrive in the best of shape...
              IMG_2292
              IMG_2293
              Kit included a full disc brake upgrade for the rear.
              custom calliper carriers, Mk4 golf rear aluminium calliper and MK1 gti front discs (drilled)
              IMG_2308

              So the guy sent me Wilwood front break upgrade for a ti. Came with E21 front hubs, E21 323 vented and drilled front discs and a calliper carrier for a ti.
              As expected, the calliper carrier ended up being useless so I had to get a custom one made. other than that, it all went together really easy.

              A shot of the original 2002 front disc. Seen better days!
              IMG_2332

              E21 big bearing hubs
              IMG_2334
              E21 323 discs
              IMG_2336

              Now that all the brakes were on, It was time to focus on the pedal set up.
              Because of the exhaust manifold I had to make. The original Brake and clutch mater cylinder were almost touching. considering they were in need of a refurb anyway. I decided it would be best to remove them completely.
              Bought a OBP rally ready hydraulic pedal box with a brake ballast adjuster and had to somehow make it fit...
              Not an easy task. as they pedals were now super close to the driver!
              Opted to build a platform. that allowed me a push the pedals back and get a much more comfortable driving position.
              Ended up looking like this
              IMG_2800
              IMG_2801

              Now that the brakes and clutch all worked I was able to drive the car for the first time since owning it!
              A big day!!
              because the car was now sort of "usable" I moved on to all of the other things that needed to be done for it to be deemed "roadworthy"

              Because the original headlights were about as effective as a candle. I decided to go for a HID projector headlight upgrade
              IMG_2412
              IMG_2414
              Didn't like how they looked in black when they were on the car. So I changed them to silver later on.

              Now for some aesthetics..
              Loved the custom front airdam that Rob Daehn made for his car and Ive always had a soft spot for a classic car with a duckbill. So rather than just buy a 2002 Turbo airdam. I decided to make my own..
              IMG_2470
              IMG_2471
              IMG_2472
              IMG_2473
              IMG_2484
              IMG_2486
              IMG_2487
              Built not bought
              IMG_2504

              Once that was done, the back of the car was missing something... So I wanted to add something a bit different.
              Found some sheet metal hanging around and built a drag spoiler
              IMG_2510
              IMG_2511
              IMG_2513
              IMG_2514
              Apologies for the filters. Went thought a weird Instagram phase!

              Thats pretty much all up to date.
              So heres a few more shots of it at the moment.
              IMG_2594
              IMG_2678
              IMG_2570
              IMG_2596
              IMG_2601
              IMG_2810
              [/url]

              Check out my BMW 2002 build thread

              Instagram: 76build

              Comment


              • #8
                Mmmm yes, always loved 02s
                Great job on restoring it


                CHL TRTL DSM Zero Ground Resurection Build Thread http://www.stanceworks.com/forums/sh...ad.php?t=57509

                Comment


                • #9
                  wow this insane
                  http://www.neuemotorsports.com/

                  Comment


                  • #10
                    So the 02 had its first breakdown.
                    Turns out that the gearbox and prop were slightly out of line and the flex joint bought the brunt of that. ended up with me trying to limp the car home with a serious amount of vibration..
                    Safe to say I had to give up and wait for 4 hours to be recovered 4 miles back home... not fun!
                    Flex joint post breakdown
                    IMG_2687
                    So I had to re-aline the gearbox and prop. wasn't too much trouble. But because of the change in geometry, the exhaust was hanging down at a really weird angle and got rid of the little ground clearance I had.
                    IMG_2757
                    IMG_2759
                    So I had to make some tweaks to the exhaust to get some ground clearance back.

                    While the prop was out and I had some room in the tunnel. I thought id try my hand at making a custom short shifter as the shifter was a little too far away in its current position.
                    Wasn't too difficult, use the original 2002 shift mechanism and moved the fulcrum point to allow for a lot less throw between gears.
                    I love the original 2002 lux "wood effect" gear knob so that had to stay!
                    IMG_2702
                    IMG_2703
                    IMG_2799
                    Here's a link to the new short throw in action.
                    http://instagram.com/p/4Cz8jWrL3q/?taken-by=76build

                    Once everything was buttoned up the car drove better than ever! but was getting a little warm in traffic - Which has made daily driving a nightmare!

                    I think I've tried everything under the sun to fix the problem, but its still getting a little too warm despite my best efforts.
                    IMG_2836
                    So I decided to focus my efforts on building a radiator fan shroud. to accommodate a twin fan set up.
                    IMG_2823
                    IMG_2837
                    IMG_2838
                    IMG_2832
                    IMG_2833
                    IMG_2839
                    IMG_2840
                    IMG_2843

                    The fan shroud definitely helped! but still didn't solve the problem...
                    Then I noticed that when I unplugged one of the fans, the remaining one span faster. So I had to rewire the new set up.
                    While I was at it, I thought it would be a good idea to redo the switch panel.
                    Because of the 4 point harnesses in the car, the existing switch panel was a little too far away.
                    (sorry for the terrible photo)
                    IMG_2796
                    So I came up with this.
                    IMG_2879
                    IMG_2881
                    IMG_2885
                    IMG_2889
                    IMG_2890
                    IMG_2892
                    IMG_2893
                    IMG_2896

                    Also in an effort to reduce engine bay temps I wrapped the exhaust. Shame to hide the stainless manifold, but its made such huge difference!
                    IMG_2849
                    Any suggestions to try and get the car to run cooler in traffic are welcome! I'm running out of ideas!
                    The only thing left that I can thing of is to install a bigger rad.. but there is no room in the engine bay. Which means it would have to be a rear mount rad - which I'm not apposed to doing... but I'm not if that would fair any better in traffic?

                    As a distraction I made some time to play with the exhaust a bit.
                    Now let me start by saying I love a loud car! but not that loud!
                    the back box I bought was supposed to have twin 3" tips... It arrived with twin 3.5" tips. They were huge and stupidly boomy.
                    IMG_2810
                    IMG_2690
                    I had some spare 2.5" pipe hanging around and decided to weld it on to see if it would quite the car down a little.
                    Doesn't look quite as good but was a drastic improvement.
                    IMG_2873
                    [/url]

                    Check out my BMW 2002 build thread

                    Instagram: 76build

                    Comment


                    • #11
                      Made some additions to the 2002 over the summer. First of which was a bash bar and tow hook
                      Untitled by Josh Parker, on Flickr
                      Untitled by Josh Parker, on Flickr
                      Untitled by Josh Parker, on Flickr
                      Untitled by Josh Parker, on Flickr
                      Untitled by Josh Parker, on Flickr
                      Untitled by Josh Parker, on Flickr

                      Also bought a LSD to upgrade the last part of the cars driveline.
                      Untitled by Josh Parker, on Flickr
                      Untitled by Josh Parker, on Flickr
                      Untitled by Josh Parker, on Flickr
                      Untitled by Josh Parker, on Flickr

                      Made up some billet calliper mounts for the wilwoods and an air filter shroud
                      Untitled by Josh Parker, on Flickr
                      Untitled by Josh Parker, on Flickr
                      Untitled by Josh Parker, on Flickr
                      Untitled by Josh Parker, on Flickr
                      Untitled by Josh Parker, on Flickr
                      Untitled by Josh Parker, on Flickr

                      Managed to get out in the car quite a bit over the summer, and took a few photos of how it looked before the winter set in.

                      Untitled by Josh Parker, on Flickr
                      Untitled by Josh Parker, on Flickr
                      Untitled by Josh Parker, on Flickr
                      Untitled by Josh Parker, on Flickr
                      Untitled by Josh Parker, on Flickr
                      Untitled by Josh Parker, on Flickr
                      Untitled by Josh Parker, on Flickr
                      Untitled by Josh Parker, on Flickr


                      Thanks to the LSD I managed some skids and my fair share or burnies too...
                      Made me realise that I didn't really want a show car. Instead I wanted to focus the car down more of a retro racer route.

                      Thankfully now that the weather is crap! I decided to take stock and have a good look at what I had and what I wanted to re-do/mod further.

                      When looking at the work Id done. I came to the conclusion that I rushed most of the build and A LOT needed to be refined or done better!
                      First and most importantly, the car wasn't low enough and I didn't love the MK1 golf arches...
                      So a major stance overall is happening!

                      I decided that the best thing to do was to cut off all four arches get the car sitting how I wanted and make arches to fit afterwards. So thats what I'm doing!

                      One really annoying thing about the 2002 is that it really seems to sit on top of its wheels... Where as a lot of other cars of the era like the Datsuns and Toyotas etc seem to have the wheels and tyres much higher up in the body. So to me, they immediately look better and wayyyy lower!

                      Unfortunately he 2002 isn't one of those cars. Which means getting that low retro race car look that I'm looking for isn't easy!
                      On top of everything else, I dont want a garage queen - I want to be able to drive the car pretty hard!

                      So the brief;
                      I need useable static stance...
                      But it must be lower and wider (better)

                      To achieve this, Im taking most of my inspiration from Paul Harrisons rad Corolla drift car.
                      If I can get anywhere close to that stance, I will be a very happy boy!

                      IMG_3508 by Josh Parker, on Flickr

                      So thats my goal!

                      Problem I have is that I'm using GAZ racing coilovers... The struts are pretty long and I was getting close to the the lowest adjustment of the adjustable spring perch before...
                      I think the car needs to be at least 1.5 - 2 inches lower...
                      Untitled by Josh Parker, on Flickr

                      So I had no choice but to raise the strut towers!

                      Untitled by Josh Parker, on Flickr

                      Figuring our where I want the wheel to sit

                      Untitled by Josh Parker, on Flickr

                      Untitled by Josh Parker, on Flickr


                      Now to figure out how to mount the coilovers and camber plates.
                      New top mount design
                      Untitled by Josh Parker, on Flickr

                      Preposed top mount height and new top mount
                      Untitled by Josh Parker, on Flickr
                      Untitled by Josh Parker, on Flickr

                      I didn't want the raised strut towers to look like an afterthought but at the same time I wanted people to notice them... So I decided to shape them similar to the stock towers but with more room for camber adjustment

                      Untitled by Josh Parker, on Flickr
                      Untitled by Josh Parker, on Flickr
                      Untitled by Josh Parker, on Flickr

                      Welding
                      Untitled by Josh Parker, on Flickr
                      Untitled by Josh Parker, on Flickr


                      Figuring out the new position
                      Untitled by Josh Parker, on Flickr

                      Welding into place
                      Untitled by Josh Parker, on Flickr
                      Untitled by Josh Parker, on Flickr
                      Untitled by Josh Parker, on Flickr
                      Untitled by Josh Parker, on Flickr

                      The back of the car was a little easier because the coilovers have way more adjustment.
                      First I hacked off the old arch, opened up the original arch as high as I could and tacked everything in place
                      The back of the car might have to go a little lower which I can do by extending the rear strut mounts and getting rid of the original 2002 spring perch. but I'm going to sit it on the floor as is before going to those lengths.

                      This is how it looks now:
                      Untitled by Josh Parker, on Flickr
                      Untitled by Josh Parker, on Flickr
                      Untitled by Josh Parker, on Flickr
                      Untitled by Josh Parker, on Flickr

                      I Will probably do something about the negative camber in the back and toe in a later date. but that can wait until Ive seen it sitting on the floor.


                      [/url]

                      Check out my BMW 2002 build thread

                      Instagram: 76build

                      Comment


                      • #12
                        Shit, dude. I would have tossed the whole car after seeing all the rot it had. But you turned this around in a hurry.

                        Nice work, I love all the home-brewed fabrication you're doing.
                        BB6 Prelude . . E36 ///M3 . . VA WRX Limited . . 1969 Nova
                        Originally posted by Ollie
                        We all love to turn heads. Sub-consciously we're all materialistic attention-craving dickheads.

                        Comment


                        • #13
                          love this build mate keep it up

                          Comment


                          • #14
                            Really awesome work! Loving the switch panel
                            Flickr

                            Projects :

                            1984 W123 300D (Sold)

                            1999 C43 AMG (no thread..yet)

                            Comment


                            • #15
                              i love you......


                              Originally posted by BozoBubble
                              Stance bug bites hard, man, you ain't gonna shake it.

                              Truck Build

                              Instagram: somestancekid

                              Comment

                              Working...
                              X