If this is your first visit, be sure to
check out the FAQ by clicking the
link above. You may have to register
before you can post: click the register link above to proceed. To start viewing messages,
select the forum that you want to visit from the selection below.
thank you, and yes I'm absolutely going to spray it. bay will be getting painted first then with the car rolling I can finish the guard work and get the rest done. I'm in ryde.
Yea mad as man!!! sounds good cant wait to see it
aw yea mad mad I'm at Beecroft lol small world
can we get a glimpse of what the roof rack looks like installed? ive been searching for one since i got my z about a year ago... with no luck even finding a picture.
sooo many unicorn parts.....
love the build...mines coming along but not as well as yours!
Thanks guys, glad to hear positive feedback. I used to want that commercial ad my video ring tone, haha. You can check out the thread I made about the racks here Tib.
Should have some new content up within a few weeks. Been very busy but squeezing in my hours on the chassis work I've been putting together for the front end.
Alrighty then, bit of word. Finished up another big big section of work on the chassis.
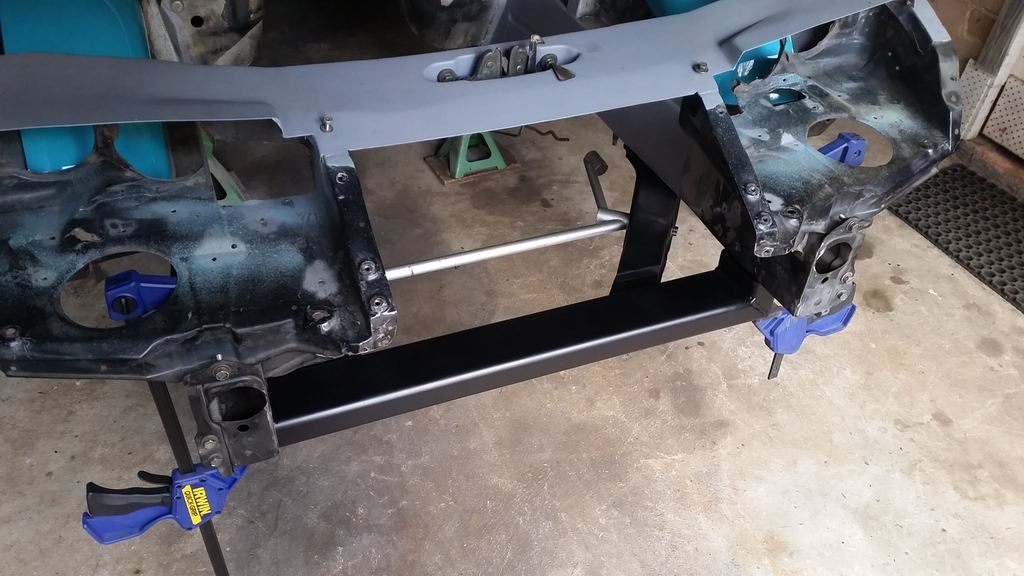
As I went over, I decided to make an after market rad support. The old one was obtrusive, bent, and would have taken longer to make look nice than simply replacing it.
With the elongated caster rods in place, it was time to work out just what the new final resting place of the radiator was. Initially, the rad support blocked relocating a radiator (of any use able size) further forward in the chassis. With that gone, it was a matter of trimming any other non-structural metalwork that prevented the radiator from being further tucked.
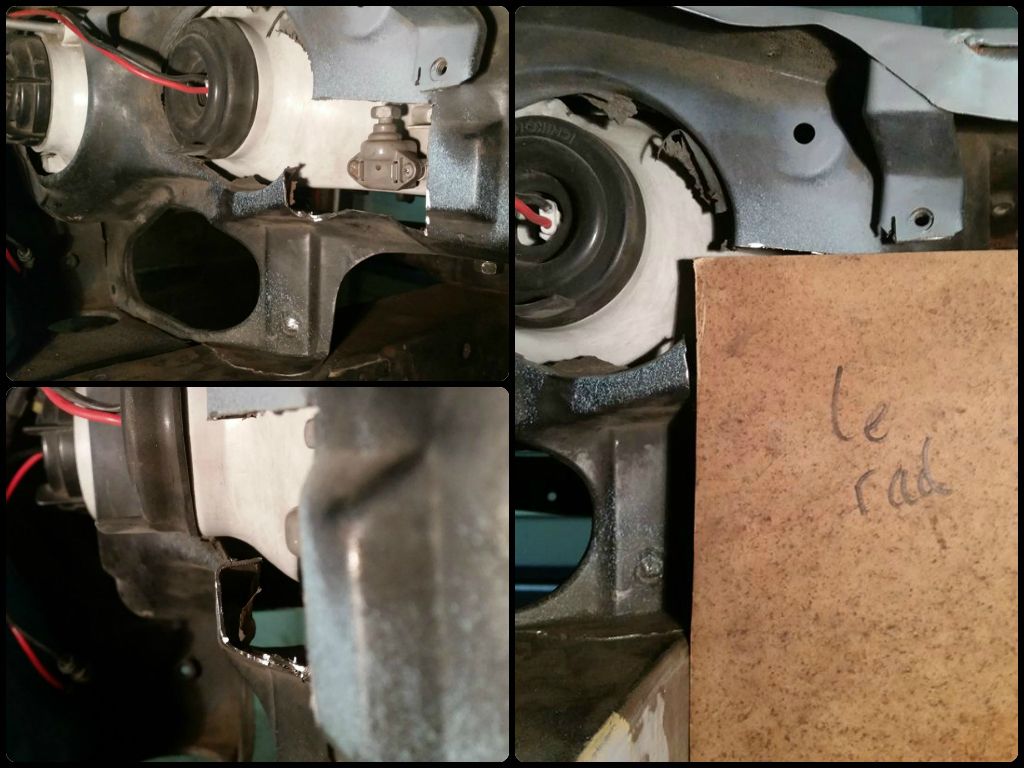
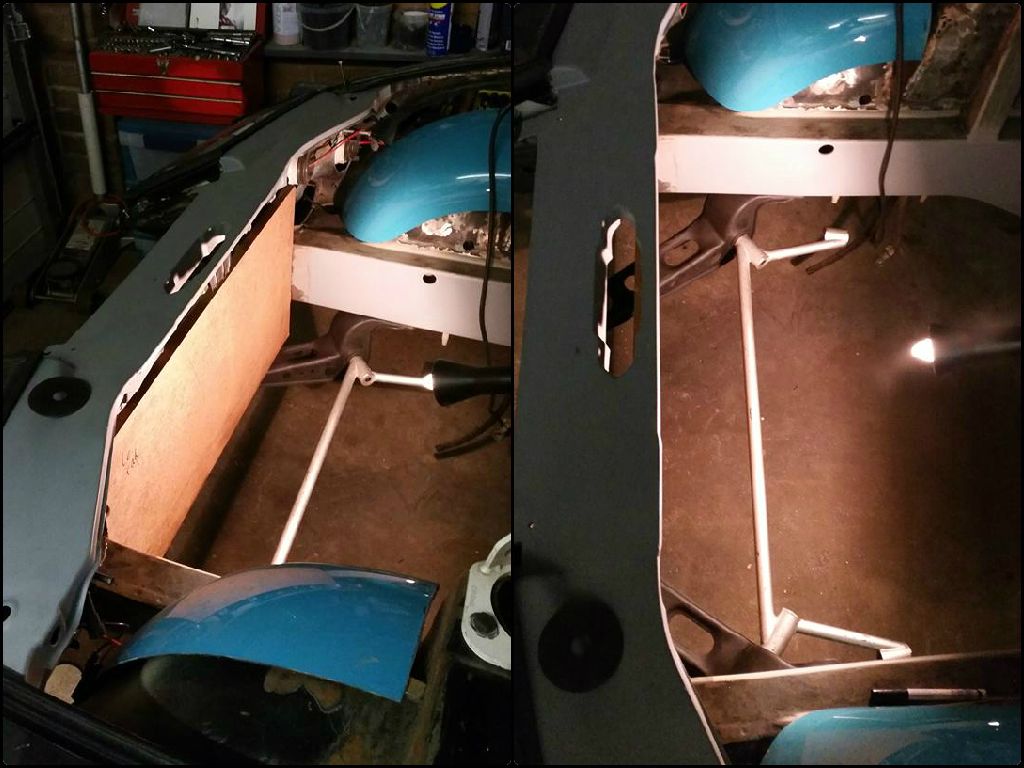
I made up a mock up radiator out of some MDF to serve as a guide and started trimming out the back of the headlight buckets.
This was during the whittling process and as such very rough - lots and lots of very small cuts to make sure I don't gut too much. It was plenty cleaned up later on.
With width dictated by the frame rails, after removing some of the headlight bucket the next component to foul was one of the high beam adjustment linkages. I needed to pull apart my headlights at some point anyway (made the mistake of welding near them and buggered the glass) so I did it sooner rather than later to see if modifying the linkage could help my cause.
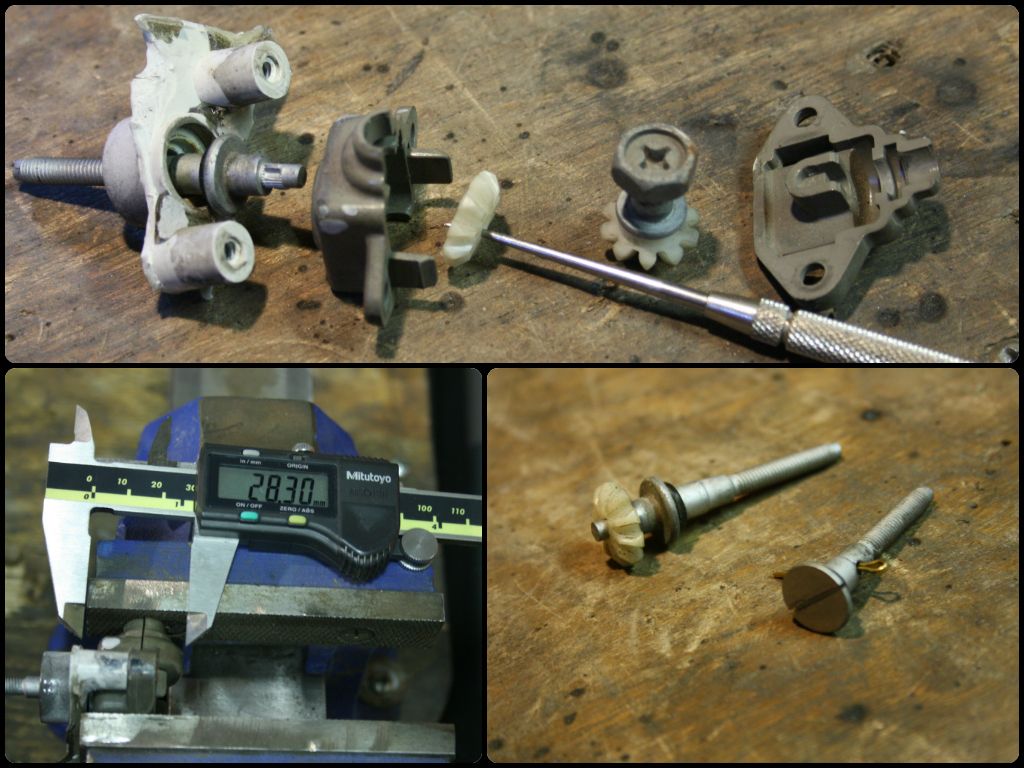
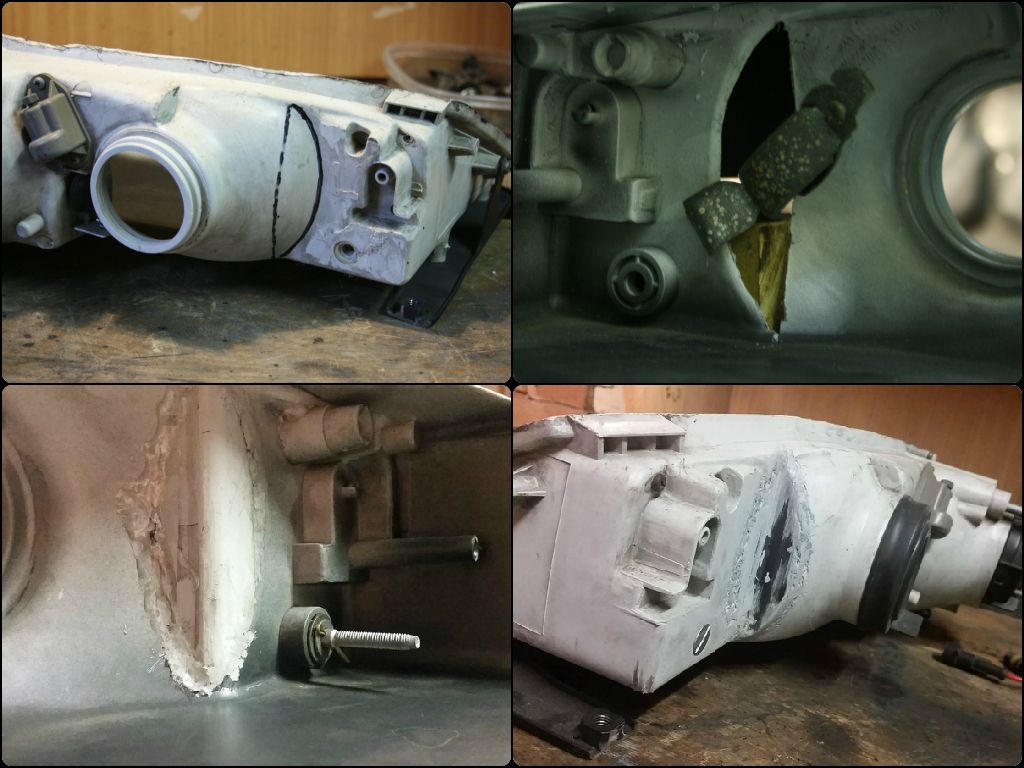
This I guess is an "exploded view" of the factory inner high beam adjustment linkage. The long bolt was initially held in place by a housing that bolts to the back of the headlight, while now it is secured with a split pin inserted through on the inside of the headlight. The bolt was then trimmed and slotted on top so I could wind it with a flat head. The factory linkage is designed to be adjusted from above, but my upper rad support is all welded up so that isn't possible anyway. This new set up is actually (in my case alone) more practical too, which is neat.
Next step after that was removing a bit of the plastic housing too. With a whole lot of measuring, I worked out that I could cut a portion out, replace it with L-section plastic and not limit the adjustment of the high beam lens in doing so - Mr. Nissan left heaps of extra room inside the housing.
Housings were cut up, new pieces plastic welded in and the inside of the housing sealed with two part epoxy for water proofing (I'm not that gun of a plastic welder). The top right pic shows the new position of the (wooden) radiator with the now modified headlight housings. The newly added split pin is in the bottom left pic, and you can just make out the now slotted bolt head in the bottom right pic.
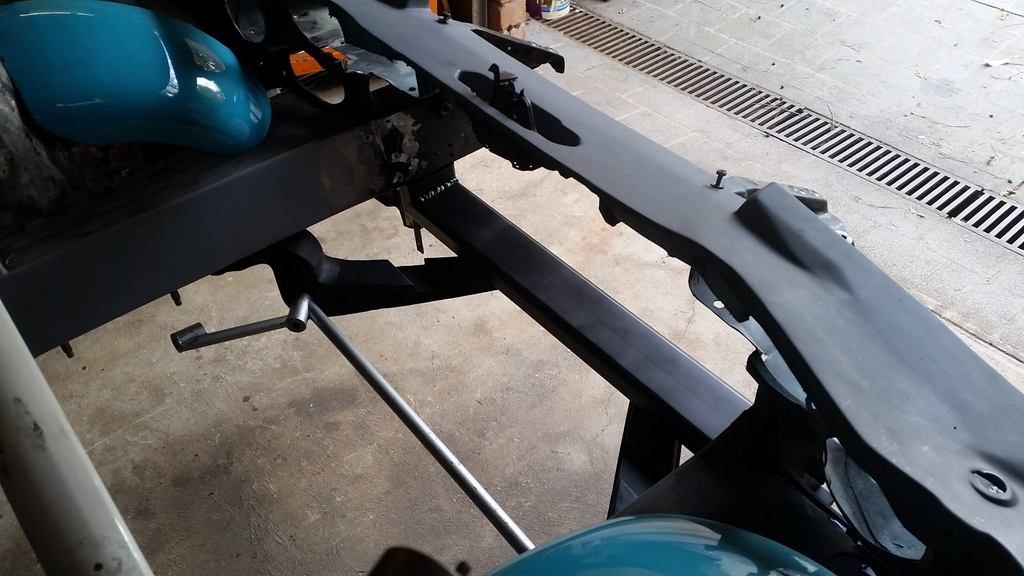
All in all I was able to move my rad forward a further 30mm after doing this, and the headlight functions just the same as it always did. Extreme, probably, but I'm satisfied the rad's as far out of the way as it could be within reason.
More or less totally out of sight. Pretty happy with that.
The challenge here was not just how far forward the radiator could be, but (somewhat obviously) the how big it would be too. Z32s in a warm climate like mine are notoriously hard to keep cool with electric fans, so much so that if you even mention them on the Aussie forum you'll be lynched. The reason for this is that relatively speaking, the radiator in a Z32 twin turbo is tiny. It's also almost square; at best only a single 16" fan can be bolted up to it and this plain and simple doesn't have the air pulling capabilities to compete with even stock cooling mechanical fan. The rad I'll have to make up to fit in this location has about 20% more surface area (2760 cm� vs 2200cm� stock) but being a whole lot wider, can also have two 14" fans fitted to it. The Dereale pullers I'll be picking up advertise 2100 CFM each, so combined they should make for a proper hurricane keeping the car cool.
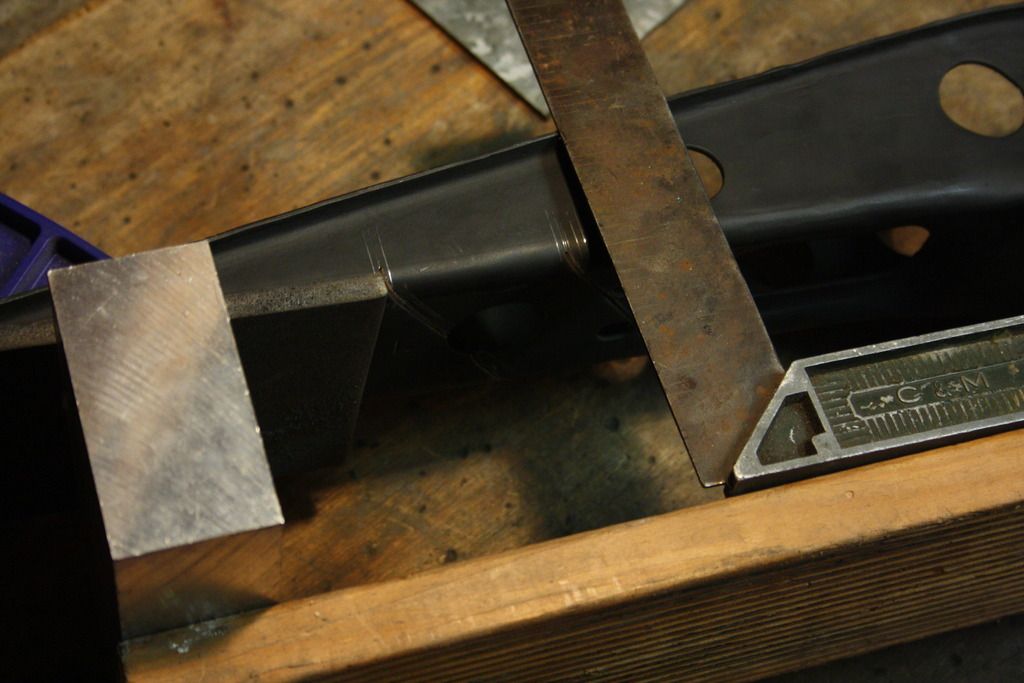
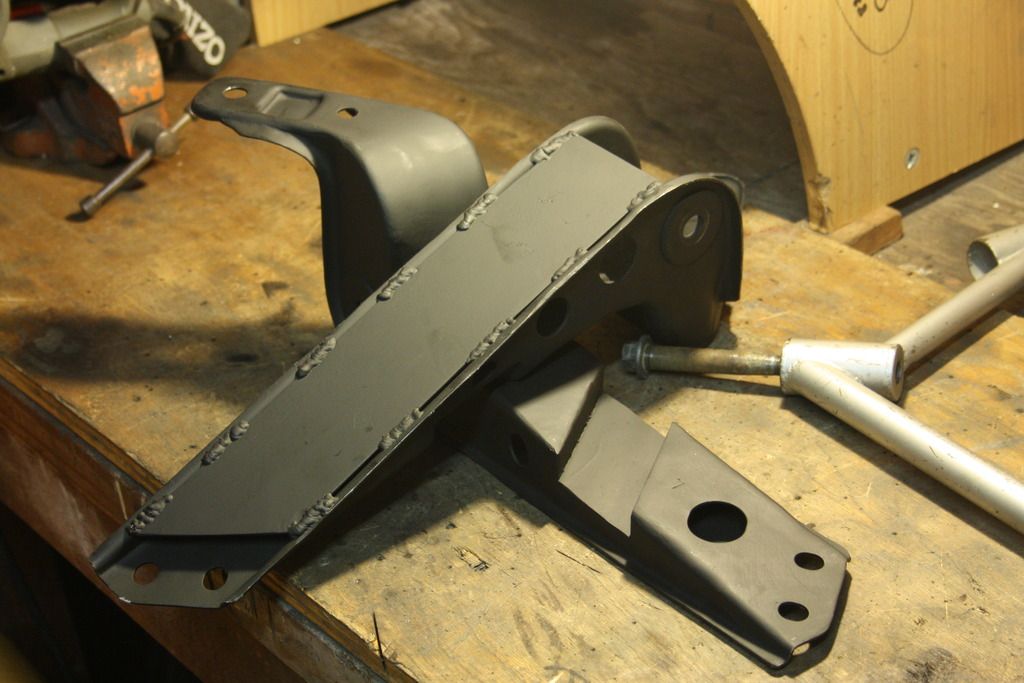
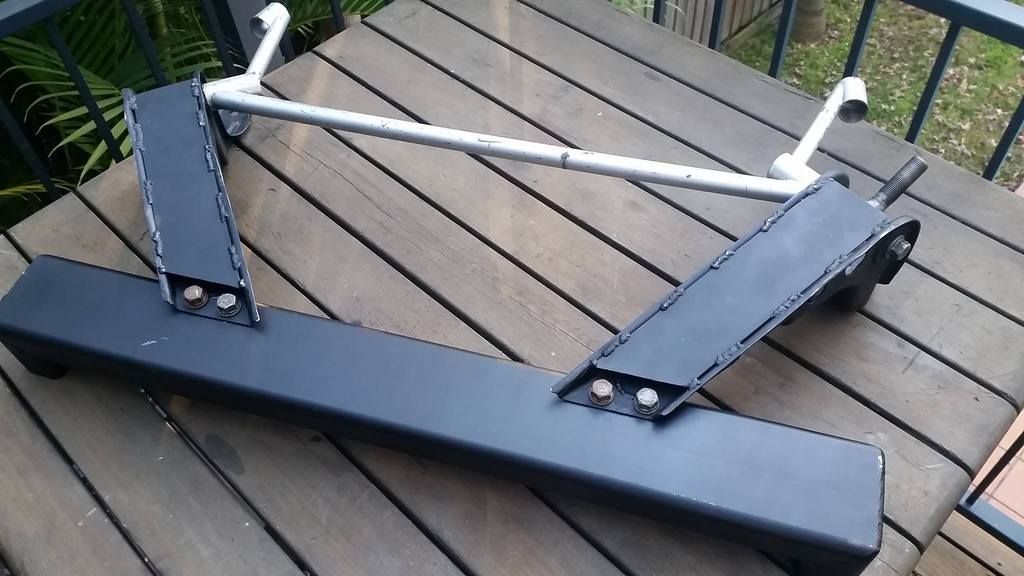
Now that the new rad location was determined I got to work further modifying the caster rod brackets to suit. They were channeled in order to make way for a little more core size and hold the radiator in its place.
The rad position was marked on them, they went back in the "jig" to ensure dead straight (relative to frame rail) markings and then got the chop. As this is obviously a structural area, I made up some 5mm plate steel U section channels to weld into the recesses. Quite sure the channels are now by far the strongest area of the whole part, haha
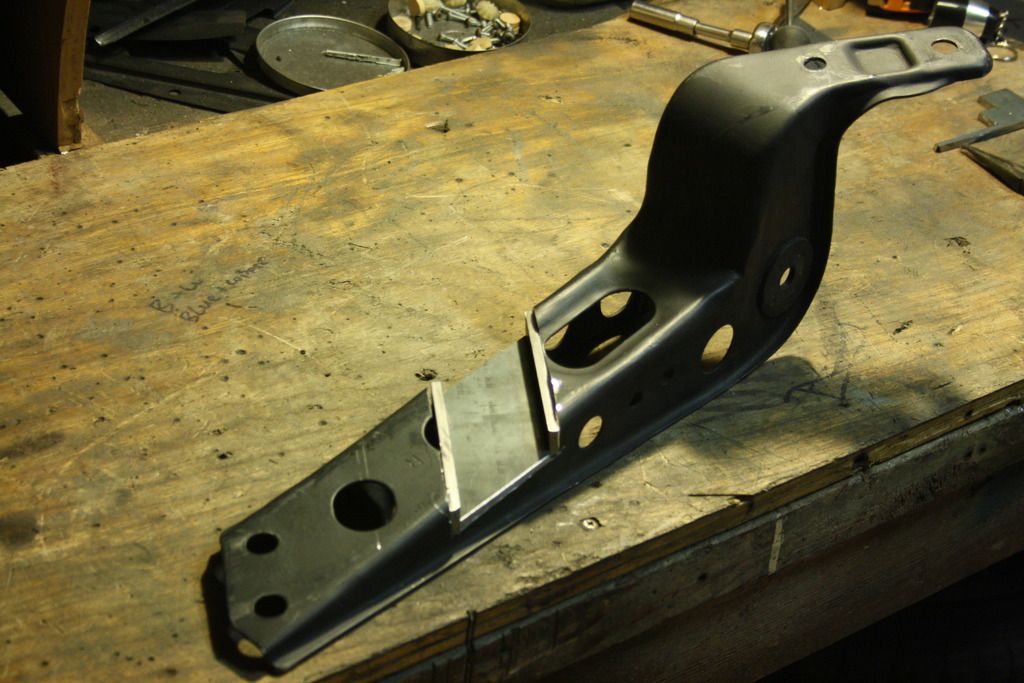
Once the channels were welded in, underside access was no longer necessary so I could finally finish the units off by gusseting the underside. This is I think is common practice among the S-chassis crowd as their brackets are considerably longer and more likely to flex than the stock Z32 ones.
All said and done they were cleaned up and I was good to move onto the rad support itself.
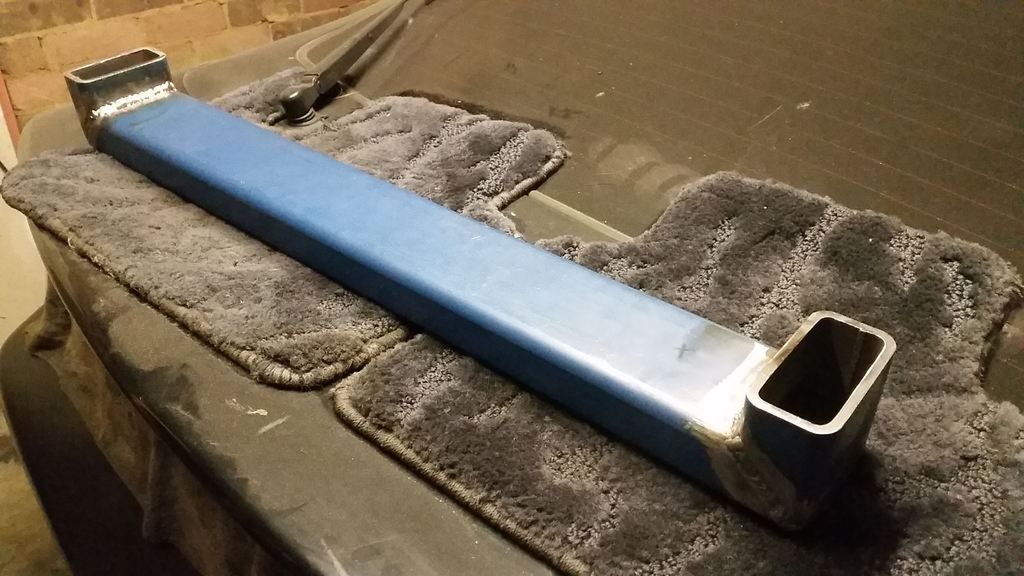
I picked up a metre or so of rectangular box section, bought a drop saw and went to it making the basic shape. This is some thick wall stuff so it's super strong, though a bit heavy.
Surprise benefit here was that I could just use the jig to determine the length of the verticals without touching the car. Winning.
Welding welding welding. Beveled it a bit much but oh well
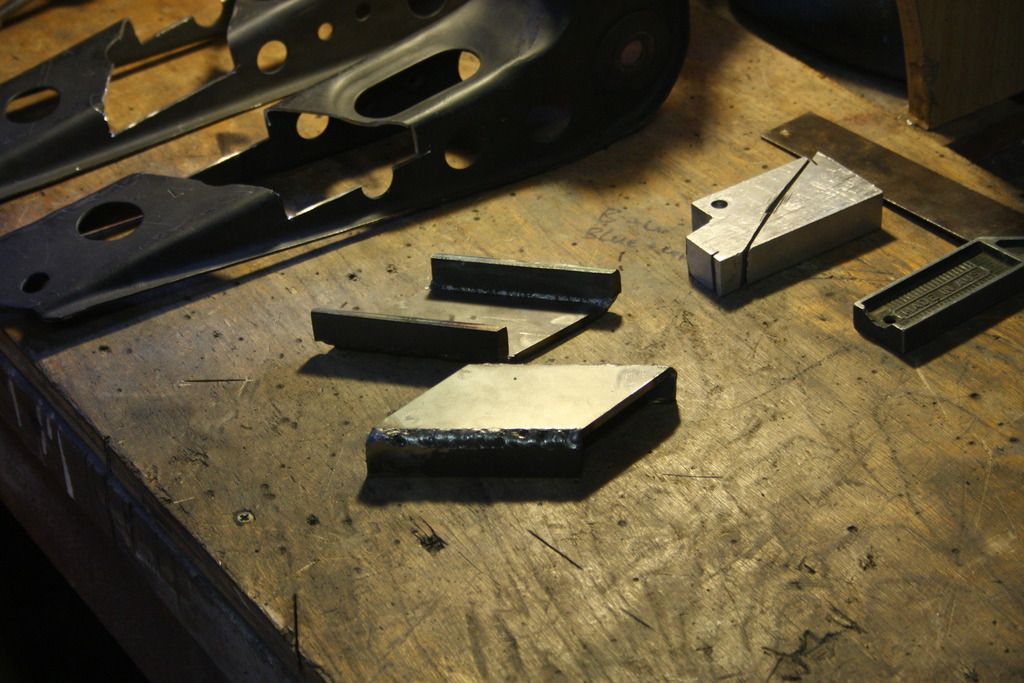
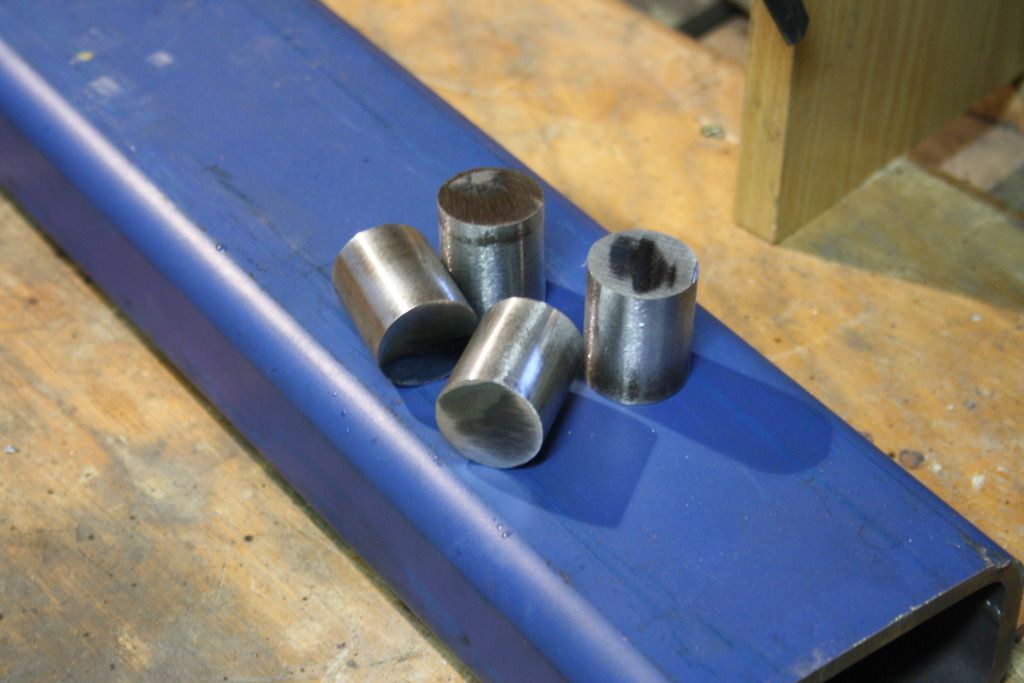
Now with the rad support made up it next had to be modified to receive the four bolts on the end of the caster rod brackets. This meant a set of captive nuts. I flexed my new drop saw muscles and cut up some scrap left over from when I made the weld-in brake master cylinder brace;
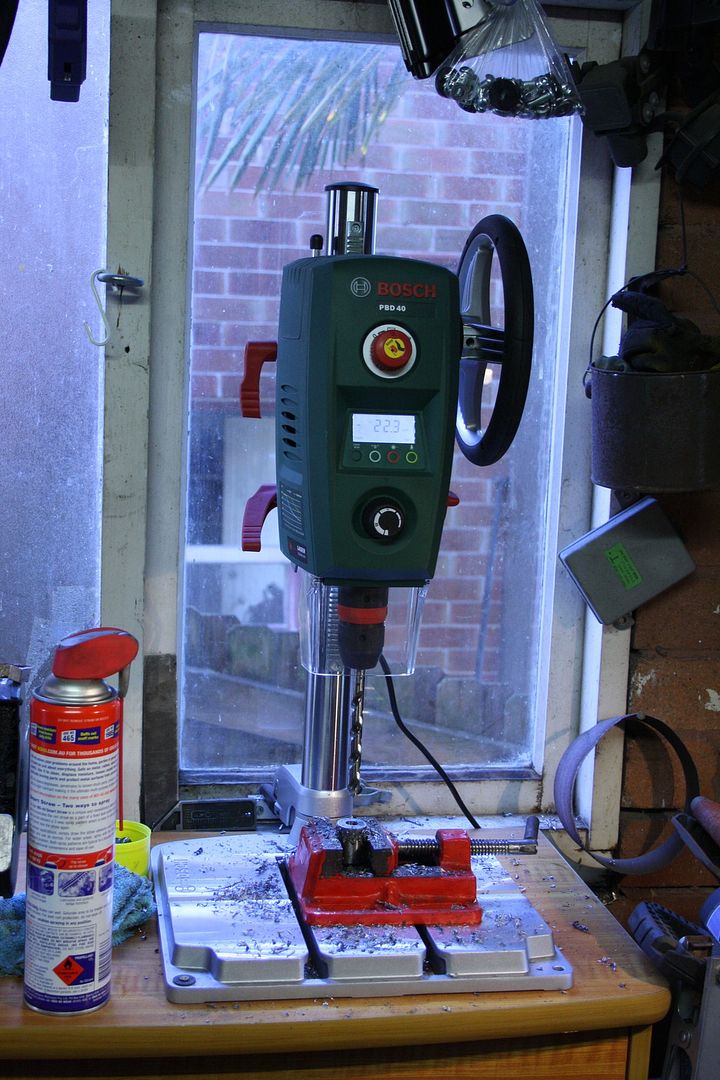
Then went out and bought myself a bitchin' drill press complete with RPM/depth readout and a laser guide that doesn't work properly.
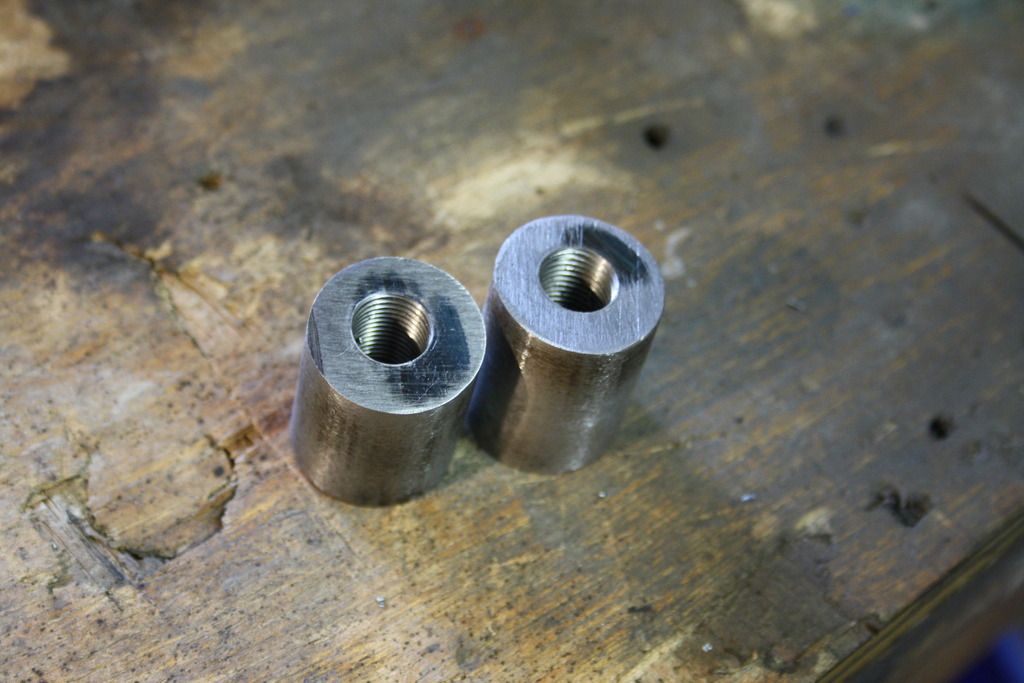
Tappin'. These bolts are exactly the same width/pitch as the brake caliper mounting bolts, which is mad because that's the only tap I actually have haha. The holes aren't centered very well which is a shame, but I'm learing how to do this stuff as I do it so I can forgive myself every once in a while...
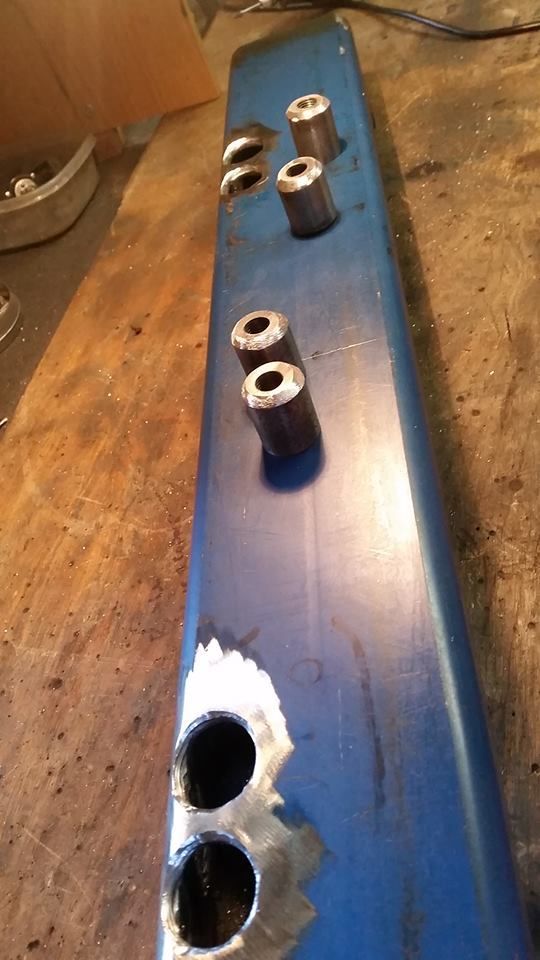
I drilled out the new support and beveled both the holes and the captive nuts so the welds could safely be ground flat after.
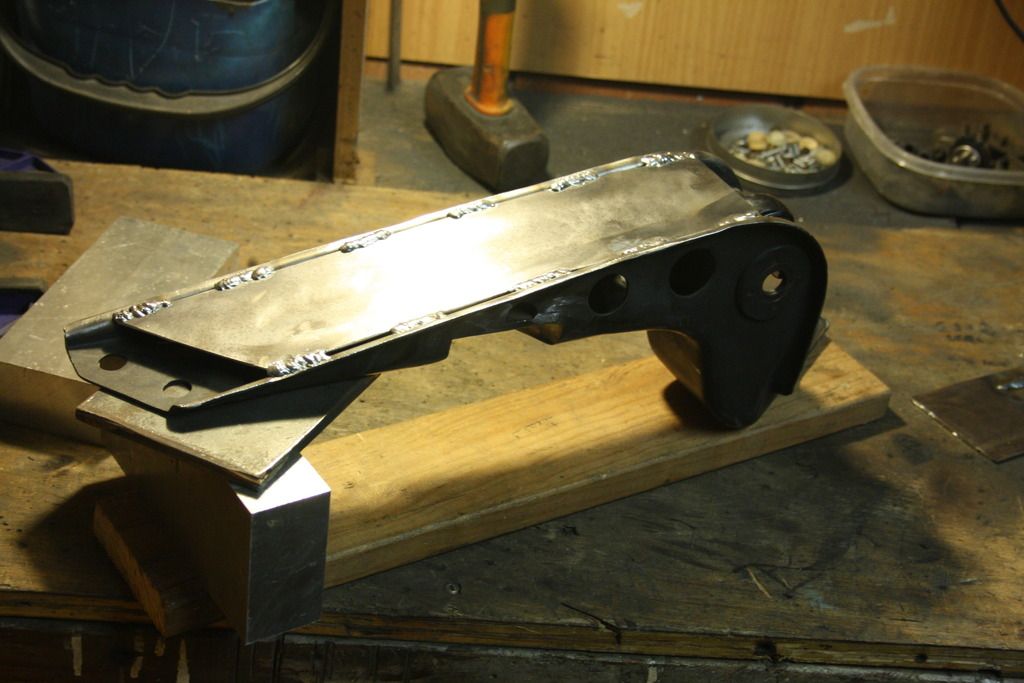
More welding. Chucked in some spare bolts (R32 GTR caster rod bolts if anyone needs some lol) during the welding to stop the threads warping, but I don't know if that's necessary.
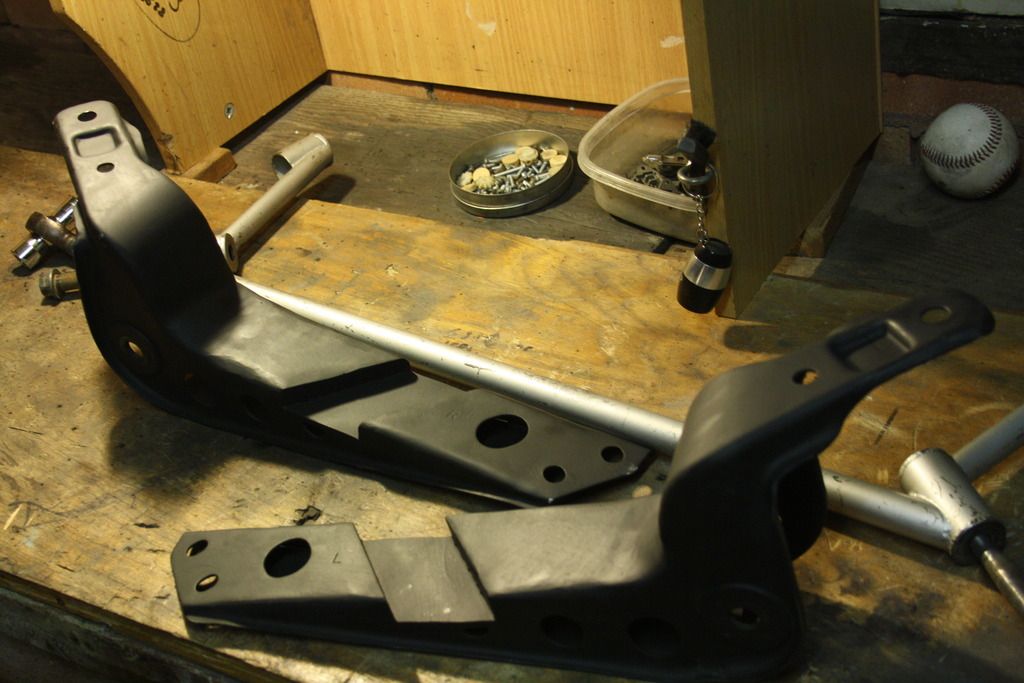
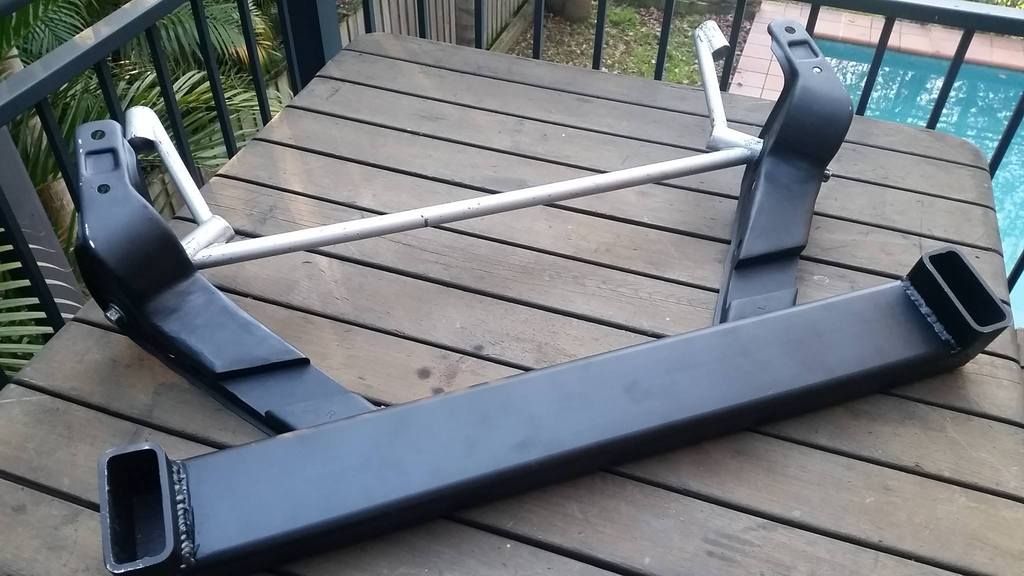
Next up the last job before paint was redrilling the caster rod brackets. When the final rad support placement was concluded (that was hard, seriously) the brackets were trimmed of an inch or so of excess length (still well longer than the stock Z32 brackets), so four new holes had to be put in. Now in theory these could be painstakingly and meticulously measured out, marked and drilled and then you can kill your wife when they turn out to be bloody miles off. Anyone who's done something like this can attest to this (and their wives probably). Never work off measurements alone unless you absolutely have to. Always mark.
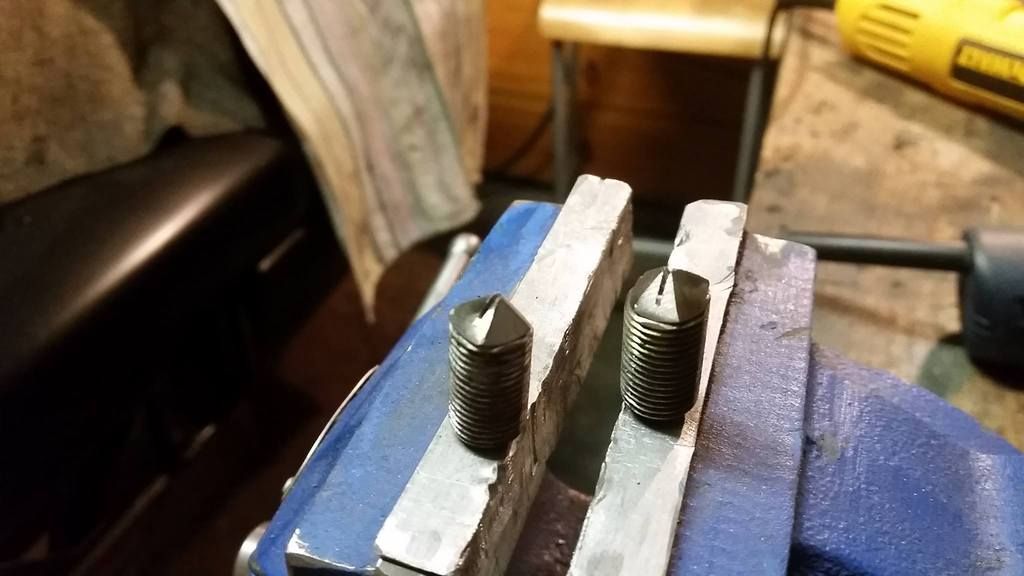
Once mocked up together the (non drilled) caster rod brackets covered the four holes in the rad support, leaving no gauge of where line up the drill to. To overcome this I knocked up a few of these little things. They're the same thread as the rad support, ground to have a pointed tip and slotted topside so they can be wound in and out with a small flat head.
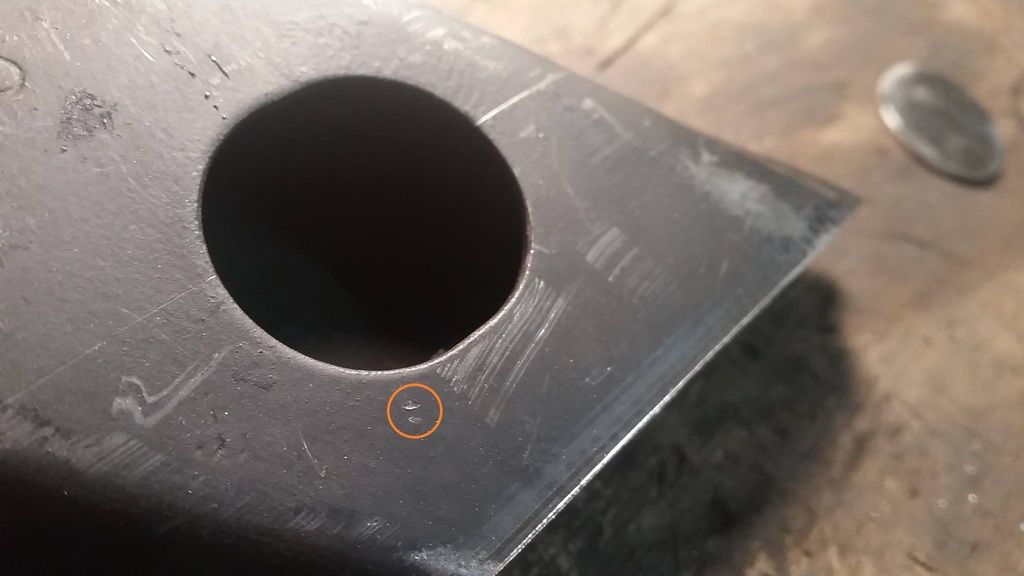
With those handy it was simply matter of threading them into the rad support with only 2mm or so of peak protruding, fitting up the rad support and caster rod bracket assemblies on the car then smacking the underside of the bracket ends with a hammer. The brackets were left with neat little imprints from the bolt tips, guiding where to drill.
Or in my case, where you'll have to weld up a big hole because it's too close to where you need to make new smaller holes :p ahhhhhhh it's all part of the fun
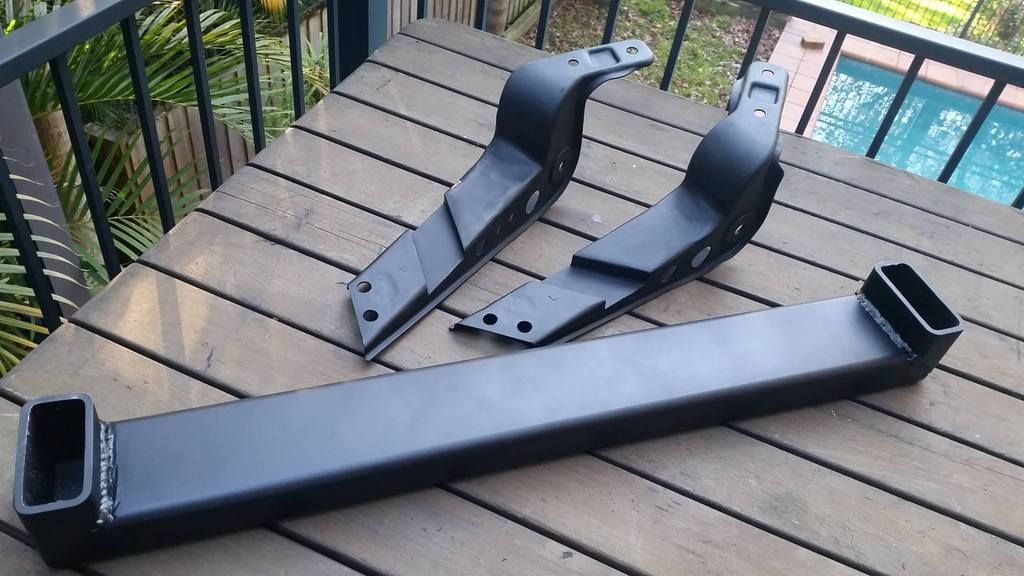
Coat of paint and they're all done and dusted.
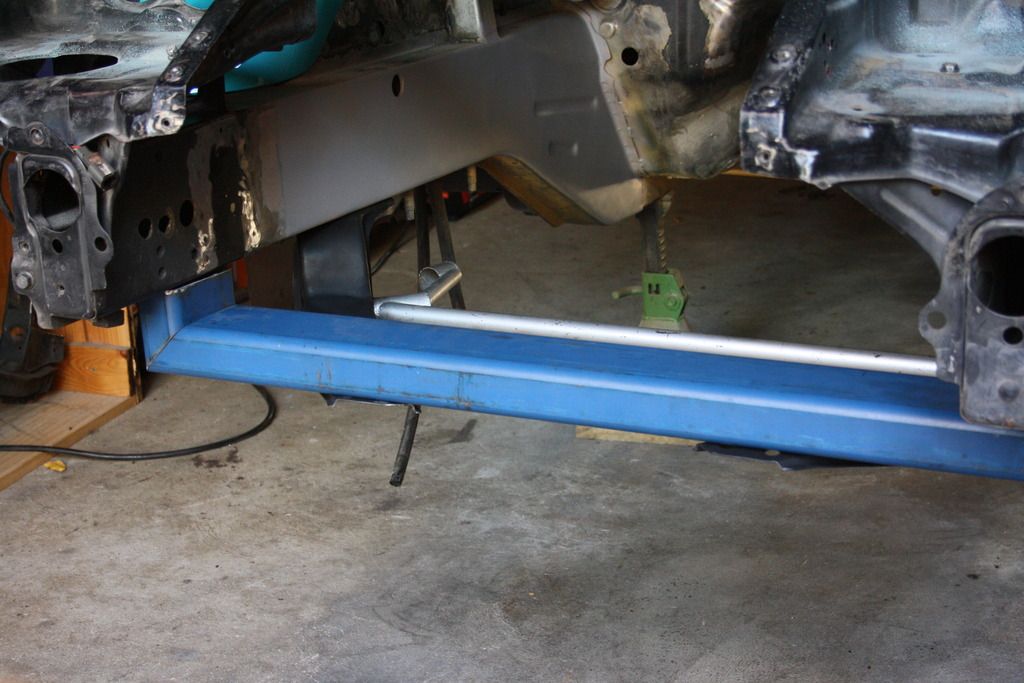
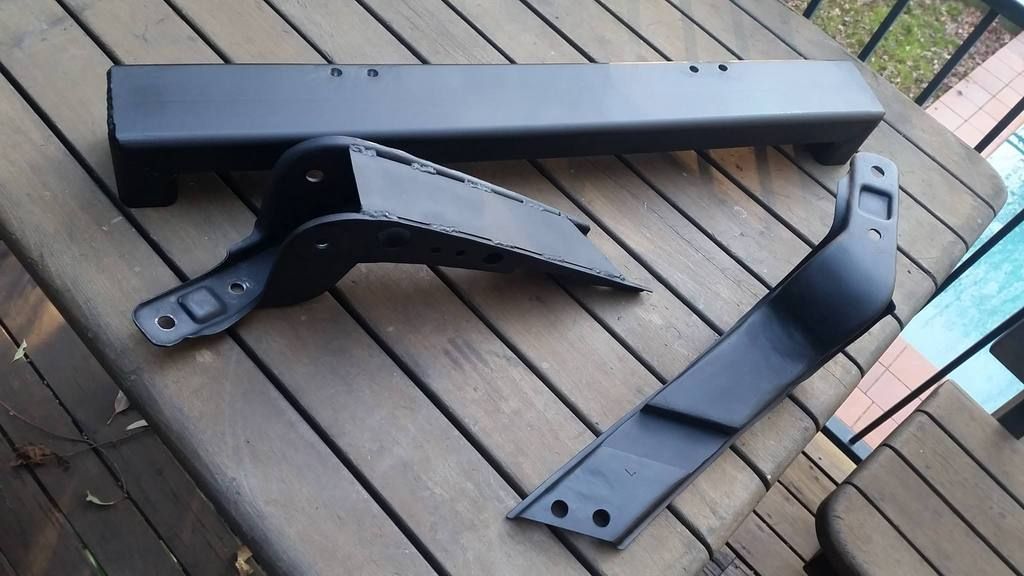
And at long last, fitted up to the car. I am not welding in the rad support just yet because my garage is a bit height restricted, and as is with the rad support out I can pretty easily skateboard a motor in for mock ups.
Alright, so I just started my new degree. It's been character building to say the least, and between full time eng study, working part time and maintaining my relationship I have had literally no time to touch the car. It's simply going to have to be a between semesters type deal from now on.
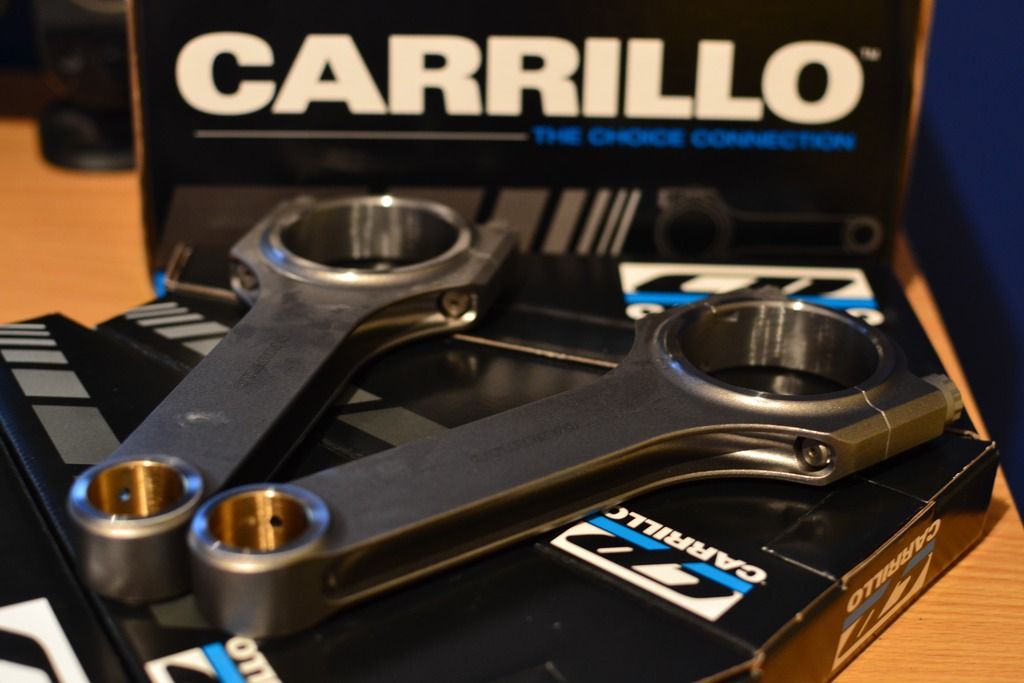
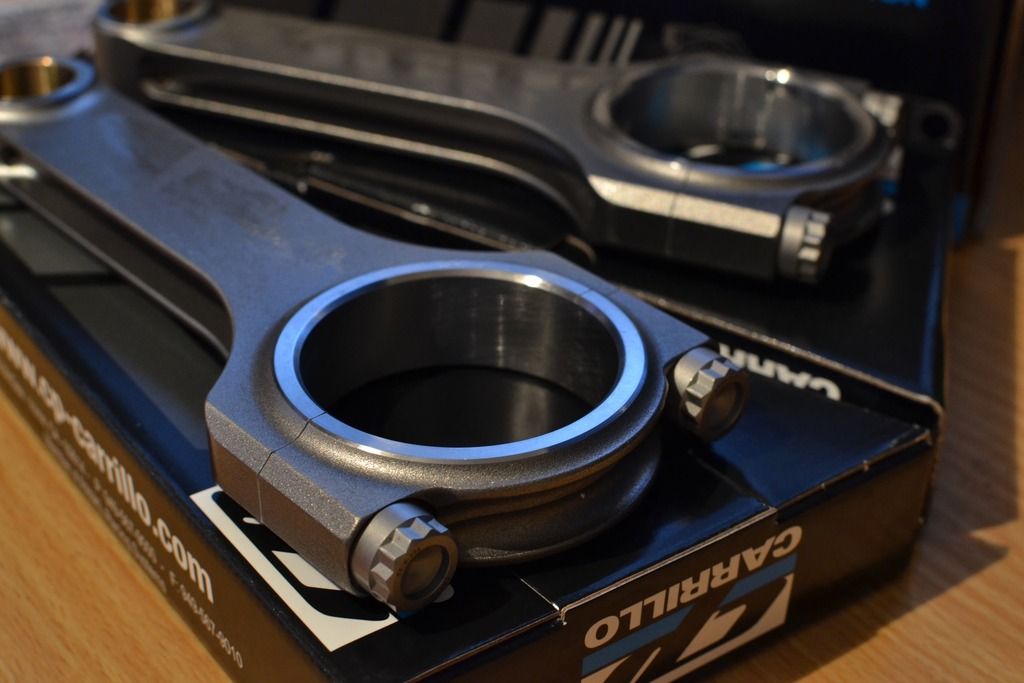
Fortunately in the mean time I've been keeping up the parts flow. I haven't had the same cash to burn obviously, but my constant Yahoo scouring as well as general priority from-the-top-of-the-list-down parts have been coming in as I can afford them. Let's start off with some most expensivist shit. New rods from Carillo. These are stupid dear even when the dollar is good, which it's not, as I'm sure you all know...
I had a set of Eagles, but with what I'm putting together on the boost side of things we were really sitting on the edge of what they were up to. Took some convincing for me to cough up for these but it's better than rebuilding the motor. I got the CARR bolt upgrade too, no weak links here.
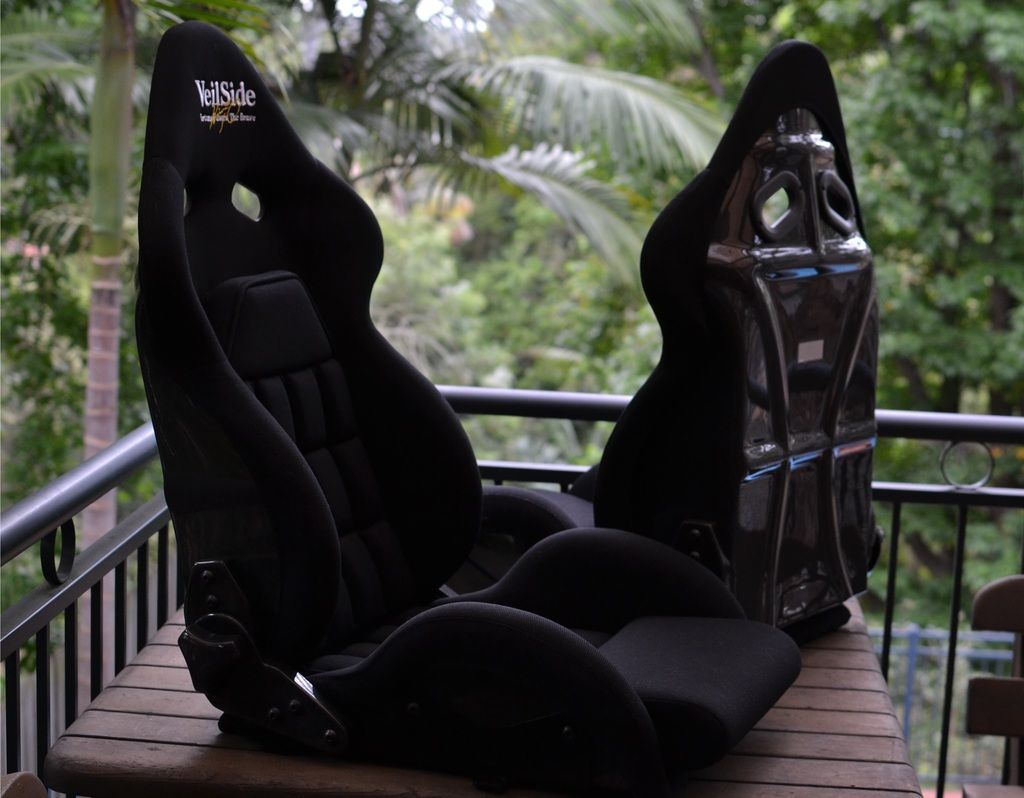
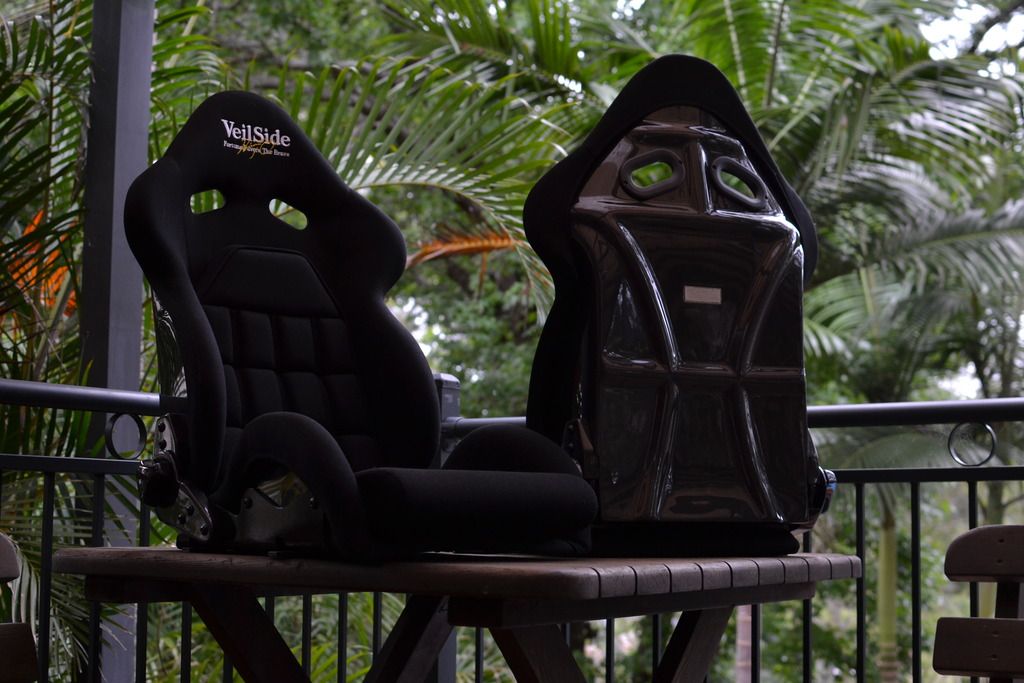
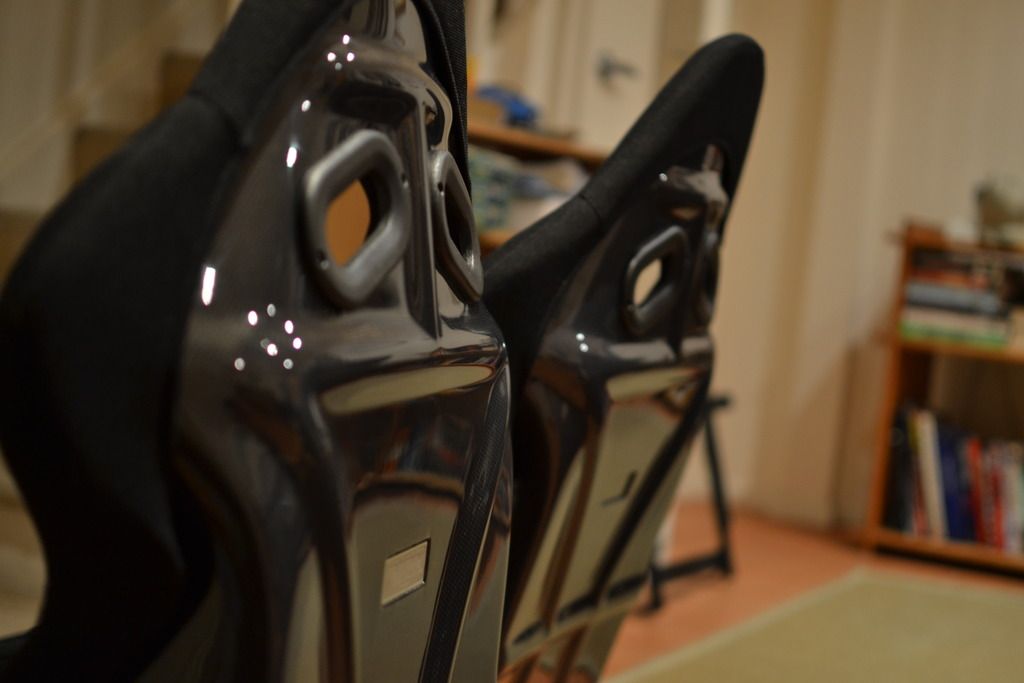
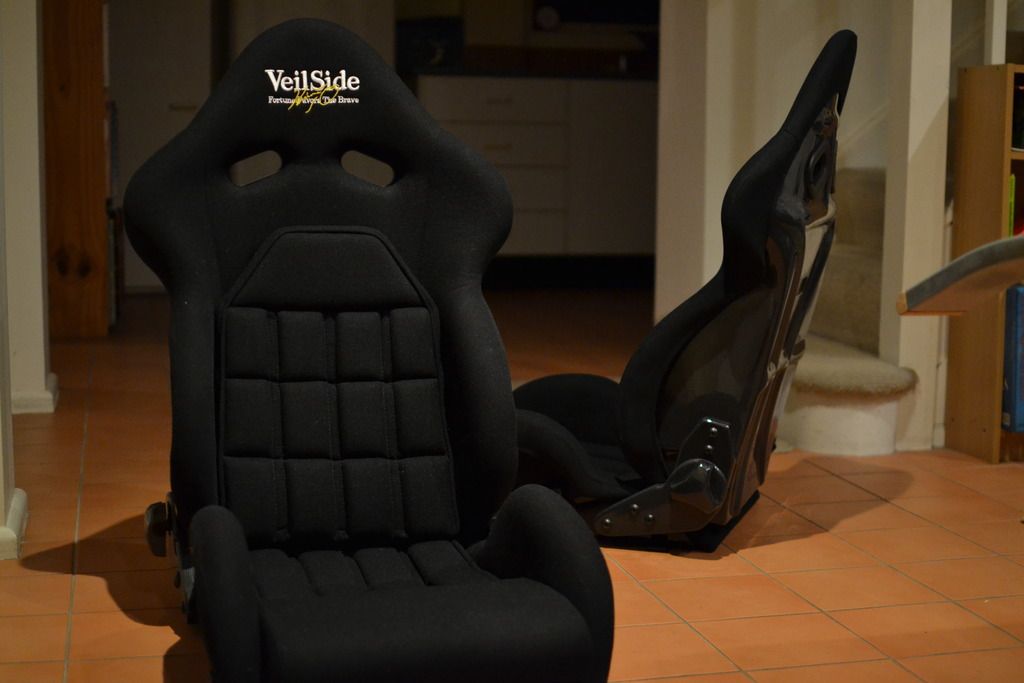
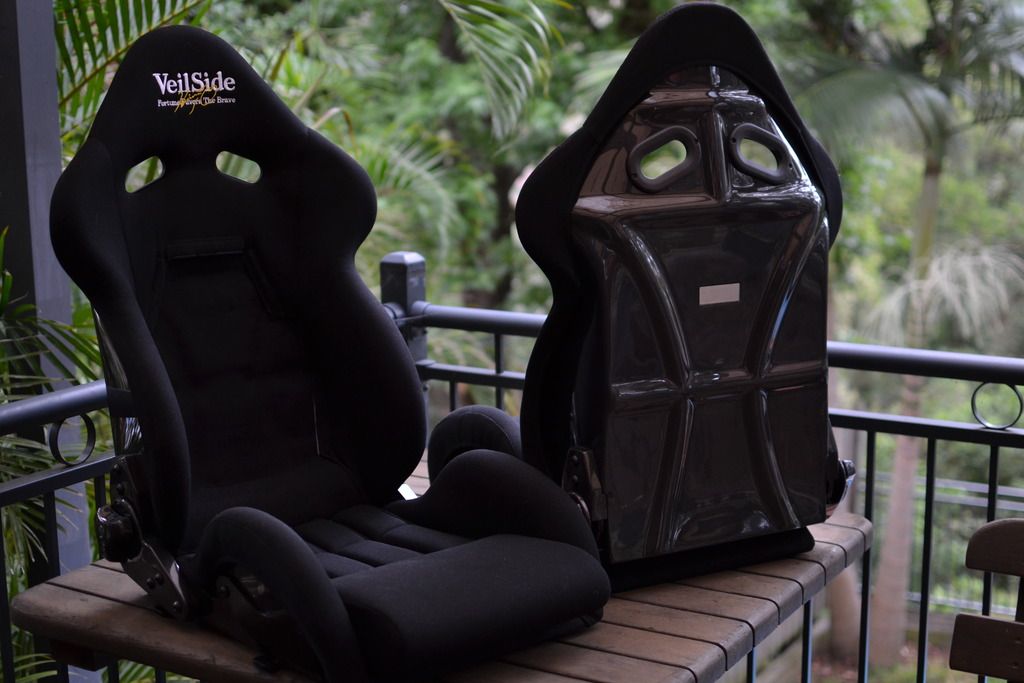
Next up is something I've been waiting for for a god damn age and a half. Back at the beginning of the year I sold off my Tommy K Recaro SR2s (never even made it into the car) and at long last placed the order for my dream seats, a pair of VeilSide VSD-1Rs. Now when I say an age of a half I'm damn well not kidding; they quoted a two months made-to-order lead time and they took a whole fucking 7 months to arrive. No shit.
Back on black, reclineable, in full carbon fibre (not an overlay! very happy to discover that upon arrival)
Thankfully they feel great (never sat in any before) with exception of the chequered backrest padding. I ***** it when I was oggling them online, ***** it when I ordered them, ***** it while I was waiting for them to arrive and unsurprisingly **** them just as much in real life. However not only do they look bad, but they're so thick that they space the user literally completely in front of the side bolsters, defeating the whole damn idea of racing seats. Thankfully they're only held in with velcro, and much much better to sit in once removed. I'll knock up something simple and thin as a replacement.
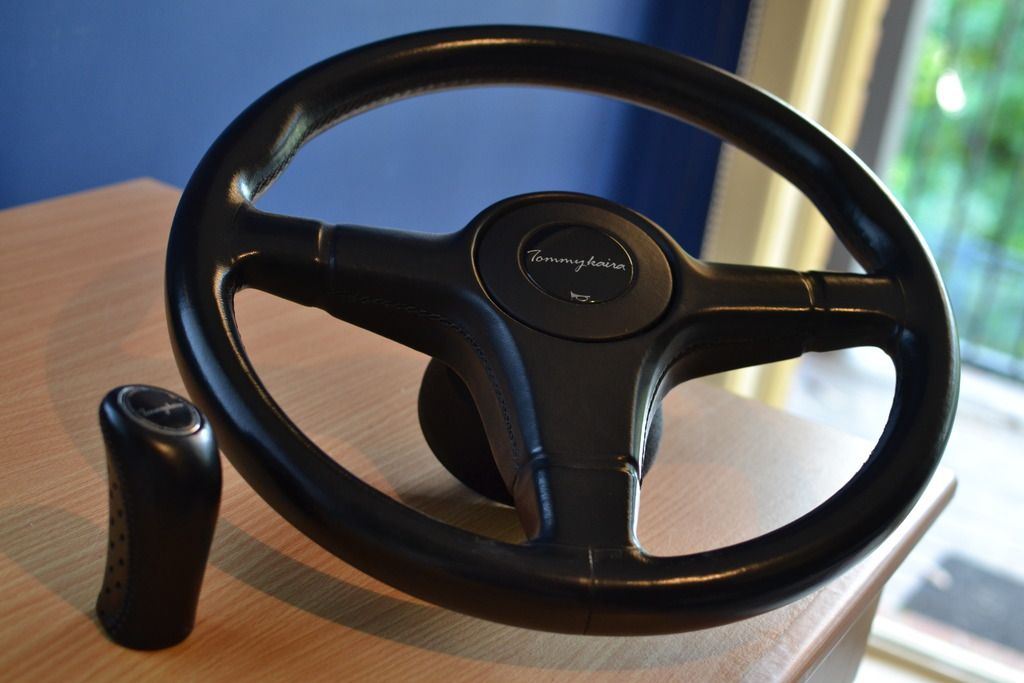
Next on the list of interior accoutrements I picked up a Tommy K shifter to match my steerer. Landed this off of my buddy who's parting his car, as well as a sweet amp and a few odds and ends. It's completely flawless like the wheel, super nice looking unit.
Sorry about the selective focus, I bought a new to me Nikon D3100 and am trying to wrap my head around it.
Next up more interior additions... got another unicorn part
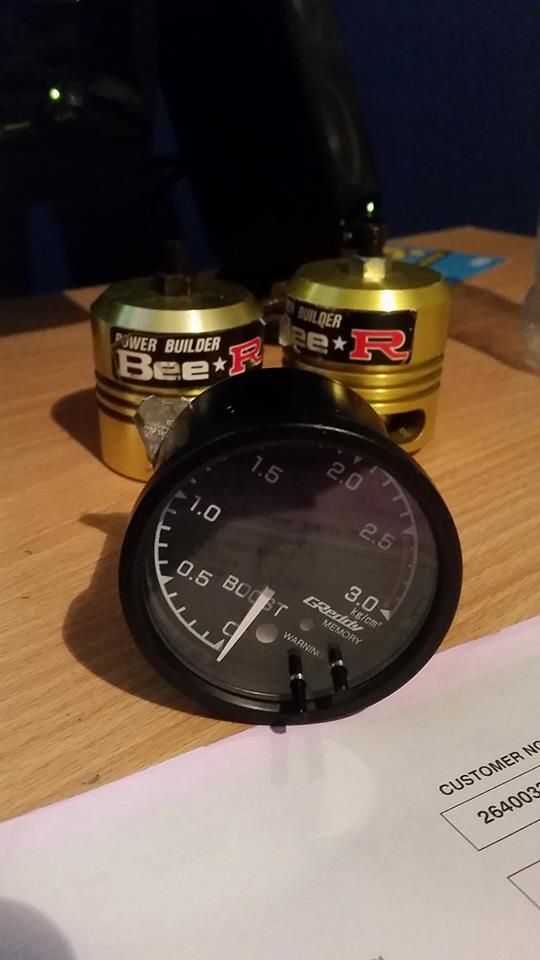
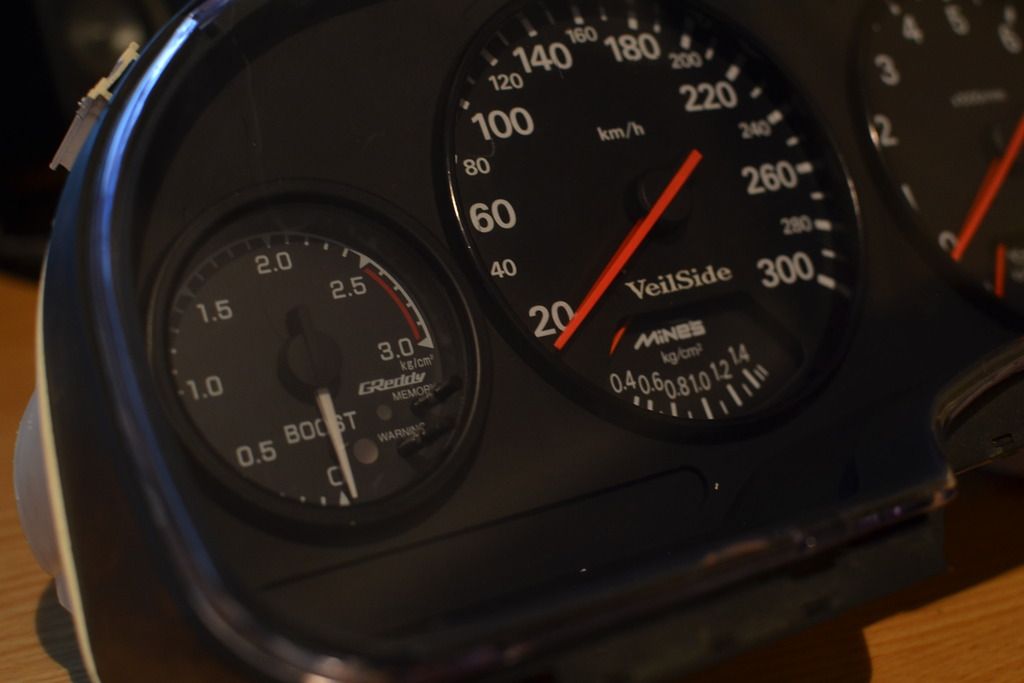
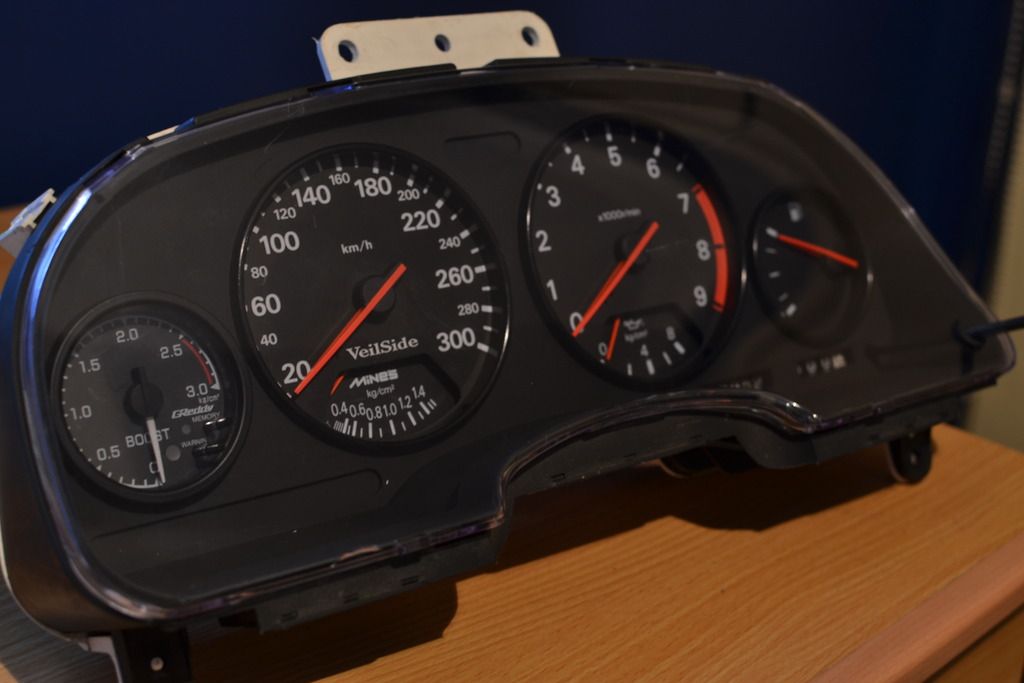
Took me 6 months to find an original GReddy 3 bar. These were made back in the 90s when not many cars ran that high a boost level, so they didn't sell many. They're the perfect match for the OEM cluster and in my mind the best pick for an as close to seamless install as possible. My centre bezel triple holder is full (water+oil temp, oil pressure) and I wasn't able to find a period correct high reading unit in 52mm anyway. A close runner was this unit from HKS, and although it has a matching needle and displays vacuum, it doesn't read high enough unfortunately.
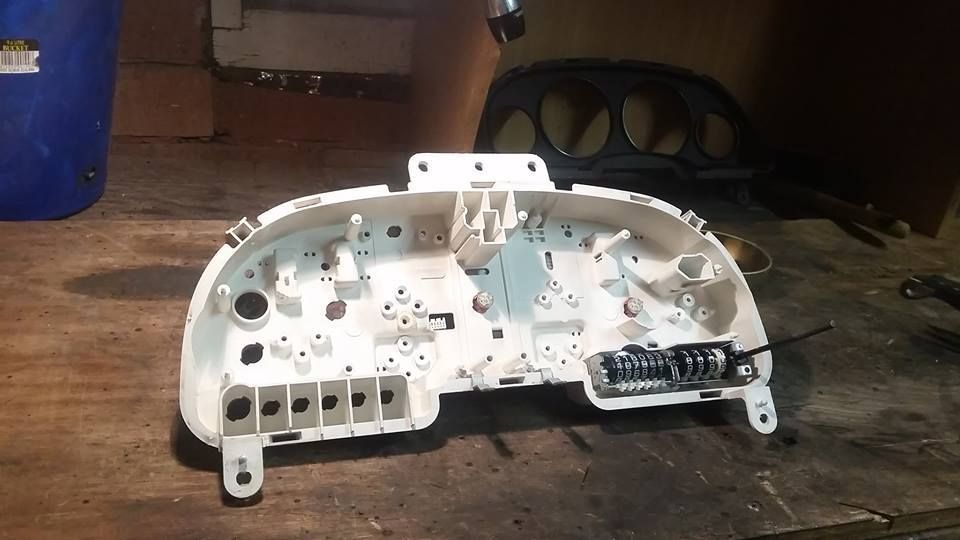
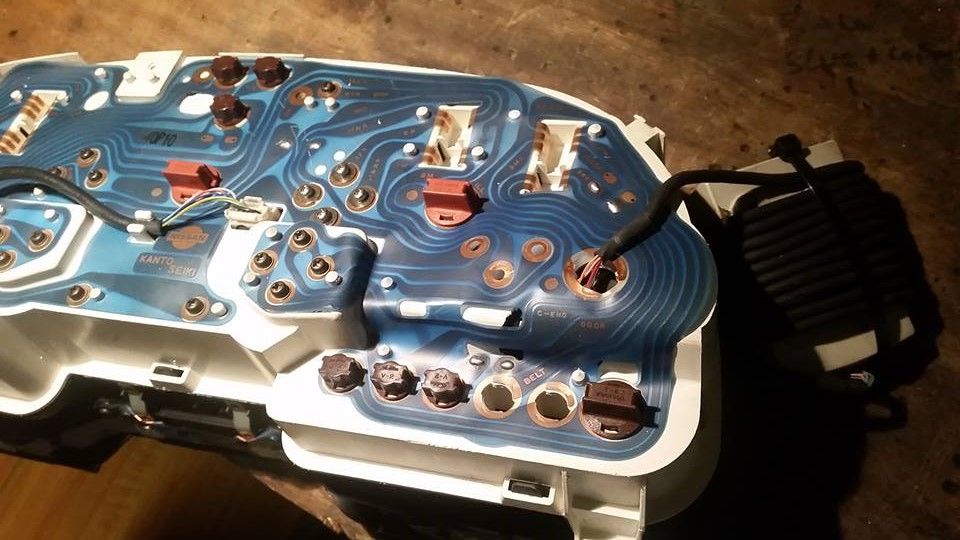
All stripped down, I've done this so many times I reckon I could get a stock cluster to this state in three minutes blindfolded
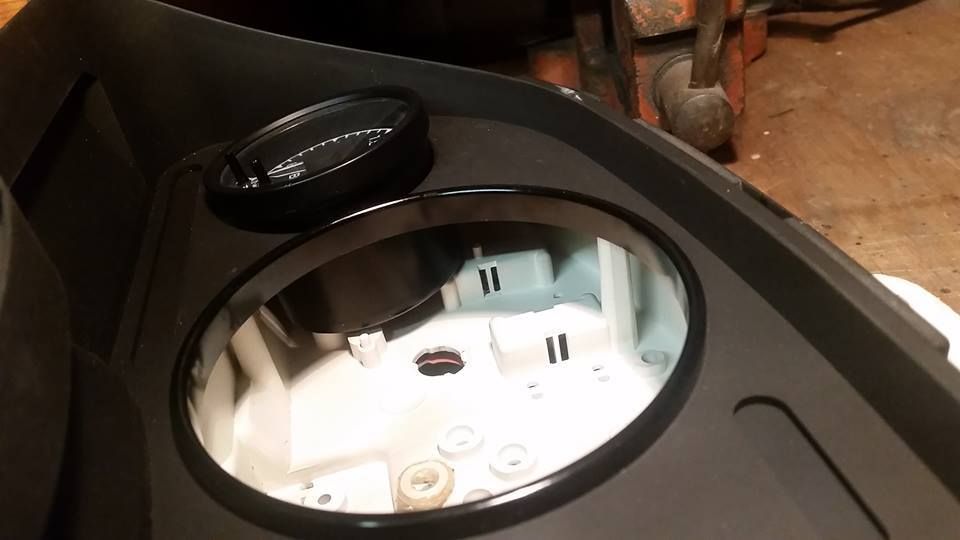
Test fitting the GReddy unit in the useless OEM temperature gauge location, bezel matches my CZP piano black gauge rings almost perfectly
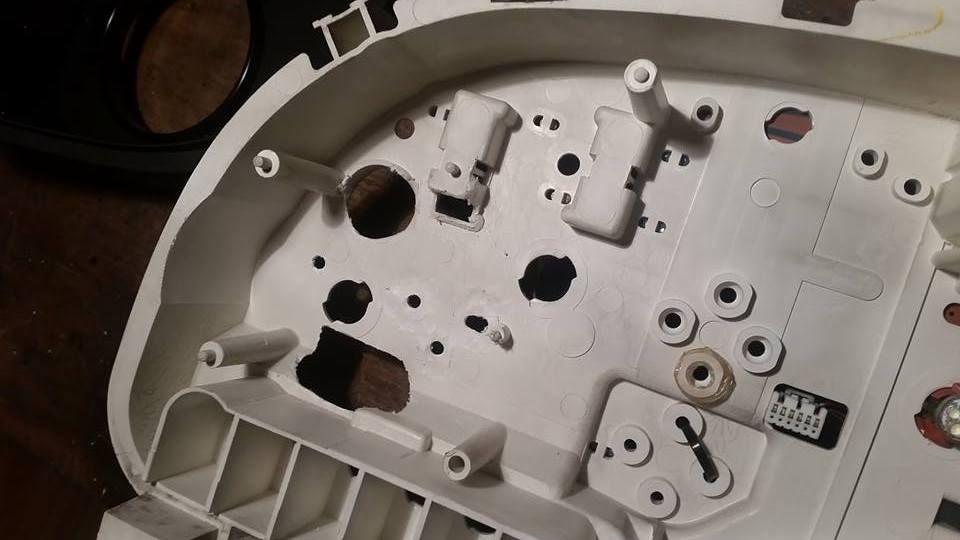
Trimming trimming trimming. One back light bulb (no longer necessary anyway) is removed, some useless screw bosses cut away and one wiring plug shrunk down to size. Still enough meat left to remain operational.
Wiring run out the back, everything buttons up more or less as it was
All in all this was a staggeringly straight forward job - not only does the GReddy unit look like it's meant to be there from the front, it's almost as though it was designed to be fit to a Z32 cluster. the back of the gauge lined up perfectly with the back panel of the cluster (just!), the relevant pins of the wiring plug on the cluster that I had to trim lead to nowhere anyway (cat warning light, etc) and even the OEM screws that held the temperature gauge in wound into the back of the GReddy unit, securing it to the cluster.
My endlessly critical best friends were quick to point out that the needle doesn't match, and they're right, but I'm planning to swap in another GReddy unit to the OEM fuel gauge position on the other side so at least it'll not match symmetrically. Fuel gauge will be getting moved to the OEM oil pressure gauge location similar to this.
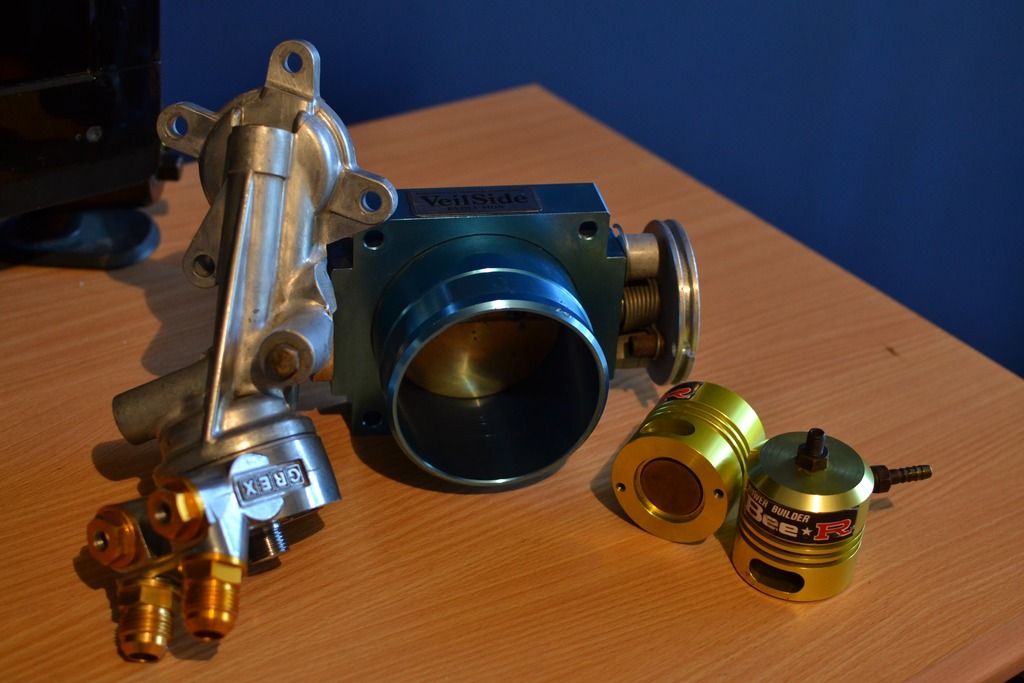
Next up are some cool hard to find engine parts! yay
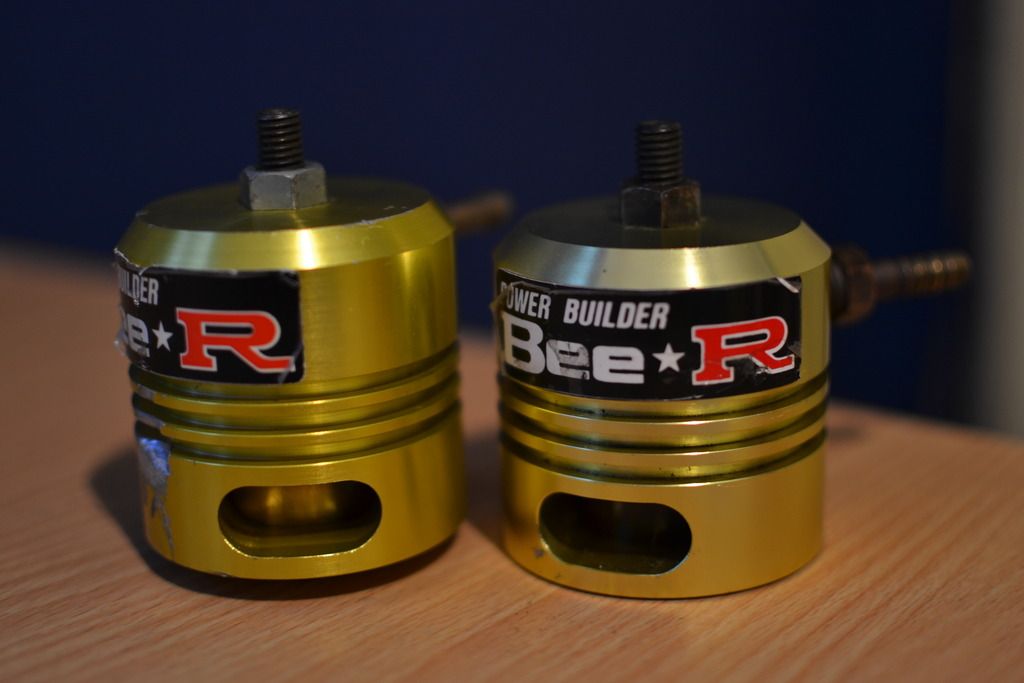
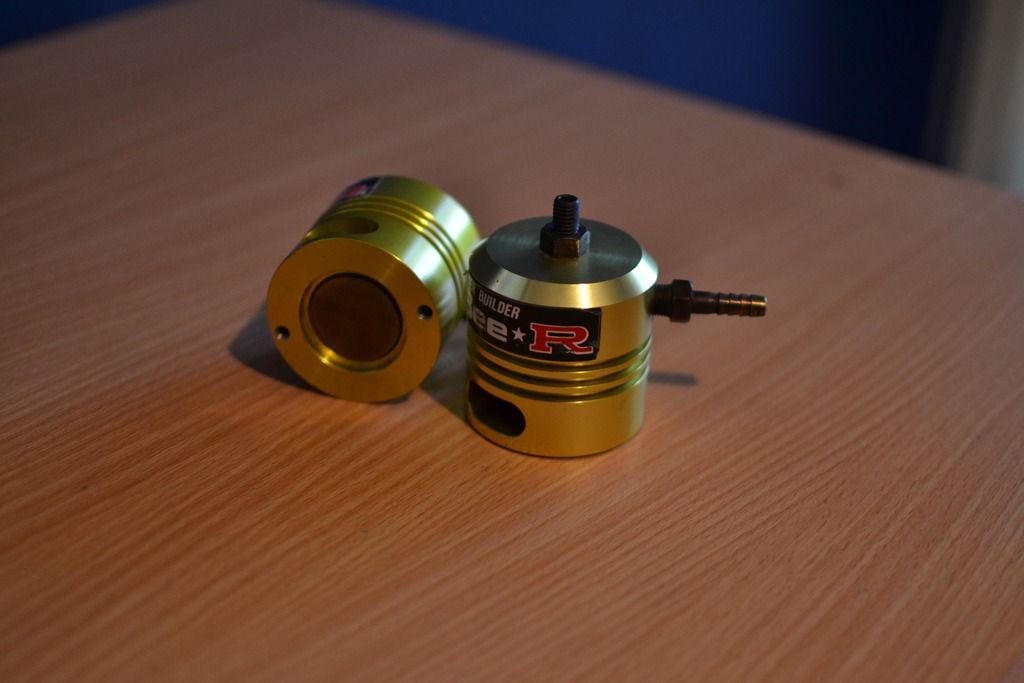
I sold my fake HKS BOV's ages ago, and needed to pick up something at some point... but there're just so many items on the market that all do the same thing. I'm kind of meh about it all... 'til I came across these with; "BEE*R BOV'S? THAT'S MAAAAAAD" then this further thought process;
"Hey dude wanna hear my Bee*R?"
"fuck yeah I've never heard one in real life, hit it!"
Vrooooom psshh
Spectator is disappoint
I am lol
SOLD
It then took me 6 month of looking before one came up on the local Facebook drift group for next to nothing, and simultaneously an immaculate one on Yahoo. Awesome!
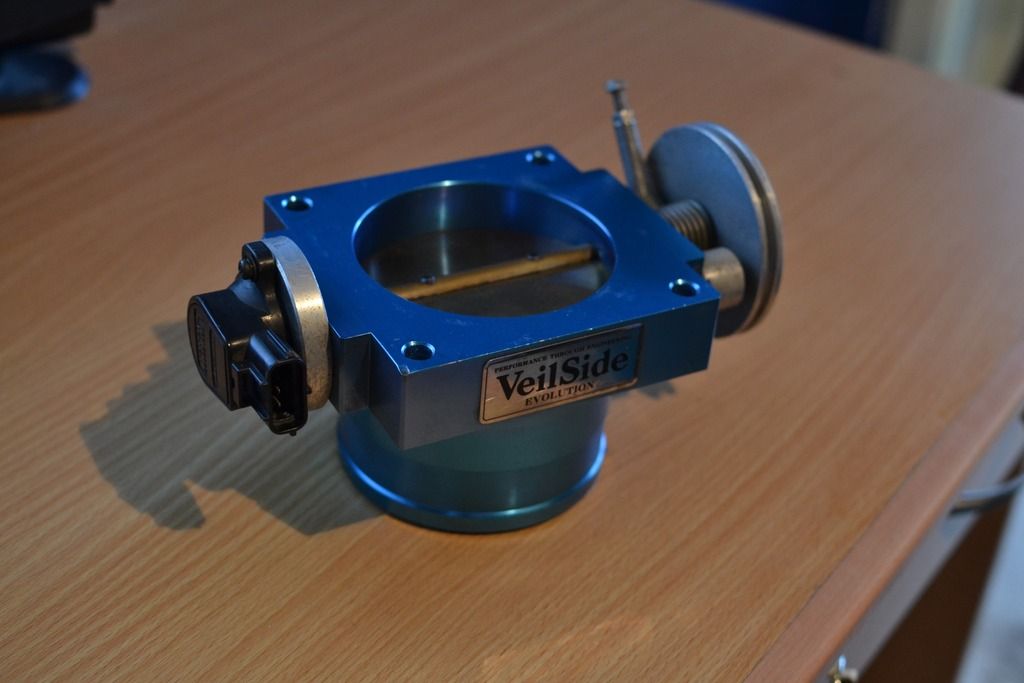
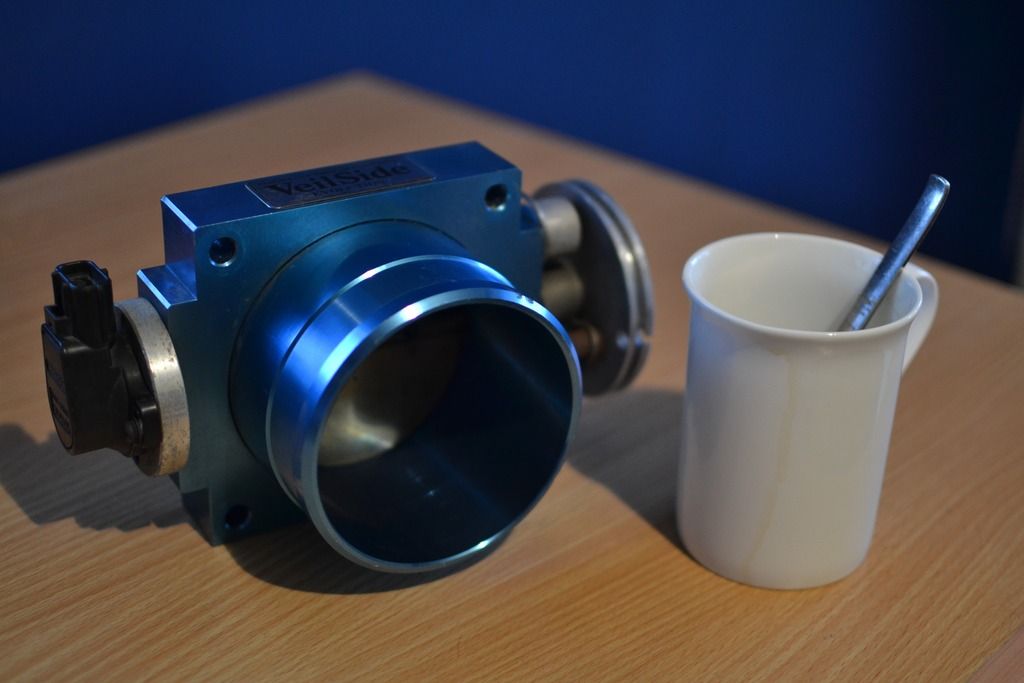
Next up is something I don't even know if I'm going to use, but when this thing of mythical legend came up for sale on Yahoo I just had to have it.
I've read about these things - fitted to RBs and 2Js back in the 90's. In all my years of regular searches of my favourite brand I've never seen one for sale before so it was just kind of a no brainer to grab it.
It's 100mm, and seriously fisting jokes just don't cut it because this thing could make it all the way to anyone's shoulder without issue. It's fucking massive. I'd love to rock it but it's going to come down to the best way to make up the plenum with flow coming first.
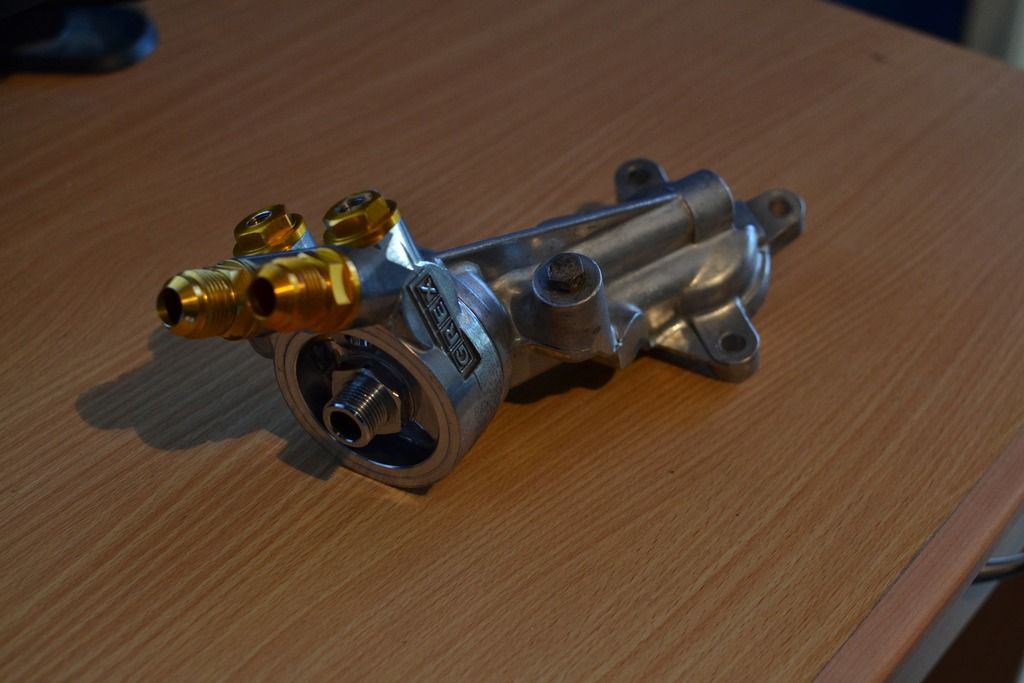
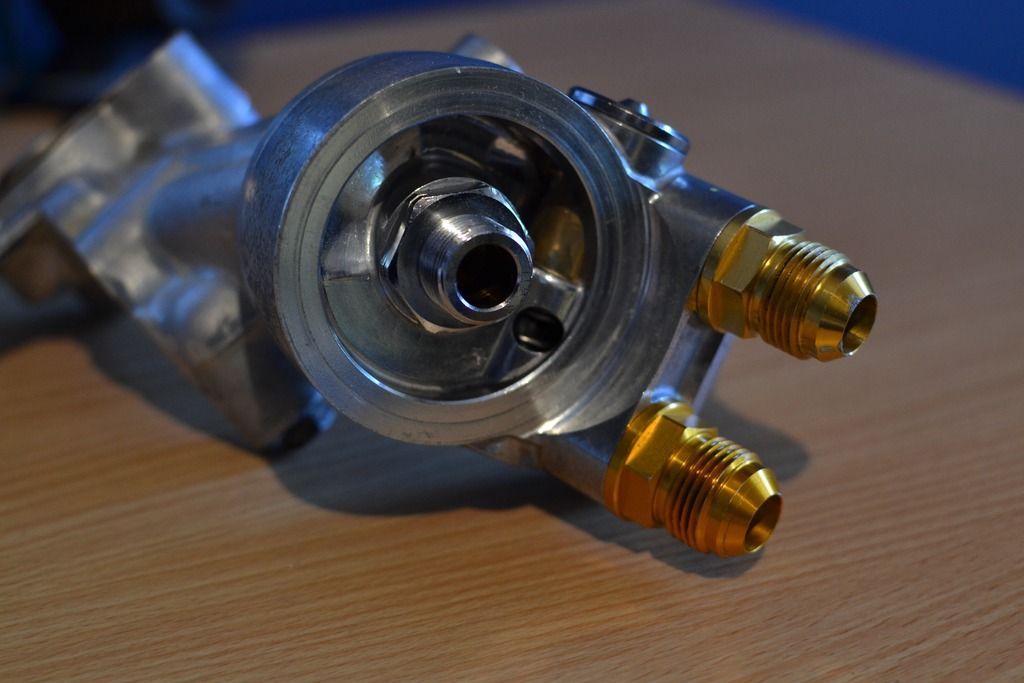
Next up I picked up a GReddy thermostated sandwich plate and an NA oil filter tree.
In researching how to plumb an oil thermostat best on a TT (after I already picked up a remote mount thermostat somewhat recently), I found out that the factory Nissan oil cooler port is only fed with excess oil pressure, as part of a bypass valve that flows directly into the sump. This obviously limits how much cooling can be carried out. With the NA oil filter tree (pictured, no oil cooler port), and the GReddy thermo'd sandwich plate, oil always flows when necessary to the cooler before being fed back to the filter - way more cooling potential.
Thermostat port is tiny but these guys know what they're doing so I guess it's okay.
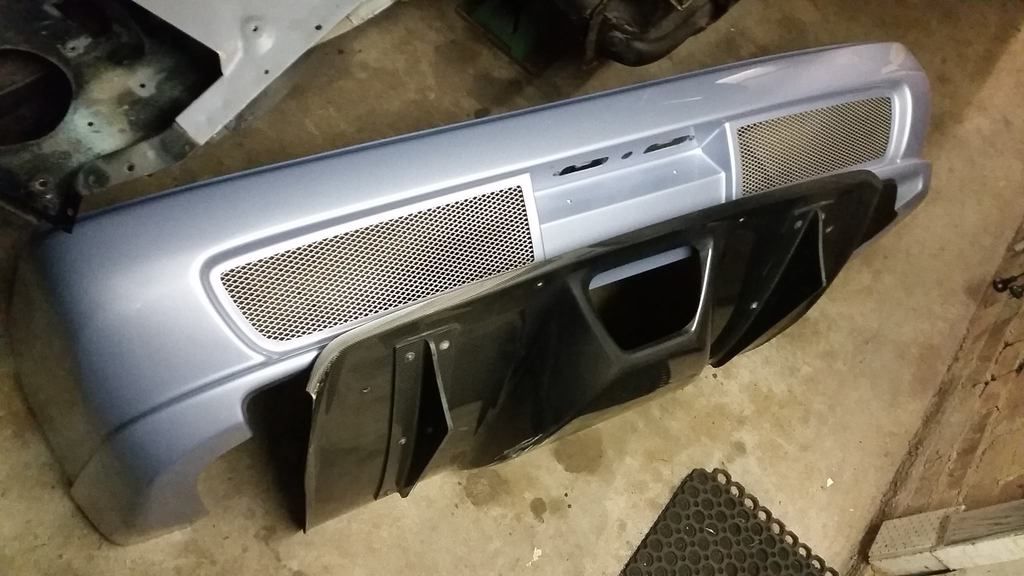
Last up for today is a big one, a body mod... more old school jap cool
IT'S SO HAPPY
Those that know me are aware that I've had a long long long love for this bar but never really planned to pick one up as it's quite OTT... but when the Ab-Flug bumper, carbon fibre diffuser combo came up dirt cheap on Up Garage I just ab-solutely couldn't say no. here's a an idea of how it looks fitted up, and no I won't be using the outer winglets or a centre exhaust.
The diffuser is "generic" in the sense that Ab-Flug fit it to a range of cars (most notably their FDs). as such it doesn't fit the car/bar what I'd call properly, so I am going to cut the absolute hell out of it to make it work on the car 100%. I thought about it for weeks and weeks and have a game plan that has more or less turned into a complete rear end overhaul project so it will be sweet to see how it carries out.
That's it for tonight, I'm just about done with the first project since semester end and will post it up shortly.
Very nice! This reminds me a lot of some of the Mid Night club's cars. The abflug stuff isn't too crazy expensive new, have you thought of picking up some more pieces from them?
While the needles not matching being fixed by not matching symmetry is ok with me I don't understand why you think you don't have to paint the bezel piano black too.
LCG I'll have you know I actually am planning to re powder coat all the gauge rings and the GReddy bezel so they match, in a batch with my other gauges (centre console), pedals and shifters.
Very nice! This reminds me a lot of some of the Mid Night club's cars. The abflug stuff isn't too crazy expensive new, have you thought of picking up some more pieces from them?
now that IS a compliment! I do follow what Ab-Flug still produces, but am not really terribly keen on anything else. I have the bodywork mapped out more or less how I want it for now.
LCG I'll have you know I actually am planning to re powder coat all the gauge rings and the GReddy bezel so they match, in a batch with my other gauges (centre console), pedals and shifters.
now that IS a compliment! I do follow what Ab-Flug still produces, but am not really terribly keen on anything else.
Glad to see someone else who is a Midnight Club enthusiast.
IIRC Abflug still has all of the molds for their older body kits(like the pink Z32 widebody.) Have you seen this one? Always thought it was the most modern looking z32 front fascia while still being older than the Greddy Gracer and other kits.
 Tweet
Tweet


 )
)


Comment