Announcement

Collapse
No announcement yet.

56 beetle, a long build

Collapse
X
 
  • Filter
  • Time
  • Show
Clear All
new posts

  • #46
    I think thats the first time I've been Rick Rolled in over a year.
    You bloody hooligan!
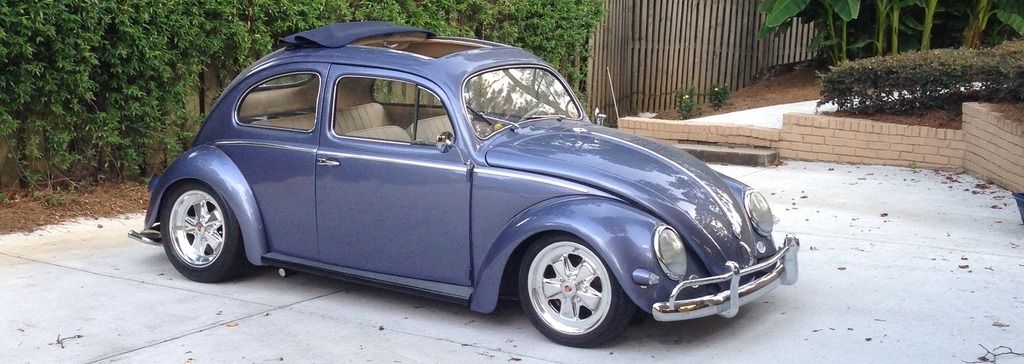
    The car is absolutely amazing, the amount of work you put into this is amazing. Looking forward to the updates


    Comment


    • #47
      Holy shit that is pretty
      Im going to build a 1/24 scale model inspired by yours

      Comment


      • #48
        I'm crying a little inside

        Lucas
        Daily: 2004 Pontiac GTO. . . . . . . . . Daily Econobox: 2009 Mini Clubman Cooper
        Originally posted by LCG
        High 21! It's like a high 5 but includes both hands, both feet and a boner.

        Comment


        • #49
          Damn. Rick got me there.

          In for more.


          Audi RS4PRA | VW Golf MKV GT-Y | Audi A1 SportBack

          Comment


          • #50
            Originally posted by iadubber View Post
            Nice build! I love the rag top. Any updates on the engine build?
            The engine is actually going in the car this weekend, I've just been lazy and haven't updated much at all. I'll write up some updates soon, there is alot to post

            Comment


            • #51
              Originally posted by ALRoN73 View Post
              Holy shit that is pretty
              Im going to build a 1/24 scale model inspired by yours
              That's awesome! post pictures in the build thread or pm them to me when you're done i'd love to see that.

              Comment


              • #52
                Really can't wait to see this thing.
                IG: ashtonlafleur

                Comment


                • #53
                  You know, I guess your car is alright, but I would definitely take a Rx8 over it.
                  - Project Young Muscle -
                  Fitness
                  Cars
                  Fun
                  - Honda Pilot

                  Comment


                  • #54
                    Originally posted by idonthaveacarbutiwantone View Post
                    You know, I guess your car is alright, but I would definitely take a Rx8 over it.
                    k

                    Comment


                    • #55
                      Part 1 Engine Build

                      So here is part 1 of the engine build, it is unlikely that i will be consistent wit the length of the updates but I'll try to get the posts up as quick as possible so here we go.

                      We decided it would be fun to layout all the parts on the garage floor before we got started so here it is minus tin.


                      So we threw on the flywheel to get the crank to stand up so we could heat up and put on the cam gear (straight cut) a spacer and the distributor gear (no that it matters, electronic ignition will be used). The crank is a cb forged 82mm crank for anyone wondering. Here is my mom heating up the cam gear. She wanted to show off her acetylene torch.


                      Heres the crank with the cam gear spacer and distributor gear installed.


                      Next we put on and torqued down our rods as well as the oil slinger and another bearing. They're cb super race rods. Very technical name i know, but cb makes quality stuff.


                      We then dropped the crank into the case after putting in the bearings and all that, I like excessive pictures so expect them.


                      Next I tried to put the cam gear on the cam by myself with the fancy allen key whatever they're called bolts and in my inexperience and stupidity (engine was actually one of the earlier things I did on the car) i stripped out a cam bolt pretty bad. After my dad and uncle almost killing me i managed to grind down the bolt and back it out with some vice grips narrowly avoiding their wrath and thankfully allowing my engine build to go on. We then threw in an extra set of stock cam bolts we had, carefully avoiding stripping them, and they worked just fine. Here is the carnage.


                      Next we put in the cam bearings only to realize that the box had one bearing that was notched that wasn't supposed to be, irritating but not devastating. Instead of taking the easy way out and grinding off the notch we drove to our local, (Hour and a half drive away), aircooled parts vendor to buy another set of cam bearings.

                      Its supposed to go in that spot below it, as you can see it isn't notched.


                      After driving back from Alabama with our second set of cam bearings we put in the lifters, lubed everything up, and dropped in the crank. After dropping in the crank we put permatex on the case so we could seal it and cinch it together. It is an Eagle "Drag Race" (FK-8) cam.

                      Then we put the second half of the case on and torqued it down. Then we put the case studs in and the oil pump and the oil pump plate setup for a full flow system.


                      We then put on the pistons, 94mm, lined up the compression and oil rings and put the cylinders on.


                      We then put in the copperhead gaskets then tried to put on the heads. They're cb 044 super pro heads, 44 x 37.5 valves. We then tried to put on the heads and then realized that the head studs were too long so we began the long process of measuring and cutting all the case studs to fit properly. We dont have any kind of machine shop type equipment to do this so we used a hacksaw, a jewelers saw, and my moms "foredom" which is essentially a dremel on crack.

                      Here is the giant ports and a good picture showing why the case studs would not work.


                      Once we got the case studs cut, which annoyingly took the better half of a day. we finally got the heads bolted on and threw the front pulley on for a quick picture. We also had the distributor block off and fuel pump block off installed at this point.


                      Then we put on our additional oil sump, it will limit how low i can go but it'll help the engine get the cooling it needs with all the additional go fast goodies I have on it.


                      Next we put on the alternator stand, oil cooler, and oil filler neck.


                      After this we had to find our rocker geometry and have our push rods cut to length. I dont have any pictures of this process but it involved using an adjustable push rod to find the length, having a machine shop cut them and then installing them as well as the rocker arms. I have forged 1.4: 1 rocker arms on that I'll make sure to post pictures of soon. Then i adjusted the valves and put the valve covers on which I tapped for a line to the breather box.


                      There's a hint of some tin in there and some color previews. I went through two sets of tin before finally coming to the fit like a glove setup i have now. But that's a story for another day. There'll be plenty of content for another engine build post over the next couple of days.

                      Comment


                      • #56
                        Originally posted by thatbeetleguy View Post
                        That's awesome! post pictures in the build thread or pm them to me when you're done i'd love to see that.


                        Comment


                        • #57
                          damn

                          how did i miss this the first time

                          so awesome
                          Floccinaucinihilipilification

                          Comment


                          • #58
                            Alright stanceworks Ill give it to you straight. The car is almost done, Ive documented pretty much everything and i have a lot of cool stuff to share. while i wanna preserve the magic of a steady progression i want to also just show the current progress. so here it is


                            So that's the ride height for now. my front beam is about 2.5" off the ground while my muffler only sits 2" off the ground. The beam is adjusted all the way down + 2 inch drop spindles while the rear has 2.5" drop place + its lowered 1 click on the inner teeth of the torsion bar. overall lowered about 5" all around. Its my dd and is using stock torsions so the suspension is not very stiff to say the least. considering this, its not going to be lower before i have money for more goodies one day.

                            Ill do a real update actually documenting some work later tonight, but for now that's the current situation.

                            Comment


                            • #59
                              Damn! Looks kick ass! I'd love to see some slightly smaller tires in the rear, but I love it.
                              IG: ashtonlafleur

                              Comment


                              • #60
                                Originally posted by aLaFleur View Post
                                Damn! Looks kick ass! I'd love to see some slightly smaller tires in the rear, but I love it.
                                Thanks, I appreciate it. The rears are old 205/55's from decades ago that were on the wheels when I got them. They're on their way out but they were free and for initial fitting/ mock up purposes that's one of the best characteristics of a tire.

                                Comment

                                Working...
                                X