 Tweet
Tweet
Well let's keep this short the Audi is gone here is its replacement and the forum gets to see me push the limits of taste at times and never afraid to take risk as you already know.
Strap yourselves in lads its game on.
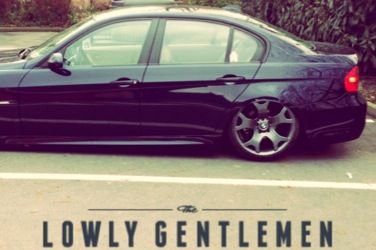
BMW 330ci 2001 Y plate Silver M sport, grey leather Auto, SATNAV, Memory seats, IPod connection, multifunction steering wheel, aircon
18 inch staggered mvs
Tiptronic gearbox as some people know I tore my archiles a while ago and its not healing right so struggling on my left foot atm so made sense to go for this instead of a manual.
Absolutely insane exhaust noise its intoxicating on acceleration and car goes like a scolded cat.
Few bits to sort inc a bubble on front drivers arch easy repair.
Slight bubble on rear passenger arch very easy to sort.
Feels like worn track rod end if I'm honest in braking but assured its not serious by Aaron reeve who see it earlier.
Needs a good valet and service as I'm picky lol.


Will get better pics when clean
Updated the mk3 navigation unit today after finding links freely available on google and burnt some disc for my own use to update the system.didnt take pics as i was busy doing non car work on the laptop as well so i will include a video link showing exactly what ive done.look s very nice now but ideally for 7 digit postcode searches i need the mk4 unit down the line.
[ame="http://www.youtube.com/watch?v=-__kMbR3aWs"]BMW Navigation MKIII Software Update - Key CD - YouTube[/ame]
New front droplinks on order inc new rear topmounts and lollipop bushes up front.all lemforder ones.
Audiovox rear screen control

And gone


IPod media control and freeview unit wired up and in glovebox for now.just need a iPod and freeview digibox to finish off.


One more parcel to arrive then its game on starting it all

So it begins its coilovers Time.
Warning very pic heavy and so ups and some downs but here goes and the 330 gets some love and some abuse
7 am start at Aaron reeve performance as i needed due to work commitments to get stuff done so he got started early to help me out


so that was new rear top-mounts on,new front coil overs on,new lollipop bushes on but no droplinks off the Hyundai coupe as there was some confusion over the correct part numbers so im running no drop links on it till tomorrow .coilovers weve soaked as they are seized due to being second hand but will be sorted tomorrow hopefully and ive had to buy some 6mm spacers as they are catching a bit:frown:frown:frown:frown:frown.
kind of annoying as i sold my front/rear 15 hubcentric spacers a month ago too thinking i didnt need any as i had the audi
Anyway here was its first view after i got stuck on the lift also:hihi:hihi:hihi:hihi:hihi

Then seeing as i had been up since 6 am and i wanted to be home till tomorrow and knackered from a long week at work last week i decided to hit some monster drinks/smoked some tabs and put slayer on my surround sound system in the garage and the car got its first clean


Used some youtube guides to get my lights back up to new condition which scared me taking sandpaper on em

interior then got some love inc clean and leather revive


Then i used my own secret way to clean my engine bay


so bits still to sort and front to raise 25mm and rear i want 20mm lower yet but project is well and truly moving on quick.next stop mot/tax this month
Andy
Update-Rear lowered
Decided as some recent pics suggest the rear was way too high compared the front so obtained some e36 328 lowering springs off a mate for nothing and got cracking on seeing how far i could get it down to give me an idea of future fittments:thumbsup:thumbsup:thumbsup
original height

comparisons from old to new


new one in.notice on previous pic how i lever the gap more due to being on my own and it wouldnt move down far enough to release the spring so i used this method ive done before

And new height with more to settle yet


Bit too low out back even for me and used the springs to see where i need to be for the future but rides a lot softer and nicer than before and corners very flat and handles well.needs spacers to fill the gap as im running 8 j et47 225/40/18 fronts and 8.5 j et50 255/35/18 rearsand not liking the tucked look and want a much more squatted look with retaining the oem feel but doing my take on it also.new wheels isnt an option atm due to needing new wishbones and already forked out for the car and new rear topmounts/front droplinks/front coilovers/fitting bits and tax/mot all due this month :frown:frown:frown:frownalso.
Pics of coilovers up front,old but still ride nice and will do for now fitted with shortened Hyundai coupe 05 onwards droplinks and due to the design of the lock rings and adjuster rings i needed no spacers up front as i have at least 5mm gap to spare


Right mot/tax as said this month and things are very very tight financially atm due to a holiday i really need in may so updates might be scarce for a while but 15mm spacers all round might be a welcome addition too if anyone has some going cheap with longer bolts:thumbsup:thumbsup:thumbsup:thumbsup:thumbsup
Andy
Strap yourselves in lads its game on.
BMW 330ci 2001 Y plate Silver M sport, grey leather Auto, SATNAV, Memory seats, IPod connection, multifunction steering wheel, aircon
18 inch staggered mvs
Tiptronic gearbox as some people know I tore my archiles a while ago and its not healing right so struggling on my left foot atm so made sense to go for this instead of a manual.
Absolutely insane exhaust noise its intoxicating on acceleration and car goes like a scolded cat.
Few bits to sort inc a bubble on front drivers arch easy repair.
Slight bubble on rear passenger arch very easy to sort.
Feels like worn track rod end if I'm honest in braking but assured its not serious by Aaron reeve who see it earlier.
Needs a good valet and service as I'm picky lol.
Will get better pics when clean
Updated the mk3 navigation unit today after finding links freely available on google and burnt some disc for my own use to update the system.didnt take pics as i was busy doing non car work on the laptop as well so i will include a video link showing exactly what ive done.look s very nice now but ideally for 7 digit postcode searches i need the mk4 unit down the line.
[ame="http://www.youtube.com/watch?v=-__kMbR3aWs"]BMW Navigation MKIII Software Update - Key CD - YouTube[/ame]
New front droplinks on order inc new rear topmounts and lollipop bushes up front.all lemforder ones.
Audiovox rear screen control
And gone
IPod media control and freeview unit wired up and in glovebox for now.just need a iPod and freeview digibox to finish off.
One more parcel to arrive then its game on starting it all
So it begins its coilovers Time.
Warning very pic heavy and so ups and some downs but here goes and the 330 gets some love and some abuse
7 am start at Aaron reeve performance as i needed due to work commitments to get stuff done so he got started early to help me out


so that was new rear top-mounts on,new front coil overs on,new lollipop bushes on but no droplinks off the Hyundai coupe as there was some confusion over the correct part numbers so im running no drop links on it till tomorrow
.coilovers weve soaked as they are seized due to being second hand but will be sorted tomorrow hopefully and ive had to buy some 6mm spacers as they are catching a bit:frown:frown:frown:frown:frown.kind of annoying as i sold my front/rear 15 hubcentric spacers a month ago too thinking i didnt need any as i had the audi
Anyway here was its first view after i got stuck on the lift also:hihi:hihi:hihi:hihi:hihi

Then seeing as i had been up since 6 am and i wanted to be home till tomorrow and knackered from a long week at work last week i decided to hit some monster drinks/smoked some tabs and put slayer on my surround sound system in the garage and the car got its first clean


Used some youtube guides to get my lights back up to new condition which scared me taking sandpaper on em

interior then got some love inc clean and leather revive


Then i used my own secret way to clean my engine bay


so bits still to sort and front to raise 25mm and rear i want 20mm lower yet but project is well and truly moving on quick.next stop mot/tax this month
Andy
Update-Rear lowered
Decided as some recent pics suggest the rear was way too high compared the front so obtained some e36 328 lowering springs off a mate for nothing and got cracking on seeing how far i could get it down to give me an idea of future fittments:thumbsup:thumbsup:thumbsup
original height

comparisons from old to new


new one in.notice on previous pic how i lever the gap more due to being on my own and it wouldnt move down far enough to release the spring so i used this method ive done before

And new height with more to settle yet


Bit too low out back even for me and used the springs to see where i need to be for the future but rides a lot softer and nicer than before and corners very flat and handles well.needs spacers to fill the gap as im running 8 j et47 225/40/18 fronts and 8.5 j et50 255/35/18 rearsand not liking the tucked look and want a much more squatted look with retaining the oem feel but doing my take on it also.new wheels isnt an option atm due to needing new wishbones and already forked out for the car and new rear topmounts/front droplinks/front coilovers/fitting bits and tax/mot all due this month :frown:frown:frown:frownalso.
Pics of coilovers up front,old but still ride nice and will do for now fitted with shortened Hyundai coupe 05 onwards droplinks and due to the design of the lock rings and adjuster rings i needed no spacers up front as i have at least 5mm gap to spare


Right mot/tax as said this month and things are very very tight financially atm due to a holiday i really need in may so updates might be scarce for a while but 15mm spacers all round might be a welcome addition too if anyone has some going cheap with longer bolts:thumbsup:thumbsup:thumbsup:thumbsup:thumbsup
Andy


Comment