 Tweet
Tweet
My name is Daniel from York Pennsylvania. So here is my 1988 BMW 528e super-eta and it's an automatic! :roll: I got it for a little less than $1,000 with 167,000 miles and some problems. Car has no radio, sunroof doesn't open, no A/C or heat. Car died on me after the first 3 hours driving around, replaced the alternator in a high school parking lot and it runs fine.
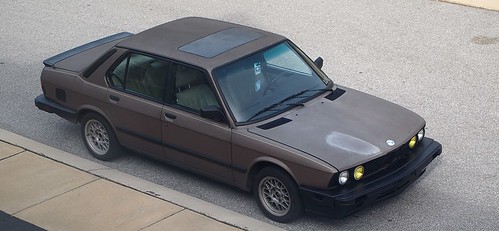
Here is the car when I first purchased it in April...

ec1ccc78907011e1abd61231381b6d77_7 by Brocamdan828, on Flickr

2ca6ac4a8c6c11e1abd61231381b6d77_7 by Brocamdan828, on Flickr

f45fdab0952511e19dc71231380fe523_7 by Brocamdan828, on Flickr

ae5b1fa0956811e1b10e123138105d6b_7 by Brocamdan828, on Flickr
Had to do some maintenance, spark plugs, filter, new oil etc... After a month or so, I sarted to do a few little things to make it my own. I took the bumper off and ran bumperless for a while and tucked the turn signals behind the grill. Also painted the kidney grill black. The car also had no exhaust past the cat, so I had 2 2.5" straight pipes added on. Pissed off the neighbors before, pissing them off even more now! Love it!

3c4fafceb65711e1b10e123138105d6b_7 by Brocamdan828, on Flickr
The front seats were torn to hell and the elctrics didn't work. So I swapped them out for some manual seats I picked up for 70 for the pair.

6f53ab6e9ba411e1ab011231381052c0_7 by Brocamdan828, on Flickr
Then picked up a set of wheels off of craigslist for $120 and slappped them on.

b6631f68d5d211e1a2fe22000a1e8a58_7 by Brocamdan828, on Flickr
Then I painted the front valance black and painted all the chrome trim on the car.

6209e1a41f9711e2b19422000a1f9bc9_7 by Brocamdan828, on Flickr
Also painted the gas cap and side pillers behind the rear windows.

e910f1d61ddc11e2a8b522000a1cf597_7 by Brocamdan828, on Flickr
Had some parts that I picked up laying around, so I painted them black to get put on! Picked up 2 m5 air dams, and is trunk spoiler and 16x8 et23 style 5's all for $150 and a 6 pack of yeungling. Good deal to me!!

c14b5faef79611e18dfe22000a1cfdcd_7 by Brocamdan828, on Flickr
DId some more stuff, got new front rotors and pads on, and started to get bumper trim and bumper back on, also painted the chrome bumpers black.

f3f13c16ed2e11e1bfc622000a1cde39_7 by Brocamdan828, on Flickr
I got around to drilling holes into the valance to set up the mounting brackets for the airdam. Then I got the airdam mounted up and tucked the bumper in.

P1010856 by Brocamdan828, on Flickr
Then got the is trunk spoiler mounted, drilled some holes in the trunk and used trusty skateboard hardward to keep it nice and tight! Also painted the sunroof black but I didn't get a decent picture of that.

P1010875 by Brocamdan828, on Flickr
I got tires dismounted from the free wheels I got, and started to clean them up! They looked like freaking hell, but I think they cleaned up pretty well.

31cfecee24f211e28abf22000a1f9bf5_7 by Brocamdan828, on Flickr
Then the paint process, heres the finished product. Used Dupli-color wheel paint. Love the way it turned out!

a0df68f6261111e29ae122000a1f9a03_7 by Brocamdan828, on Flickr
I'm just waiting to get tires and 15mm spacers to get them mounted up!
Always love the look of the euro french style high beams... So I ordered the lamin-x film for the high beams. Then I also un-tucked the bumper. US. diving boards are cool...

P1010889 by Brocamdan828, on Flickr
Decided to get the foglights back on... Since they weren't the foglights for the m5 airdam, but the ones for the under bumper mount... I had to do some creative mounting. I'm cheap and don't want to pay for new foglights...
So I took the foglight apart, went to lowes and go 2 new bolts a half inch longer than the original ones pictures here...

P1010913 by Brocamdan828, on Flickr
Put the bolt in the light casing and on the back side I put the washer and I used a skateboard bushing to use a spacer so it would mount flush...

P1010921 by Brocamdan828, on Flickr
Had to drill more holes into my valance...

P1010934 by Brocamdan828, on Flickr
Put the bolt through and tightened the nut behind the valance... and here's how it looks!

P1010909 by Brocamdan828, on Flickr
I tried to get the other on, but after plugging the light in, it doesn't turn on. Saving that for another day!
And here is how the car sits today...

P1010931 by Brocamdan828, on Flickr

P1010928 by Brocamdan828, on Flickr

P1010925 by Brocamdan828, on Flickr
And my favorite shot of the car to this date...

P1010936 by Brocamdan828, on Flickr
Hope you like, would love to hear what you all think. I'll be adding more as I go along! Thanks for checking it out!
Here is the car when I first purchased it in April...
ec1ccc78907011e1abd61231381b6d77_7 by Brocamdan828, on Flickr
2ca6ac4a8c6c11e1abd61231381b6d77_7 by Brocamdan828, on Flickr
f45fdab0952511e19dc71231380fe523_7 by Brocamdan828, on Flickr
ae5b1fa0956811e1b10e123138105d6b_7 by Brocamdan828, on Flickr
Had to do some maintenance, spark plugs, filter, new oil etc... After a month or so, I sarted to do a few little things to make it my own. I took the bumper off and ran bumperless for a while and tucked the turn signals behind the grill. Also painted the kidney grill black. The car also had no exhaust past the cat, so I had 2 2.5" straight pipes added on. Pissed off the neighbors before, pissing them off even more now! Love it!
3c4fafceb65711e1b10e123138105d6b_7 by Brocamdan828, on Flickr
The front seats were torn to hell and the elctrics didn't work. So I swapped them out for some manual seats I picked up for 70 for the pair.
6f53ab6e9ba411e1ab011231381052c0_7 by Brocamdan828, on Flickr
Then picked up a set of wheels off of craigslist for $120 and slappped them on.
b6631f68d5d211e1a2fe22000a1e8a58_7 by Brocamdan828, on Flickr
Then I painted the front valance black and painted all the chrome trim on the car.
6209e1a41f9711e2b19422000a1f9bc9_7 by Brocamdan828, on Flickr
Also painted the gas cap and side pillers behind the rear windows.
e910f1d61ddc11e2a8b522000a1cf597_7 by Brocamdan828, on Flickr
Had some parts that I picked up laying around, so I painted them black to get put on! Picked up 2 m5 air dams, and is trunk spoiler and 16x8 et23 style 5's all for $150 and a 6 pack of yeungling. Good deal to me!!
c14b5faef79611e18dfe22000a1cfdcd_7 by Brocamdan828, on Flickr
DId some more stuff, got new front rotors and pads on, and started to get bumper trim and bumper back on, also painted the chrome bumpers black.
f3f13c16ed2e11e1bfc622000a1cde39_7 by Brocamdan828, on Flickr
I got around to drilling holes into the valance to set up the mounting brackets for the airdam. Then I got the airdam mounted up and tucked the bumper in.
P1010856 by Brocamdan828, on Flickr
Then got the is trunk spoiler mounted, drilled some holes in the trunk and used trusty skateboard hardward to keep it nice and tight! Also painted the sunroof black but I didn't get a decent picture of that.
P1010875 by Brocamdan828, on Flickr
I got tires dismounted from the free wheels I got, and started to clean them up! They looked like freaking hell, but I think they cleaned up pretty well.
31cfecee24f211e28abf22000a1f9bf5_7 by Brocamdan828, on Flickr
Then the paint process, heres the finished product. Used Dupli-color wheel paint. Love the way it turned out!
a0df68f6261111e29ae122000a1f9a03_7 by Brocamdan828, on Flickr
I'm just waiting to get tires and 15mm spacers to get them mounted up!
Always love the look of the euro french style high beams... So I ordered the lamin-x film for the high beams. Then I also un-tucked the bumper. US. diving boards are cool...
P1010889 by Brocamdan828, on Flickr
Decided to get the foglights back on... Since they weren't the foglights for the m5 airdam, but the ones for the under bumper mount... I had to do some creative mounting. I'm cheap and don't want to pay for new foglights...
So I took the foglight apart, went to lowes and go 2 new bolts a half inch longer than the original ones pictures here...
P1010913 by Brocamdan828, on Flickr
Put the bolt in the light casing and on the back side I put the washer and I used a skateboard bushing to use a spacer so it would mount flush...
P1010921 by Brocamdan828, on Flickr
Had to drill more holes into my valance...
P1010934 by Brocamdan828, on Flickr
Put the bolt through and tightened the nut behind the valance... and here's how it looks!
P1010909 by Brocamdan828, on Flickr
I tried to get the other on, but after plugging the light in, it doesn't turn on. Saving that for another day!
And here is how the car sits today...
P1010931 by Brocamdan828, on Flickr
P1010928 by Brocamdan828, on Flickr
P1010925 by Brocamdan828, on Flickr
And my favorite shot of the car to this date...
P1010936 by Brocamdan828, on Flickr
Hope you like, would love to hear what you all think. I'll be adding more as I go along! Thanks for checking it out!


 Are you the one I was talking to on instagram about the extra one you had??


Comment