Announcement

Collapse
No announcement yet.

my kraut burner

Collapse
X
 
  • Filter
  • Time
  • Show
Clear All
new posts

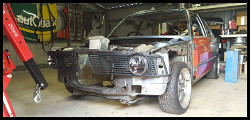
  • so hard brake lines and clutch line are all done, just need to flush them, and bolt all the lines up, then leak test it all.

    oh, also need to sort out a bracket for my reservoirs now too.

    lines arent perfectly straight, but ill maybe straighten them a bit more once everythings done up tight


    Comment


    • stole the special crimp pliers from work so i could do some wiring today.

      for now ive hooked up the reverse wires, starter wire and the alt wire into the top plug, and the oil pressure sender into the bottom plug. need to decide where im routing wires before i do the rest of the sensors.


      i hooked up a temp starter power wire, so i could kick it in the guts. started first go after the fuel pump primed up, gotta strip and clean the carbys though, somethings sticking and its overflowing fuel


      pulled the center console, speakers, and old radio wiring aswell.


      aaaand i swapped the overflow bottle over to the drivers side, now that theres no brake booster in the way. shortens the hose and empties the passenger side a bit more

      Comment


      • had the day off today, so i slacked off for the morning, then went out to do some more wiring.

        i changed my plan of attack a bit, and moved the oil pressure wires upto the top plug, then added oil temp and water temp wires. so now top plug is all gauges and starter/alt/reverse. bottom plug is now free for ecu only wires.

        as you can see, i also taped up the harness to the engine. will run the alternator wire when i get the new bracket installed


        and i found a few m4 allen head screws lying around so i test fit them, just need more now. theyre the perfect size.

        Comment


        • so this is where my fuel pump and filter used to sit, right in the warpath of the new diff output flange


          today i decided to move it to a safer place. didnt want to prime properly here, but the battery is quite flat. *just had a quick read, and i knew there was a certain way im not supposed to mount the pump, which is the way ive mounted it *facepalm*.

          looks like ill be flipping it the other way, and just change some of the fittings and extend the outlet hose

          The fuel pump should be mounted with the outlet above the inlet. This will help with eliminate vapor lock issues. Never located the pump so the outlet is below the inlet. Horizontal mounting will not effect fuel delievery performance


          Comment


          • whoring it up today, went and changed the pump setup. works fine now.

            Comment


            • got my alternator bracket from my mate today. test fit it when i got home, so far so good. i got one hole slightly off, but that can be fixed with some elongation, gotta drill another hole i couldnt get exact measurements for, and gotta get mate to remake a part that he/we/i/probably me stuffed up

              yeh, alternator wont quite bolt in there...


              so this is how it looks with the alt on(sans front bottom piece)


              and a few bolted up shots. i realised when i mocked up my first bracket, that one of the lower timing cover holes isnt tapped, so ill have to pull the crank pulley off and tap a thread.

              belt alignment looks good. real test will be starting it up


              have to machine up some spacers for these 2 bolts, and get some longer bolts


              its a shame it tucks away so much, i think itd look awesome from the front

              Comment


              • This is just fucking sweet!

                Comment


                • brake/clutch reservoir turned up today


                  and heres a little teaser of whats coming up for the e21

                  Comment


                  • so today i decided to play with the alternator bracket. drilled some more holes, lined up some stuff, lathed some things and ended up with this.


                    need to get front lower piece remade for more strength, longer belt and some shiney bolts, hook up charge wire, then alternator is done

                    Comment


                    • Awesome
                      Flickr

                      Projects :

                      1984 W123 300D (Sold)

                      1999 C43 AMG (no thread..yet)

                      Comment


                      • keep up the good work man

                        Comment


                        • so today i did a bit. wired up and tested the new alternator, well didnt hook up the charge light, but its a 1 wire alt, so doesnt need it, but it charges fine, just need to get a longer belt from work. my mate is remaking the front lower piece this week for me.

                          pulled my front and rear bumpers, and dropped the front guards back on with a couple bolts(was sick of seeing them on the roof)

                          then it got the better of me, ive been trying to work out a clean way to mount the brake fluid reservoir, but had to clear the throttle cable bolted to the firewall.

                          so i tacked on a bit of metal to the pedal inside the car and bolted the lokar cable through an original hole(not sure why it was there, just was :S)

                          adjusted the pedal stop a bit, and i have full travel. no billion linkages and swivelly bits now, just pedal>cable


                          now allows me to bolt straight to the firewall like so

                          Comment


                          • so these came today, isky springs, which are supposed to clear the early style valve stem seals. fun bit will be installing them, not sure if its a head off job


                            and so did this. bmw motorsport duck tail rear wing. threw it on for a quick test fit. have to fix the outer 2 mounting studs and clean the old glue off the bottom. not sure if i want to try painting it, its a really soft rubber/foam stuff


                            Comment


                            • did some more work on the rear wing today

                              note: measure a shitload, drill once...


                              wing cleaned of old tape and silicon, new tape applied


                              and new bolts welded to the 2 outer mounting points, which were snapped off when i got it

                              how the inner ones look


                              and the new outer ones


                              tomorrow ill finish a couple bits on the holes in the boot(mainly an extra hole for screwing the nut on the outer ones), throw some sikaflex on the wing and stick it down

                              Comment


                              • and its mounted.


                                random shot of both cars in the same shot(til e21 is on the road, then ill be getting a shoot of both of them out and about)

                                Comment

                                Working...
                                X