Announcement

Collapse
No announcement yet.

teamSPB Project DFN U - 4 SMD 18's 30kwrms, air ride etc etc

Collapse
X
 
  • Filter
  • Time
  • Show
Clear All
new posts

  • #16
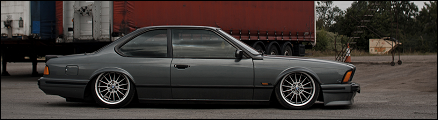
    Unfortunately there is no way to reduce camber...its an IRB on the back (Independant rear beam), so the wheels naturally camber in...to be honest, in person it looks spot on...

    [ame="http://www.youtube.com/watch?v=Qt-KPOm2VE0"]YouTube - teamSPB Project DFN U Air ride demo[/ame]

    [ame="http://www.youtube.com/watch?v=pEQmWCOIr54"]YouTube - teamSPB Project DFN U Air ride rear camber![/ame]

    [ame="http://www.youtube.com/watch?v=13hzuWcHoVY"]YouTube - teamSPB Project DFN U Air ride...how low!![/ame]

    Comment


    • #17
      haha nice that is really freaking low...I do agree that the rear needs some spacers but its fine as is

      Comment


      • #18
        I see what you mean watching the videos, their is little to no camber when you are at full height but the lower you get the more it appears?

        Comment


        • #19
          Yep...I WILL space the rears out slightly...however, one thing I must always keep ontop of my mind is the amount of weight in the vehicle...anything that will potentially endanger or increase risk of anything failing will not go on the vehicle...

          Once I start moving onto the audio of the build, you will see what I mean about weight LOL!

          Comment


          • #20
            Last few bits and bobs on the exterior....


            Bulb change


            Not really a fan of orange indicators...


            The lights were cut open, and then the orange filter broken and cut out...coupled with some silver bulbs


            This was the result


            MUCH better


            teamSPB

            Comment


            • #21
              After the air ride project...it was time to strip the vehicle down for some sound deadening....


              For some reason I have lost alot of pics of this stage, so will put up what I have...


              Right...what was used for sound deadening.....


              ALL the sides was done with 2 layers x 4mm Loudboys deadening + 2 layers x Second Skin Damp Pro + SS Overkill (just wanted to test the Overkill product out)


              The floor was done with 1 layer x 4mm Loudboys deadening + 1 layer x 18mm MDF


              The roof was done with 2-4 layers x 18mm MDF


              Any gaps were filled with fire retardant expanding foam


              Vehicle stripped


              2 layers of LD's deadening applied


              SS Damp Pro applied


              Other side was stripped and done to


              Both sides done...Note the Turbonetics T61 turbo sat there!


              Tailgate is also deadened fully...however, its now too heavy to stay up in the air so a pair of molgrips come in EXTREMELY handy LOL!


              Next up was to attack the floor...


              teamSPB

              Comment


              • #22
                Layer of 4mm deadening going down...


                This stuff was a great size for laying down on a large area...no cutting was needed at all thank the lord! LOL! It really is a bit of a pain to work with...but man does it stiffen up panels!!!


                Making MDF panels for the flooring


                Then bonded and glued into place


                There was then around 100-150kgs of weight added on top of the MDF to help adhere properly to the deadening below...


                Once this was cured (I allowed 3 days), I done a test...try to lift up the MDF from the corner with all my force...I did my back in LOL!!!!


                At this point, the next step was the Roof....


                It is REALLY weak, AND I had the added bonus of TWO sunroofs which is a pain in the ***!!!


                First off was to tackle the thin sheets of metal.....Welcome Mr Singh (Am) to help me with this bit...with the roof sanded down, it was time to cut some MDF and bond it to the roof...


                This piece was cut to cover the complete roof section (Well from driver seat back)


                Where the sunroofs are...LOADS and I mean LOADS of insulation was used to keep pressure applied to the glass...this was placed and glued onto the MDF


                This picture shows around half the amount used on the second sunroof


                On the outside, the glass has been sealed and bonded shut...seems to work a treat!


                teamSPB

                Comment


                • #23
                  The roof section was then raised....and PACKED....when I say packed...I mean around 8-10cans of expandy foam!! The roof is SOLID!...I got up on it and jumped...and took my weight no problem!


                  The front sunroof was also covered up and everything was FG'd together...


                  teamSPB

                  Comment


                  • #24
                    Lookin good mate, keep it up. bagged soccermumcars. <3

                    Comment


                    • #25
                      love this! looking forward 2 seeing more on the audio build up etc. its kool 2 c a totally different base car 2, awesome!!

                      Comment


                      • #26
                        +10 for the SPL build... I wanna see termlab numbers when shit is done, 155+ on music kthx
                        Last edited by Leftouch; 03-25-2011, 07:32 PM. Reason: drr didnt read

                        Comment


                        • #27
                          Are you going to space the rears? That would set it off. At least flush it I think that would be nice. Keep up the hard work man.
                          56' Big Back Glass Chevy
                          08' Audi S5

                          Comment


                          • #28
                            Cheers for the kind words guys...and im glad you dont mine seeing something a bit different from the norm!!

                            Left touch, I need to pull the arches slightly as when the vehicle is at driving height, its near enough in line with the arch...the camber on the back is only present when slammed all the way down which is something that cant be helped due to the independant rear beam setup...they will naturally camber in the low it goes (as you probably know)

                            It does 154db on music already - thats only running 4 amps at 1ohm each...soon we will have a pair of amps stapped showing each amp 0.5ohm (showing 1ohm strapped per pair of amps) and ramping up the voltage as high as we can...hopefully around 16-16.5v for booming and 16.9v for charging!

                            Comment


                            • #29
                              Right, time for an update on the box...


                              Box is made out of 25mm MDF...Initially, front is 3 layers sides and back are 2 layers


                              The box was built in 2 halves initially to help slide it into the Previa...then glued, and screwed together inside


                              Some pics


                              HAVE to say a HUGE HUGE HUGE thanks to Rohit for helping me with the box...helped me out BIG BIG time!


                              The box doesnt look very big here...But Rohit over well over 6ft tall!!!


                              And one next to a coke can lol


                              Bottom half in


                              Glued up ready for the top section


                              Et Voila!


                              Over run on the glue!


                              teamSPB

                              Comment


                              • #30


                                45deg bits were cut (Cheers Andy!)


                                Such a simple job...but so much messing around to getting the angles to meet up...where the 45deg angles from the floor meet the verticles!


                                FG'd in place


                                This bit was yet ANOTHER overkill...but I wanted to do it for piece of mind! Filling the gaps in the 45's with expandy foam


                                Then all the corners were smoothed over


                                teamSPB

                                Comment

                                Working...
                                X