 Tweet
Tweet
haha, mines a mix of oem brackets/hardware and a carbon fiber copy of the oem GT/LTW splitter. its fully adjustable like the original
-
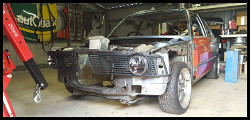
first real bit of damage to splitter, came into the driveway on wrong angle/bit too fast.

only broke because ive slowly been filing away the underside on cement since install in december 2012 :p both sides are much the same. will pull bumper off in a couple weeks and do some repair work, using the carbon fiber cloth and epoxy i have left over from airbox.

also broke the slide clip enough for bumper to sag. some of the previous hits had damaged the top section a bit, but last night finished it off. couple screws and a bit of flat plate fixes it.

Comment
-
Are you still running the Getrag box?
Also lol typical hilux driver, especially in this area.Comment
-
nah, the m3 runs a zf 5 spd, which is what mines got. ill switch out to a 6spd when i break it :pComment
-
Did you refresh the shifting bushings & pins while it was out? I'm considering doing mine, after 280,000 they're pretty rooted.Originally posted by hakhawk View PostComment
-
i didnt, i wish i had, as its a prick to get to in the car.
i "think" i did one of the seals at the back, not sure which one, if i even did. if anything, it would have been the output shaft seal.Comment
-
Got the intercooler brackets welded up today, and enjoyed the drive back through some country twisty roads

Mate sat on a wet seat, poor bastard looks like he wet himself

Comment
-
another shot of my mate doing his thing

seeing i went overkill with the thickness of the mounts, it gave him a nice challenge :p


now i just need to clean it up and give it a ghost coat of black so it blends in a bit, and do some trimming around the bonnet catch area and grilles, since its a bit tight there now.
and my catch can came in the other day, need to mount it and organise lines and fittings next.

Comment
-
center caps finally arrived. took bloody long enough :p

disassembled the original caps, and cleaned everything up while it was off

and on the car. need to wash the car before full shots

Comment
-
cant help but spanner on this thing, always something to play with :p
so this weekend is doing a few bits to prep for supercharger/fix small problems
first port of call, remove airbox, plenum, etc.

since the engine went in, ive had a problem with belt squeal. initially i put it down to too short a belt(which i did have) but when i replaced all the pulleys, it remained. i then noticed the power steering pulley/pump looked crooked, so i replaced that, no fix.
i remembered the oil filter housing had a couple small cracks where the pump bolted on, but it seemed to bolt up fine. turns out the whole mount is bent!!
i put a straight edge against the pulleys, and yep, thats a decent gap at the pump

so pull it off, and itll be destined for the scrap pile(after raiding parts from it). replacing it with another one i purchased a while ago, cleaned up and painted.

while im going, i test fit the new lower alternator bolt that will also hold the supercharger bracket. its 180mm long, which is friggin huge and doesnt fit without removing the radiator or engine mount
solution, notch the new filter housing, so i can drop it in place without removing anything. lets hope theres enough meat for it to hold up without cracking. ocne its bolted up, nothing will move, so i think it should be ok, but will inspect from time to time

bolted it back in place with a new oring/gasket. also replaced the tensioner pulley because it was shagged(cheers bent bracket!!)

and straight edge check after. much better. will be getting some more degreaser tomorrow, thought i had more than i did.

and thats it for tonight. tomorrow ill be attempting to replace the vanos accumulator, letting the nut soak overnight, as its tight! and i'll test fit charger and plenum.


Comment
-
im going to open with this pic, so you can choose to ignore the rest if you want :p

infact, you know what, thatll do for pics today.
everything bolts up, i need to reweld the outlet straight instead of on an angle, swap the drain fitting back out for a basic hose fitting because it hits the wheel arch. ive decided im going to run the intake under the charger instead of over, because it looks neater, and will be less work than having to mock up to test fit a mould for carbon intake.
new oil filter housing seems to work a treat, no more belt noise so far. new throttle cable is FRIGGIN AWESOME!! made a hell of a difference to throttle response.
i didnt do the vanos accumulator, couldnt crack the nut, and decided ill just buy a new steel line and do it when i do the vanos unit, as itll probably need cutting.Last edited by hakhawk; 06-08-2014, 02:58 AM.Comment
-
picked up next weekends mission today. cost me $56 plus some fuel. give it a good clean next weekend and put it in then, if not the weekend after. decent replacement for mine with a hole under the dead pedal, worn areas, and just general dirty.

Comment
-
Sick build buddy! Looks great
Comment
-
^cheers dude
waiting for parts, next mission is to get plenum ready for welding on mounts and moving hose points and such
then onto welding up cooler and intake piping

need one of these next

Comment
-
decent weather today(bar one little spurt of rain), so i decided to get this carpet in.
started off with a quick steamclean. didnt need much, but i thought hell, why not, its out of the car!!

after removing trims and seats, i pulled the old carpet out. wasnt shy in cutting things that made it difficult to remove :p i didnt bother removing the front center console, because the new carpet had been cut around it anyway.
might need to remove seats more often and vacuum underneath, damn it gets filthy!! most of its just dust and leaves from leaving windows open at work. maybe ill just leave them cracked from now on.

under the carpet wasnt too bad, i took the opportunity to run my stero wires under the oem covers

under the pedal had its share of dirt and rocks, but otherwise pretty good. there was some surface rust where i hadnt cleaned my left overs from making speaker hole bigger, so i cleaned it and rustkill'd it.


being a sedan carpet, i had to cut holes for the seatbelt bar, but that was like 2 minutes work. the rear carpet piece needs some foam transferred over, but thats ready to go tomorrow.

so tomorrow i clean up the seat rails, add the foam, find and install the new side trims i bought like 2 years ago, and reinstall everything else.Comment

Comment