If this is your first visit, be sure to
check out the FAQ by clicking the
link above. You may have to register
before you can post: click the register link above to proceed. To start viewing messages,
select the forum that you want to visit from the selection below.
wow, No doubt its awesome job. I also like photography but i am not good expert. I don't know what software you have used for it. Do you like to share something ??
Well, I went out last night for a try on light painting on my car. The spot was cool, but too much mud and cars passing by with their lights on... anyway i was not satisfied at all and stopped my test. That's why I did not light the roof for example.
So, why sharing? It's always good to see some examples, no?
Three shots:
- 1 for the background
- 1 for the front
- 1 for the side/wheels
So i have a quick question for the OP and some of the others that seem to have this down.
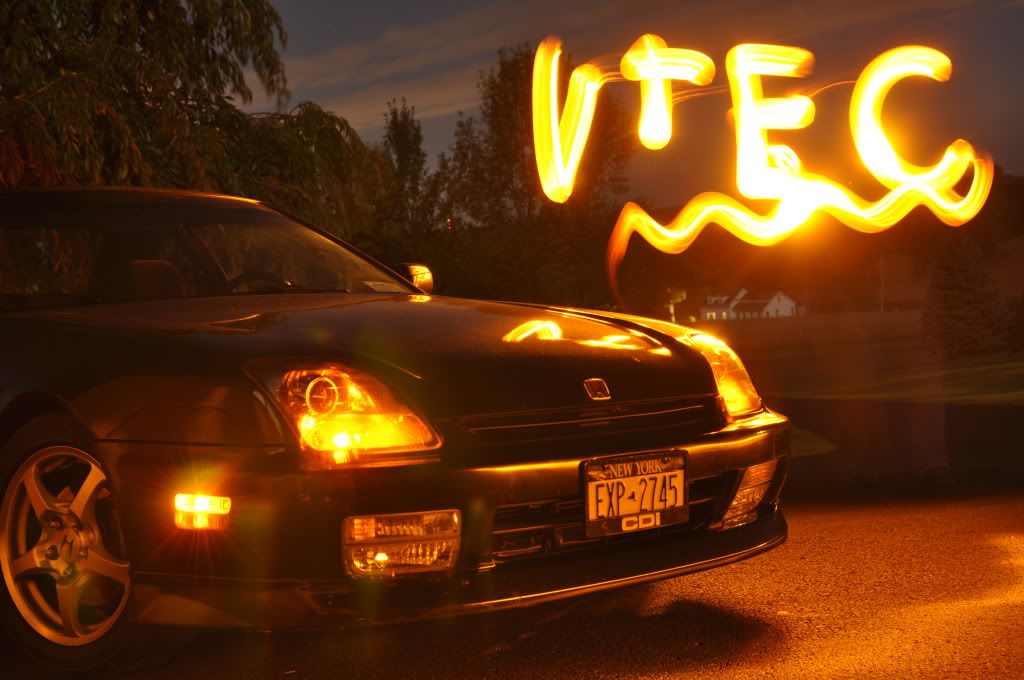
this was my first light painting shot shot of my old em1 , i forgot exactly what my light source was...I wanna say it was my old androids "flashlight" app or it might have been a Vivitar 285HV manually triggered into my DIY softbox. Think it was 3-4 images blended into 1 layer then painted in using the masking options, actually not at home right now on PS so i'm sure the term is wrong.
Either way I dont have any lighting equipment right now, but If i were to use a flashlight, something powerful enough though with a wide beam, id just go about this the same way correct? Something just seems weird about using a thin beam of light to light something up this way- the equipment Jake seems to be using seems ideal- I might try and pickup and LED light wand at a hardware store- have a shoot with a Black M6 coming up and wanted to do some light painting to accentuate the lines...plus...black cars suck.
Any advice for those of you using flashlights? Great thread btw. such a good method to bring out the lines of these vehicles.
^and yes I know I could have light up the front bumper, tires, top of the car, bottom of the side skirts, and the rear lower bumper area a bit better - hahah
forgot i had done this too- again...think it was with a speedlight popped off manually, then merged the shots into photoshop...again...some of the lines are messy and bottom could have been better- slowly learning from my mistakes.
Light painting is a great way to light a subject since the results can be really cool and you don't need a ton of gear to get the shot, but if you've ever grabbed your camera andled flashlights and set out to get a light painted shot you know that's it's not as easy as it sounds.
I've been using light painting for product photography for a couple years now but only recently have I started applying it to cars, so it's safe to say that I'm still learning but I feel as though I have enough knowledge to to share in the form of a small tutorial.
I also encourage you to use this thread to share your own light painted photos along with a little info as to how you shot and edited them.
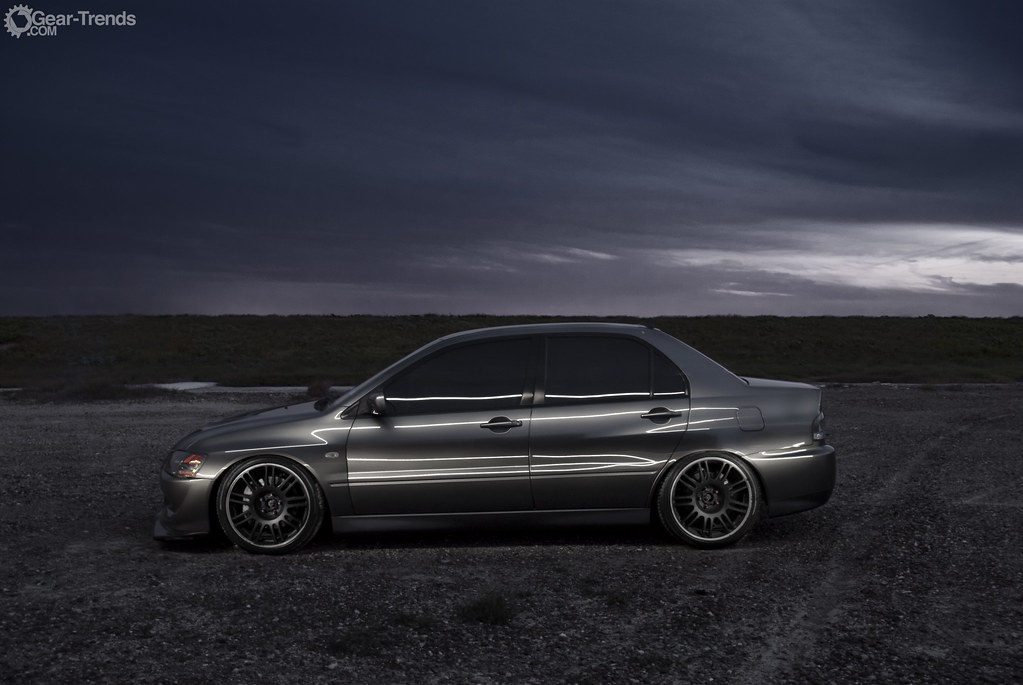
-You're going to need a dark location without a lot of ambient lighting, the best spots are dark areas with dimly lit backgrounds so you only have to worry about lighting your subject. (See the Jetta picture below for an example)
-You will of course need a bright handheld light to paint your subject, work lights with rows of leds work well as do wide beam flashlights.
-To get a decent shot you're going to need a decent tripod, something that will not move once it's set in place.
{If you do get a few small differences due to movement between exposures you can use Photoshop's "load files into stack" script (File>Scripts), just make sure you check the "Attempt to automatically align source images" box.}
-Be sure to set your white balance to match the color of your painting light, most cameras can set a custom white balance using a reference, usually a white card, but in this case you can use your light to paint a virtual white card a few feet in front of the lens.
-You will need to figure out how long of an exposure you can take at the location you've chosen, set up your shot and take a long exposure and see if there is any ambient light that will be interfering with your shot. If there is adjust the shutter speed until most or all of it stops showing up in your shot but keep in mind that whatever you set it to is how long you have to paint in during each shot.
-It helps to wear dark clothing so that you don't end up in the shot, also keep in mind that you don't want to be blocking the area your currently painting. You can avoid this by holding your light out to your side.
-Unless you want them in your shot be sure to watch out for light trails coming from your painting light when it's facing the camera or reflecting on your subject, the latter can be difficult and sometimes seemingly impossible to overcome but with a little practice and a lot of "chimping" you'll get it.
-Light as much as you can in each exposure to reduce the amount of blending you'll have to do in post but at the same time make sure you don't "nuke" or completely overexpose any areas.
-Make sure you have a lot of time to get the shot and it always helps to have a few friends with you if you're shooting in a not so safe part of town(which is where the best locations always seem to be : )
-I'm sure I've forgotten a few so if I remember any I'll be sure to add them.
The following photos where made using this light, but anything similar will work.
If you followed the tips above then you should be ready to shoot!
The Harley picture was made from three shots and the others were made up of anywhere from 7 to 20 shots each. I first take a long exposure of the scene without any light to get my "background" shot, then I take several exposures while focusing on lighting certain parts of the car, side bottom, side top, front top, front bottom, wheels, hood, roof, ground and nearby background elements. After each shot I check to make sure my painting light isn't leaving light trails or reflected light trails in the cars paint that would be too difficult to work around during processing. It's a lot of back and forth but it's better than getting home and finding out you have a giant light trail that completely messed up a shot. Sometimes if I have a friend with me I will ask them to stay by the camera and tell me how each shot came out.
I've found that the hardest part of most cars to light is the hood, a good spot to light it is from just above the rain tray, also after you shoot a few different cars you'll realize how much different paint jobs can change the way you have to paint. Light colored and flat or matte cars are cake, I freaking love em. On the other end dark and reflective cars are a huge pain, however when they're done right the resulting photos can be amazing!
So now that you're done shooting and you've packed up all your gear and walked the area to make sure you didn't leave anything behind( I learned that one the hard way :facepalm: ) you get to head home for the "not so fun" part.
In Photoshop I load all the layers and, if needed, align them using the "load files into stack" script, then I use layer masks to bring in just the areas I want from each layer. In the BMW shot I didn't change the blending mode and on the other shots I used a combination of "lighten" or "screen". I'm still trying to figure out which method works best for me but I have noticed that when using "lighten" you might get some faint borders along the newly lit areas and with "screen" you will be doubling up on any stray colors in the paint caused from ambient lighting during the shoot. You want to get a nicely exposed car with little to no light trails, easier said than done but you'll get the hang of it and develop your own techniques after doing a few.
After I'm happy with the blending I merge them all together and do a little cleanup with the "cloning" and "healing brush/patch" tools, I usually remove large rocks, cracks, painted lines or trash from the concrete as well as any sign/light poles or other background elements that might be too distracting. Then using a combination of the "brightness and contrast" and "levels" adjustments and some masking I try to smooth out the lighting and bring out or hide details in both the car and background. These are usually set to a "luminosity" blending mode so they don't interfere with the color.
Next I use "hue and saturation" and "color balance" adjustments to tone down distracting reflections and get the overall color I want for the shot, these are set to the "color" blending mode so they don't mess with the lighting of the shot. I can't give you exact numbers to use with these adjustments since every photo will be different so just take your time and play around with them until you start to get something that looks good.
Finally I'll add a little sharpening, save the PSD(in case I need to change something later on), flatten the image, and resize/watermark/save the photo. I then proceed to whore it out on forums, Reddit, and Facebook :P
Light painting is also a great way to get evenly exposed product shots and the best part is you can usually get away with a single shot if the item your shooting isn't too big which means less or no time spent editing. Here are a few that I've done.
These were shot with a small led flashlight similar to this one. Find an area to shoot where you can shut out all the lighting, I usually use my kitchen. Set you camera on your tripod and set up your shot with the lights on, once everything is ready cut the lights and paint away!
Custom aluminum shift knob:
N64 Controller:
(a green laser pointer was used in this shot)
As I said, I'm still learning myself but hopefully this thread will help bring about a better understanding of how these shots are done. Thanks for reading and don't forget to share your results!
-Jacob
Looks wonderful really wonderful. Not heard a lot about light painting but it really sounds very interesting. I will try to follow those steps and hope it turns out well for me
Light painting is also a great way to get evenly exposed product shots and the best part is you can usually get away with a single shot if the item your shooting isn't too big which means less or no time spent editing. Here are a few that I've done.
 Tweet
Tweet


") : )
: )


Comment