Announcement

Collapse
No announcement yet.

My Cosmo black E36 loon'

Collapse
X
 
  • Filter
  • Time
  • Show
Clear All
new posts

  • #16
    Got a nice set of Raceland coilovers on my Birthday. These are a bit Marmite across the internet, personally I love them and a friend bought me some 3mm spacers for the front and some 5mm spacers for the rear for a bit of Stance. When me and my friends fitted the coilovers we took the adjusters out of the rear and wound the front coilovers down to 14 threads from the bottom.


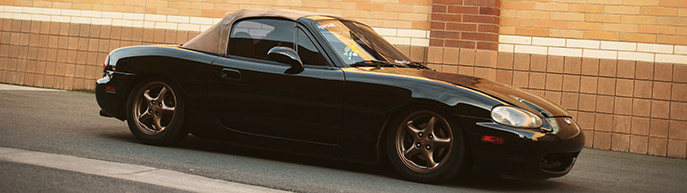
    Next on the list is some stretch tires, thinking 205/45/17 on the rear and 195/45/17 on the front. Anyway here are some recent pics from a photoshoot my friend done for me


    That's about it for now. Thanks for your time if you've read all of this. I've missed odd bits out here and there to save complete and utter boredom but I hope you've found my journey so far remotely interesting lol

    All comments, recommendations, suggestions welcome. I'll keep this up to date from now on. Next update should be my Stanceworks sticker

    Comment


    • #17
      Clean so far. I like the yellow lenses on the citylights. Definitely need some spacers front and rear...I like that you've got 8.5's all the way around as poopsed to the regular staggered Contours. Id's agree with the smaller tires...215's at least so you can wind the coils down. Is that an E46 steering wheel I see, or is that stock for euro E36's? Also:

      M3 Vaders
      M3 LTW corner splitters
      M3 rear bumper
      Maybe a rear wing delete?

      Looking great overall though....makes me want another E36.

      Comment


      • #18
        Originally posted by RobbDizzle View Post
        Clean so far. I like the yellow lenses on the citylights. Definitely need some spacers front and rear...I like that you've got 8.5's all the way around as poopsed to the regular staggered Contours. Id's agree with the smaller tires...215's at least so you can wind the coils down. Is that an E46 steering wheel I see, or is that stock for euro E36's? Also:

        M3 Vaders
        M3 LTW corner splitters
        M3 rear bumper
        Maybe a rear wing delete?

        Looking great overall though....makes me want another E36.
        Cheers fella, thanks for your input

        The steering wheel is stock over here form 1996 onwards

        The tires are 215's at the moment, dropping down to 205's rear and 195 fronts.

        I'm on the hunt for Vaders but they're quite a rarity in grey at a decent price.

        Corner splitters are a no because of our rubbish roads unfortunately, they wouldn't last 5 minutes and there's no way I'm raising the car

        Don't fancy the M3 rear bumper, its been done to death. I'm considering modding the standard bumper to conceal the exhaust instead for a cleaner rear end.

        I did have the spoiler off before now but I refitted it. In my opinion the Saloon needs a spolier but the Coupe doesn't.

        Matt

        Comment


        • #19
          Originally posted by matt752 View Post
          Cheers fella, thanks for your input

          The steering wheel is stock over here form 1996 onwards

          The tires are 215's at the moment, dropping down to 205's rear and 195 fronts.

          I'm on the hunt for Vaders but they're quite a rarity in grey at a decent price.

          Corner splitters are a no because of our rubbish roads unfortunately, they wouldn't last 5 minutes and there's no way I'm raising the car

          Don't fancy the M3 rear bumper, its been done to death. I'm considering modding the standard bumper to conceal the exhaust instead for a cleaner rear end.

          I did have the spoiler off before now but I refitted it. In my opinion the Saloon needs a spolier but the Coupe doesn't.

          Matt
          Definitely like the idea of a shaved exhaust cutout

          Comment


          • #20
            Morning all,

            Been a bit busy with the car this weekend. Stripped my interior, deep cleaned all my leather, painted my rear shelf, including seatbelt carrier, speaker covers and vent, black and painted my centre console and the underside of my dash black to breathe a bit of life into my formally dull grey interior. I removed the parts I wanted painted, gave them a good clean with G101 then left them to dry in the sun. I bought some durable Satin black paint from a local DIY store and set to work on freshening up my interior. I'm extremely pleased with the turn out, the match to the original parts is amazing and the interior feels cleaner.

            Parcel shelf out


            Most of the dash out


            Cleaned all the plastic up with G101 and let it dry in the sun


            Parcel shelf painted and ready to be refitted


            All painted and drying in the sun


            Parcel back in and looking fresh


            Dash board and console all back together
            Last edited by matt752; 06-07-2010, 05:19 PM.

            Comment


            • #21
              What a transformation - seriously nice work. Good to see another E36 owner this side of the pond doin things right!

              Comment


              • #22
                lookin good, the only thing i would suggest is to get some new wheels, they will really set your car off, rather than the standard m contours

                Comment


                • #23
                  Originally posted by Mark Ostrowski View Post
                  lookin good, the only thing i would suggest is to get some new wheels, they will really set your car off, rather than the standard m contours
                  Thanks, I'm planning to refurb my Contours again with a silver face and polished lip but I won't rule out a nice set of Hartge's

                  Originally posted by Whitbytom View Post
                  What a transformation - seriously nice work. Good to see another E36 owner this side of the pond doin things right!
                  Cheers fella, taken some time to bring her around but it's been worth it. Still got a list of things I want to do but nothing that needs doing, thats the great thing about the E36. Plus, I enjoy doing everything myself, makes a nice change from the day job lol

                  Comment


                  • #24
                    Afternoon all

                    Had a few PM's about the 18 button OBC install so I thought I'd throw up my install guide. Please excuse the rubbish picture quality, it was dark lol

                    I thought I'd offer a quick write up to those looking to install an 18 button OBC, it just takes a bit of time (roughly three hours), a bit of patience and concentration. I honestly believe anyone can do this as long as you take your time and pay attention. I was planning to install a 7 button but for the sake of an extra hour or twos work you might as well do the 18.

                    I used the following guides to assist me:


                    Before I started I printed out the written instructions and the pelican wiring plan. I used these to prepare the wires I was going to need on the OBC's black and white plugs and taped the unused wires out of the way to minimise confusion in the car. I also bought the required tools and accessories from Maplins as mentioned here:


                    First thing you have to do it remove the original Analog clock and the part of the dash below this with the cigarette lighter in. Then you need to remove your instrument cluster, this is quite a fiddly job to be honest, looking back I wish I had removed my steering wheel for easier access, but this isn't necessary. Once you have undone the torque screws that hold the instrument cluster in place you need to undo the three screws holding the lower part of the dash board in under the steering wheel, (theres one to the right of the steering wheel, one to the left of the steering wheel under a small screw cover and one under the dash by the clutch pedal) once these are undone you need to open the drivers door and pull the bit of dash toward you then down and slide it out.


                    Once this is off you can reach up under the dash board and push the instrument clusters out, I used a flat head screwdriver to prise the top part of my clusters as there were particuarly stiff, if you have to do this please be careful. Once the clusters are loose enough to get your hand round the back you have three plugs to release (facing the clusters there is small black one on the left, blue plug to the right of this and a white plug in the same postion as the blue one on the opposite side. To undo these you have to push a small release down and slide the holders down towards the floor of the car, once its unplugged carefully put the clusters out of the way along with the underside of the dash board, back seat works well.


                    You're now ready to begin the scary part. Take a deep breath and pay attention to the diagrams you printed out earlier. Starting with the top of Dan323ci's guide slowly work your way down the list. It might be good to have a quick cuppa and read through them again so you're sure you know what you're doing.

                    I noticed on my car that all the wires were the same colour as the ones I was cutting into to connect to the OBC, apparently this isn't the same for all models so do pay attention to the pin numbers on the plugs. In each corner of the plugs theres a number, 1, 13, 14, 26, this is pretty self explanatory but 1 - 13 is pins 1 - 13 and 14 - 26 is...thats right pins 14 - 26. You will probably find three of your pins on the blue plug need wires adding it. For this you will need the pins you bought from Maplins earlier to make the wires up, this is quite fiddly and if its 2c and late in the evening like it was when I was fitting my OBC be prepared to lose your rag. I suggest taking regular tea breaks.


                    Once you have been through the list you are practically there, I recommend double checking all your connections. Now you just need to plug your clusters back in, my blue plug was a bit stiff, then plug your OBC in and turn your ignition on. Hopefully you'll get a response from the OBC unit.


                    Your 'check control' will throw a hissy fit as you don't have it installed. Once you're happy everythings working as it should put everything back together and spend a few mins playing with your new toy and setting it up. All the functions should read 0 as you've not been anywhere but mine seemed to predict my Range imediately and judging by the fuel gauge I'd say it was pretty accurate.


                    I had already fitted my temp sensor at the weekend. This was a bit of a pain. The sensor goes in the side of the passenger brake duct, theres a handy earth for the temp sensor by the fuse box and an easy access point to the OBC through a hole in the bulk head under the battery. It might be easier to fit this by jacking the car up and removing the arch liner, I did it by removing the front fog light. You can also wire in the gong, if you have it, coolant temperature, washer fluid level and check control if you're feeling brave.


                    I hope this helps. Any quesitons, comments or corrections fire away or PM me.


                    Matt

                    Comment


                    • #25
                      Morning all, hope you're well.

                      So this weekend it occured to me that my car will fail an MOT with the yellow side and full beam lights (apparently cool isn't a good look for MOT's and tends to lean toward guanteed failure). So with this in mind I decided that, while it's not cold or raining, that now would be a good time to get my headlights back out and set about correcting the issue. First thing I did was remove my headlights, for those of you have done this you know it can be an absolute pig, for those of you who haven't please make sure you have a decent 8mm socket and a decent 8" (perhaps longer) extension for your socket as the bolts on the grill side are a PITA to get too without these.


                      I saw a car recently on StanceWorks with black headlights that looked awesome, I did contemplate this route but decided against it as everything else on my car is black and I didn't want to go down the route of smoked repeaters......again.

                      Once I got the headlights indoors and apart (very easy just 5 clips around the headlight unit need a little coaxing with a flat head screwdriver then the glass casing just pulls apart easily) I soaked the glass stain in nail varnish remover (thanks Andy/NWMLarge for the tip) and sure enough within half an hour the lot peeled off as a sheet, almost in one go

                      Before


                      After


                      Then I set about painting the lenses. The reason I did this is because I decided I really like the yellow look at the moment and with the lenses painted it means they can be easily removed and re fitted come MOT time, or removed totally if I decided I no longer want the yellow there.

                      First coat


                      The trick with doing the lenses is lots of light coats and patience. I got bored at one point and put a thick coat on which subsequently went a bit funny and is why, as you'll see in a bit, that the headlights are now slightly darker than the fog lights buts this is easily corrected by giving the fog lights another coat

                      Once I was happy with the finish and the lenses were touch dry I hair dryered them and put the lights back together then refitted them to the car. This is the end result


                      I'm a lot happier with the finish and knowing this can be reverted easily now for MOT and mind changes. For anyone wishing to do this it might be better to use a tinting film on the lense instead. I think a better finish could be achieved with film and you can probably get enough to do the fog's and headlight lenses in one go then touch any stone chips up on the fogs with some glass stain.

                      Comment


                      • #26
                        Matt!

                        Nice man, never seen the story of your car!

                        Might have to tap you up for advice in the future.
                        sigpic

                        Comment


                        • #27
                          Originally posted by dav3design View Post
                          Matt!

                          Nice man, never seen the story of your car!

                          Might have to tap you up for advice in the future.
                          Hello mate, thanks for your comment. Feel free to PM anytime

                          Comment


                          • #28
                            Originally posted by matt752 View Post
                            Hello mate, thanks for your comment. Feel free to PM anytime
                            Cheers man. Will do
                            sigpic

                            Comment


                            • #29
                              awesome build thread man! lovin the E36

                              flickrtm | nw-built | azntaiji multimedia

                              Comment


                              • #30
                                I`m loving your E36, looks so great, but in my opinion it would look better with another wheels, or at least another color for them. Keep up the good work.
                                Proud BMW E36 Owner.

                                Comment

                                Working...
                                X