Announcement

Collapse
No announcement yet.

106 Rallye x2

Collapse
X
 
  • Filter
  • Time
  • Show
Clear All
new posts

  • 106 Rallye x2

    I've been meaning to make a thread on here for a while, and have only just got around to it. So here's 3 years worth of progress on two old Peugeots.

    I bought the car like this a few of years ago.


    I done some general maintenance on it, changed the alternator and swapped back a few of the less tasteful mods to standard items.

    I swapped the standard engine mounts for some Vibratechnic mounts. Found some rust.


    Gave it a full service.


    I bought a Janspeed 421, caused no end of idling problems and major fitment issues.


    I bought a steering boss and this OMP Targa was chucked in for free, so stuck that on. Which I've since swapped for a dished OMP wheel.


    Pulled the dash and carpet out to sort some leaks, gave me a chance to wash the carpet off.


    As with standard procedure with French cars, fixed some more problems.


    Polished up the dirty Pugsport that came with the car.


    Bought these for the 'bay, still yet to weld in.


    Took it to French Car Show.


    Hit 200k.


    Got some B8s.


    Machined polished the whole car.


    Bought another engine and gearbox to rebuild, along with a non PAS rack and column.


    I then removed the inlet manifold, replaced all the gaskets and sensors.


    Bought some new OEM decals ready for a respray.


    Sent it up to the Beanie to do some welding and painting.


    Wetsanded and polished up the paint and wet sanded a nasty scratch on the outside.


    Lowered the axle slightly.


    Wet sanded the roof and polished it up.


    Bought a QEP race head and CatCam pulley.


    Then I got hold of Peugeot Planet out of curiosity, again being French had problems.


    Bought some of Tommys steering arms.


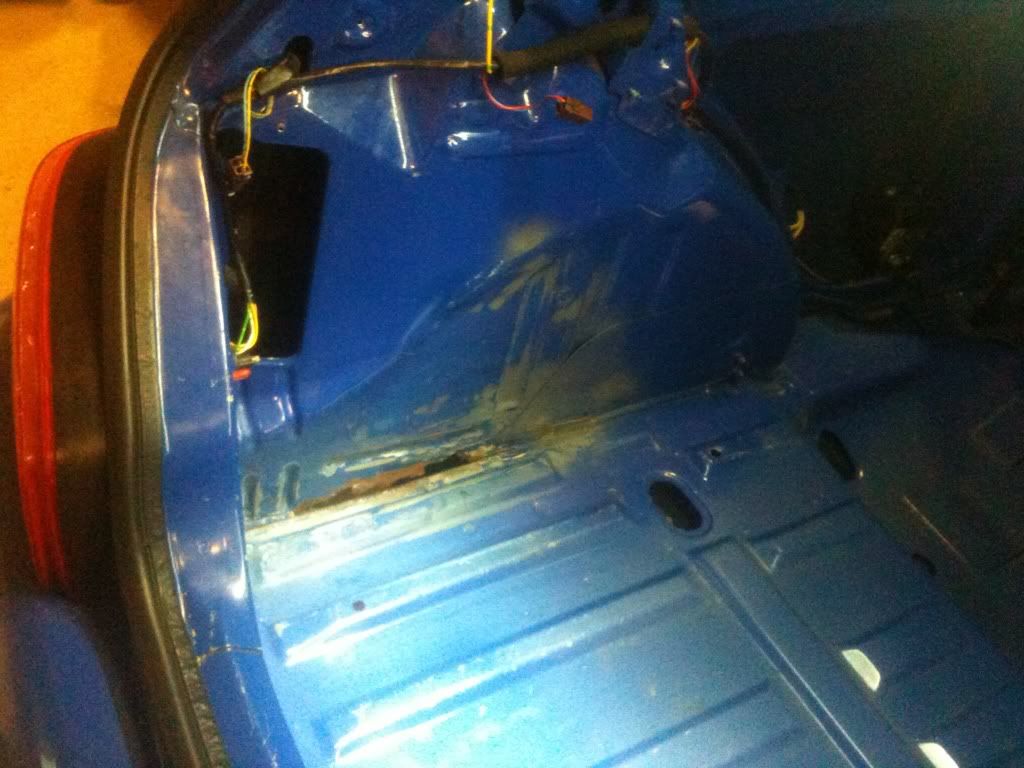
    Then the rear axle started to show signs of camber, so I bought an IM Axles refurbed axle and sorted some rust out under the boot floor, I also lowered the new axle but lowered it too much. So I'll be raising it up soon.


    Just before Christmas 2012, one of the linkages kept coming off the gearbox, so I took this chance to swap the linkages for rose jointed ones and change the clutch at the same time.


    Recently I've been sourcing parts for a new front suspension setup.


    I then had some of the parts hard anodised and powdercoated.


    I bought some 6" Faulkner 250lb springs and 3" 40lb Gaz helpers.


    I was intending on using my B8s as the dampers, but this happened when I took them off the car.


    Whilst this was happening I bought an OMP clutch and Compbrake quickshift.


    I ordered some PSF Tarmac dampers to put in my coilovers.


    Built the coilovers up and lowered it down. Excuse the dirt on the coilovers, I cleaned it off before being fitted.


    I then bought some 23mm torsion bars and painted them up.


    Then one became two!


  • #2


    The new Pug' donated it's engine to the old Pug'. The old engine gave up the ghost, head gasket went. Obviously whilst the engine was out of the old Pug', I gave it some loving. Took off a layer of structural grease and left the rust for show.


    I tided up some of the rust and put some black Hammerite over the clean metal.

    Engine went in with some back breaking labour.


    Pimping Various Parts - Brake Servo, Pedal Box & Wiper Motor

    Before


    After


    Brake Servo

    I started the pimping with the brake servo. I originally wanted to take it apart and have the casing powder coated, but after looking at it, I didn't have the right tools really. So for now I've settled with the standard bare metal, etch prime, high build and satin black. Came out really well, shame the casing was slightly pitted from the rust apart from that it's pretty mint.
    Before


    During


    After


    I just need to buy a 23mm MC and clean up the brake fluid reservoir, then it's ready to go.

    Pedal Box

    This is still a work in progress, I'm waiting on some bolts from the electroplaters. However, I stripped the whole pedal box and brake linkage system down so that I could have everything powdercoated, cleaned, plated, etc.

    Which looked like this


    After powdercoating


    I started reassembling it, however I need the bolts back from the 'platers in order to continue, so that's on hold 'till they get back.

    Wiper Motor

    Fiddled around with the wiper motor/linkages trying to make them look tidier.

    Stripped the motor off the linkages and took the cover off.


    I then decided that I wanted a better connector on the wiring. Took me a while to get the connector on, however got there in the end. Whilst the connector was off I tidied up the wiring with some heat shrink. I also fitted some nicer looking stainless bolts.


    Picked up the cover from the powdercoaters, along with some other parts.


    I put all the linkages back together and reattached the motor, looks nice and tidy now!


    I bought a roll cage. I was actually waiting around for a few months to have it fitted, which kind of happened but due to various reasons was never finished. Before I carry on this is where I got to with it.


    Whilst I sorting out the roll cage, I took some brackets and metal out that was no longer needed.


    As well as about 30 studs and lots of sound deadening...


    I also bought some nice seat rails to be welded in.


    I bought some Safety Devices harnesses to match the Safety Devices roll cage.


    After lots of searching online, I finally tracked down some rear PTS dampers.


    Gave the daily Pug a service, changed the alternator belt and tensioner, new windscreen and fixed some rattles.

    I sent some injectors away to be ultrasonically cleaned, and at the same time replaced the rocker cover gasket. I also took the time to clean and polish the oil baffle plate for extra OCD points.


    Car ticked over 222,222 miles. Of course I had to capture the moment.

    Comment


    • #3
      I spent a weekend just cleaning up some welds, tacking back paint and generally tidying up before it went for it's trip down to Carbonmotive for more welding.

      I had to get some clean metal for the seat rails and spreaders to be welded to.


      Whilst I was there, I also took out the center section. This causes not end of problems when fitting a cage and bucket seats in a 106. By removing this you gain valuable space to keep you central to the steering wheel. As you can see by the picture I got chisel and spot weld happy, I removed "some" good metal in the process. Nothing that can't be sorted though.


      Amongst all the small bits I was doing, I took these back to bare metal. A sign of things to come!


      I got a new boss! I bought a Spa quick release weld on boss and sent it off to a clever man in the Midlands who put it on my column for me.

      I also had the column and brackets powder coated for extra OCD points!


      On to the daily Pug'! For some time now I've known the gearbox has been on it's way out, it whined, it crunched and put up a fight to get in to some gears. So I decided to overhaul the gearbox and clutch system over Christmas.

      I started by fitting a low(er) mileage S2 Rallye gearbox from my other shell, I also fitted a new release bearing, clutch cable, roll pins in the selector arm and clutch fork, gearbox drive seal, driveshaft seals and new driveshafts. Whilst doing all this I fitted new top mounts and bearings as they were knocking quite badly.

      Unfortunately I didn't get any pictures during this process. I did however take a couple of pictures once I was finished, I was sharing a workshop with quite a large truck!


      Cleaned my steering wheel, which was well over due. The water was literally black after finishing, it's a lot nicer to driver with now!


      My daily Rallye finally gave up. It started drinking a lot of oil. This slowly progressed in to misfiring, and burning more oil. After running it a little more, I realised that death was imminent. So doing what any sensible person would do, I carried on driving to work work in it. It was a Friday evening and I was no more than 5 minutes from my house, and it spluttered, coughed and let out a massive cloud of smoke. It died.

      After getting it home, I looked at it that weekend and determined that stem valve seals are probably at fault. So realistically to get it back on the road, I would need to rebuild the head. So I was actually going to do, however that weekend I also got a message from a friend asking if I wanted to buy his car. So I did!

      Before that though, I'll backtrack and show you what I've been up to on the daily Rallye. Not a week before it started giving me grief, I had all of the interior out to clean up. I managed to borrow an awesome carpet cleaner, filled it up with Brisk and set to work.


      Apologies for the terrible photo quality, I really need to invest in a camera. Anyway I ended up cleaning my spare interior as well. I was really impressed how well they came up, highly recommend Brisk.

      Whilst I was there I done some of this.


      Whilst all this has been going on, I've been working on the fun Rallye. I've had no end of issues with the welding on this. Without going into specifics, I paid a company a reasonable amount of money for a terrible job. So it's going away (again) soon to be rectified by a more reputable company.

      Wanting to keep tinkering whilst it was away, I've been stripping the interior loom back and removing any harnesses that are no longer needed. I decided to buy some decent tools to help me remove pins and connectors, that way I can shrinkwrap the loom later down the line and probably fit some tasty motorsport connectors.


      I also bought some carbon door cards, they're not perfect so I'm considering having them re lacquered at some point.


      More recently when I had the car back in my possession I started stripping back all the seam sealer in the interior. It'll look a lot tidier without once it's all painted, and more importantly I'm saving precious weight haha.


      It's a super tedious job, but I'm glad I done it. Even now with just primer it looks a lot nicer.

      This brings me nicely onto my new car. Like I said earlier this was an impulse buy because it was soo cheap.

      Typical French car pose.


      It's a Renault Clio 182 FF. It was in a pretty bad state when I got it, no locking doors, tar all over the car, rear wheel bearings needed replacing, needed MOTing, the list goes on. So first things first, full detail.


      Engine bay came up nicely!


      Cleaned all the wheels, this was a horrible job. Bilberry wouldn't touch some of baked on dust. I resorted to Wonder Wheels in the end and it seemed to shift the majority of the dust.


      I ran the DA over it, brought some life back to the paint.


      The finished article.


      After detailing I fixed the majority of the issues, fixed the doors so that I could lock it. Replaced the rear discs/bearings, replaced all the tyres, wet sanded the headlights, fitted the exhaust properly.

      I decided the repaint the side and front badges. At some point they had seen a tin of Dulux in Battleship Grey, so I thought I would be able to scrap that off and save the chrome effect paint underneath. Unfortunately they had been keyed with an angle grinder, and so I decided to paint them satin black.


      I'll start with Pug' number 1. It has some serious rust on the underside and front arches. I was considering stripping it and scrapping it, but where's the fun in that. So instead I spent a weekend cutting out rust, at least until I ran out of cutting discs.


      Aside from that it looks quite nice on the outside.


      That brings me on to the other Pug'. So I had the cage welded in again (third time lucky), this time it actually fits nicely and sits a lot better to the shell. It was delivered back to my house last week and I promptly removed the cage to cover up any bare metal.


      Obligatory photo of the whole car.


      Finally we have the Clio. This has had quite a few problems in the last few weeks, so the list of things I fixed is something like this.

      Replaced the manifold to centre section exhaust bolts.


      Replaced the passenger window motor.


      Wetsanded the headlights to remove the 'fog'.


      Fixed the washer jet pumps and gave everything in the scuttle panel a clean up.


      Fixed the drivers side central locking; the terminals had corroded.


      Replaced the front disc and pads, they were pretty bad.


      Replaced the broken rear number plate light.


      Finally I replaced the climate control resistor, so that I could have some heat in the car for winter.


      Obligatory photo of the car.

      Comment


      • #4
        I've spent a few hours in the evenings taking back all the engine bay to bare metal, mainly to check for rust and also to achieve a better paint finish (when it eventually gets paint).

        I started with something like this.


        I won't bore you with lots of photos of this. So after a couple of hours I had something like this.


        Obviously still a fair way to go, but it's getting there. I also started on the drivers arch as I suspected some rust was lurking.


        Fortunately, I think I've been spared a lot more welding. Should be easy to sort this out down the line. Whilst I had the tools out, I also took a look at the passenger boot arch inside, for some reason it had underseal over it which starts the alarm bells; that said it looks like it's had some holes welded up, but nothing major.


        I've been showing my Clio some love over Christmas, that being a well overdue quick detail and new number plates.


        Something has bugged me about the Clio since I bought it; that being the rear wiper hanging down too much (as seen above). I suspected that the motor had some play in it and so it started to droop down. As a quick fix, I pulled the wiper off and pushed it back on to suit my tastes better.


        I removed the rear arches and side skirts. Anyone that's done this before knows how much this sucks.

        I managed to get it all off in the end, unfortunately I broke one of the attaching dowels so I'll have to sort that at some point.

        Here's what I started off with.


        Then what I eventually ended up with.


        I noticed on the passenger side that it's definitely been resprayed (badly) at some point. I think by this point, there's not many 106s left that haven't seen new paint.

        Motivated by the semi-successful removal of the arches, I decided to move onto the doors. They needed completely stripping down (removing glass, winders, locks, etc). This was actually a lot easier than I thought it would be. I had both sides within 45minutes.


        The observant of you will notice that some of the passenger door is gold.


        And after some poking, I found holes for GTI side strips.


        Filled with fibreglass.


        Eventually the only parts left on the doors were the door pin surrounds. I must of spent an hour trying to remove these, eventually I decided that I wasn't going to use the passenger door anyway, so I'll cut out the surround for that side.


        I've left the drivers side for the time being, if anyone knows how you're supposed to remove them, let me know!

        Whilst I was working on the doors, I got rid of the sound deadening; admittedly there's not much.


        I carried on with removing underseal from the arches and happily I've nearly finished one corner!


        Couldn't leave the Clio out, so I gave it a small service and by the looks of it, well over due.


        Whilst the inlet manifold was off, I gave it a quick wire brush, ready for when I detail the rest of the engine bay.


        I finally learnt how to remove those door pin surrounds. It's pretty easy when I realised how, shame I had already spent hours trying before hand.


        With that saga over I realised that before it actually goes to paint, I need to drill quite a few holes. So I started with Satchshift. Of course I bought the wrong size holesaw, so could only make one of the two holes I needed.


        Obviously the edges had to be deburred and sanded smooth!


        And here's where the other hole is eventually going to be.


        Not satisfied that I had ruined the shell enough, I took some paint stripper to it.


        I've got the majority of the paint off the drivers rear quarter and made good progress on the passenger side. With a few coats of paint stripper, it really seems to just fall off.

        So here's the current state of affairs.


        I've bought some 120 Grit sandpaper for my DA, which should take it back to bare metal fairly quickly. I Should be able to get that done over the next couple of weeks, then it'll be up to the body shop to get a perfect finish.

        I've also managed to finish fitting my Satchshift, really happy with the fitment on it.


        I need to drill a couple more holes for the linkage plate, but I have a plan to make it a little tidier, watch this space.


        I started to pull apart the layers


        Not sure how useful that first piece will be, as it's missing the majority of the panel. However I was really after the next piece.


        Just need to get the last couple of layers apart, then I can start mocking them up on my car to weld in.

        Found some metal to work from.


        Cut out the rough shape I needed.


        And after some tweaking and bending, I had this.


        Invigorated, I cracked on with the other side.

        Started out with a cardboard template.


        Traced it in steel.


        Now at this point I realised I had taken off too much metal when fettling it to size. With gaps like that, I wasn't sure it could be butt welded, at least easily.


        So I started again.


        Much better.


        Quite satisfying work looking back.

        Comment


        • #5
          I've been looking for these wheels since I started building my track 106, every time I've seen them come up, they're always in Ford fitment.


          For anyone wondering they're Speedline 2118s.

          Then I parked the Pug out of the way until I sort out the welding. It's pretty low at the moment.


          I've taken off pretty much all the paint on the outside of the shell now, it's an unforgiving task but once I found the best way to use the paint stripper it seemed to speed up the process.

          I also got my DA out and started to sand back the filler to the bare metal. I think the plan going forward, is to take the rest of panels back to bare metal, then etch primer the whole car. That said, I've read that etch primer absorbs water, so I might have to get some high build on top of that.

          So here we go, testing the DA on the top of the rear quarter.


          Paint stripper applied to the roof.


          After the first round of stripper on the other side.


          And the roof.


          And after the second round.


          Then the drivers door.


          If you've made it this far, congrats! That's pretty much where I am at the moment.

          Tom

          Comment


          • #6
            Frickin' sweet dude! I always loved 106 Rallyes, really wished that Peugeot had stuck around here in the States so that we could have had a shot at them.

            I was a bit concerned that you'd make a radical departure from the stark white rims that, IMO, gives the car a lot of it's character, but those Speedlines suit it to a tee.

            Clio's pretty choice as well, but I don't know as much about those. Regardless, really excited to see what you do with all three of them.
            sigpic

            Comment


            • #7
              respect saving those 2 rallye's i love them

              Comment

              Working...
              X