Announcement

Collapse
No announcement yet.

Rusty Slammington v2.0

Collapse
X
 
  • Filter
  • Time
  • Show
Clear All
new posts

  • #46
    Originally posted by M.Burroughs View Post
    What's a track day
    I think it involves sitting in your car while listening to Drake. Could be wrong.

    Good stuff so far Mike!
    Ol Dirty Bastard - RIP

    Photo by Alex Dooley
    2016 Ducati Scrambler, 2015 Subaru Impreza

    Comment


    • #47
      Originally posted by theseeker411 View Post
      I think it involves sitting in your car while listening to Drake. Could be wrong.

      Good stuff so far Mike!
      Well we wouldn't want that! I think Rusty's been through enough fire already...

      Sorry, that was bad

      Pic/Build Log: Here
      Instagram: tha_notorious_b

      Comment


      • #48
        I saw it at SEMA and... WOW just WOW. It's a work of art!!! Amazing, nothing less

        Comment


        • #49
          <3
          Floccinaucinihilipilification

          Comment


          • #50
            Making my popcorn now...

            Comment


            • #51
              Not even going to lie, this is probably the first time I've ventured into the non-classifieds sections of the SW forums in a few years but well worth it!


              Flickr

              Originally posted by Kielan
              Oh FUCK YES, 6-10 inches for me this weekend. FUCK YES!

              Comment


              • #52
                April 1, 2014

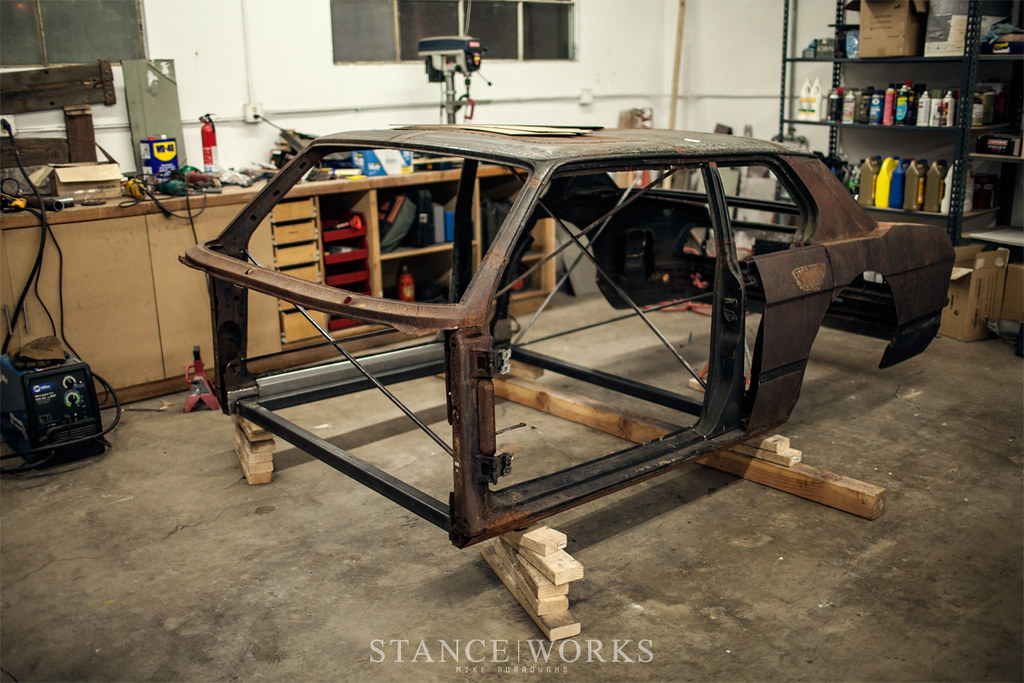
                Okay, so we have to rewind just a touch from my last photo, because there was a little bit of work to get there.

                As touched on in a previous post, we actually began building a chassis at Chuck's place, but upon arriving to CA, Byron and I made the decision that if we were going to entrench ourselves in such a big build, we may as well get to say we did all of it, not almost all of it. We cut out everything we had done in Tennessee, which was essentially the beginnings of a cage, floor, and main rails.


                If you look closely, you'll see that in Tennessee, Chuck and I had cut the rockers out of the car as part of the "skinning" process, and in turn, we put in a pair of square tubes to help hold the shape and create a new "rocker" for the car. You can also see a steel plate at the front and rear corners of the body, which is where the first chassis attached. We knew we wanted to keep some of this original stuff, so we began by cutting out anything that remained in the way. We also cleaned up the metal in preparation for welding down the road.


                As you can see, we were being very precise with our "chassis table" which was several stacks of 2x4s.

                We wanted to enclose the rocker panels, leaving the steel plates at each end accessible. It was our first experience using the sheet metal brake (I purchased a harbor freight unit, which is great for the hobbyist, but for anyone attempting a similar build, don't waste your time. Get a good finger brake to start with.)

                With that side note, its worth saying we learned an insane amount over the course of the next year and a half, ranging from tips and tricks to proper tools, methods, and more. If anyone has any questions I'd be happy to answer them, although I wouldn't suggest I'm a professional by any stretch, and I know there are some more-talented people on here.


                You can see our starting piece and then the finished idea, ready to install, above.


                Byron and I began to trim and fit the inner rocker caps. Look at those beautiful locks of his!


                tacked in!


                Both sides:


                There was a whole lot more to complete on the body, but we wanted to make some real, measurable process, so we moved on to beginning the chassis's foundation.
                Having helped Chuck build the initial chassis, I quickly learned that constructing the base out of round tube had its drawbacks, so this time around we opted for a square foundation.
                We measured out the dimensions of the cab, and then built out a square platform. Unfortunately, I didn't take photos of the build process, or I have since lost them.


                It wasn't an intricate piece to make, and was highly reminiscent of building the hot rod frame, so it was a good place to begin. From there, we simply shoved it into the body, and it was a perfect fit.


                We threw some welds on each corner to hold it all together. These welds would get cut out in the future as one of the final steps of building the car - we'd have to remove the body to paint everything.


                And that brings us back to this photo.. I promise I won't post it again.


                The main reasons for wanting a square tube base for the chassis was ease of building "up and out." Attaching tubes, bodywork, and subframes to something square is a lot more simple, and makes for an easier time attaching things like a floor.

                From there, we were ready for our first tubes!

                Comment


                • #53
                  This car is just - awesome. I would really like to see it on the track.

                  Comment


                  • #54
                    Thank you everyone for all of the kind words so far! I'm really excited to get this whole thread put together over the next few weeks/months.

                    As for all of the track comments, don't worry, I built it to drive, and it will see track time.

                    Comment


                    • #55
                      To say I am excited to see a new build thread come about Mike would be an understatement. Wish i was over there with you guys working on this thing. Spectacular so far from what Ive seen
                      sigpic
                      1990 Nissan fairlady Z32 - long term build
                      1982 euro porsche 930 turbo

                      "A less- assuming enthusiast probably wouldnt even think that this Z ran because of how naked the engine compartment was. The motor looks as if it just floats there, with nothing else in sight." Super Street 9/2012

                      http://www.stanceworks.com/forums/sh...ad.php?t=19185

                      Comment


                      • #56
                        Just wow man, I'm too excited to see all the proccess. Congrats Mike.


                        Build thread?

                        Comment


                        • #57
                          I'm frantically digging through folders, there's like a month of progress I can't find

                          Comment


                          • #58
                            Really enjoyed watching this come together this past year. 8|

                            Comment


                            • #59
                              Well guys, I'm only like two days into this build thread and I've already managed to mess it up. I guess it's my fault for waiting a year and a half to do this, but I managed to lose about a month's worth of photos. I found a few cell-phone photos that help to bridge some major gaps, but overall, some really big parts of the beginning of the build are missing.

                              Sorry guys.

                              April 7, 2014

                              I had done a good bit of research on what rear end I wanted to use. I wanted to keep it independent, but using a BMW rear end either kept the cost prohibitively high (newer stuff, such as an E92) or was a bit antiquated and the track width was too small (E30, E28, E36, etc).

                              The final answer was using a 2003 Ford IRS, with some extensive modification. Out of the box, this rear end, which is from a Cobra originally, has some flaws, but some research pointed me in the right direction on how to maximize performance, and to get a very competitive-handling rear end out of it.


                              Essentially everything needs replacing, so I bought tubular control arms that adjust the geometry a good bit. Even still, they weren't quite what we needed, and further in the thread you'll see how we modified them to correct the camber curve.


                              Paired with replacing every bushing in the rear end, swapping to spherical bearings, as well as some differential shims and a few other touches, the rear end becomes a very good option, and fit what I wanted to accomplish while staying within a 26 year old's budget.

                              We rebuild the rear end and reassembled it:


                              From here, there are some photos missing. Look at the photos and you'll see that the original subframe has some serious "arms" hanging off of it in order to mount it to its original chassis. Those obviously weren't what we wanted, so we chopped off the rears (pictured int he next post). We fabbed up new mounts front and rear, meant to meet up to the chassis where we wanted it to, instead of building the chassis to fit the original mounts. So basically, ignore those big ugly arms for now.

                              Another upside to the rear end is the absolutely massive track width. If I remember right, it's somewhere around 62 inches. Knowing I wanted the wide body, but having somewhat shallow lips (at just 4 inches deep ) this worked out and helped to make sure everything was going to sit appropriately, as well as handle well versus a very narrow track width in the rear.


                              We slid the rear end under the car, and used some adjustable jack stands I made to help get everything in plane together, before tacking on some braces to hold it in place for future steps.

                              Here's where another big gap comes in to play, and I know it's one most of you were probably really looking forward to... creation of the main hoop, a-pillar bars, and rear bars for the chassis.


                              In this photo you can see the progress that was made: the main hoop, which is the "main hub" of the chassis, is in. and the a-pillar bars are tacked in to place, meeting with the front of the frame foundation. We slowly began lining things up, and from this photo, built "back" to support the rear end, fuel cell, and other bits.
                              Last edited by M.Burroughs; 11-12-2015, 01:05 PM.

                              Comment


                              • #60
                                Love it! Stuff you're doing reminds me of what my dad and I did to my truck! We did basically the same things with the suspension!

                                I can't believe you didn't have the shell sandblasted to kill the smell! It had to have stunk!
                                -Christian.

                                '91 318iS AW2/blk slow garage queen/build...
                                '02 ///M3 carbonschwartz 6MT daily beast
                                '37 Chevy pickup-garagequeen...

                                Comment

                                Working...
                                X