Awesome! Welcome to the Goat club.
My paint cracked on the edge during the rolling, but you can fill that in with some touch paint or buy some spray cans from http://www.automotivetouchup.com
We got a bit impatient and the fenders were already damaged so the cracking didn't bother me. With heat the paint didn't crack when I pulled them out.
The Yellow Jacket is the US paint code, the Aussie one is Yellow Devil paint code 59. I bought some aerosol cans to fix the cracking and damage from the tire rubbing at lock...but I haven't tried it out after the last drift event.
The Focal wheels I have are for a BMW, 18x9.75 +30 with 20mm spacers on the front, none on the rear. That is also with running 245/40/18 or 235/40/18 tires. As you will find, the GTO is annoying (angering?) for fitting large amounts of rubber and wide wheels. I'm maxed in the rear with the Focals and no spacers. I just rolled the (very thick) rear lip that was also cut back a bit. You can cut the inner lip with a grinding wheel for more fitment. I'd recommend choosing either rolling or cutting, not both since you'll get the chance of weird results and ripples. Rolling the front fenders is pretty easy, no need to pull the heck out of em like I did. I need that for the steering angle increase, not so much for just fitting the new wheels.
The 275s on 8.5 width wheels will probably rub since they will bulge over the edge. I know the guys on the GTO specific forums are super closed minded, but you might search some of their threads to see what the guys running wide tires did. IIRC most of them wouldn't go below +40 offset. You might run into issues with rubbing both on the front strut and fender since stock setup doesn't allow any adjustment for camber. I'm running around -4 degrees camber in the front and about -0.8 in the rear for a better contact patch.
So in summary...not sure how 18x8.5 +37s will fit with the stock suspension. I ran some 17x8 +40 Koseis for a very short time with 245/40/17s and stock struts and shocks. They would have rubbed on the fender lip in the rear without the cutting. Fronts were fine with no modifications. With the right tire selection you could probably run those BMW wheels, but you'll have better luck with coilovers since they'll naturally add more camber and are smaller.
-
Into it. And not just because I just picked up a Yellow Jacket 04 GTO M6...and I'm in DFW...
How bad did the paint crack? I need to fill out the wheel wells and fit some bigger rubber under mine before putting on coils. Thinking of doing some BMW wheels (18x8.5 ET 37mm with a 255/55 or a 275/40) and rolling the inner lip at least on the fenders to clear. Any advice on fitment for a daily driver? Seems like you have pulled apart most of your suspension.Leave a comment:
-
The project started out slow, but the car is really starting to come together now. Hope to street it more this Fall.
Dang, I never even thought of looking at that style spoiler. The BMW's lip curve would fit the GTO's lines more, just not sure if it would even fit tat all. I might have to photoshop it and see how it looks, I'm sure I can find a composite one on eBay after around what I got the S14 one for. Thanks for the suggestion.Originally posted by Jlyons617 View PostLeave a comment:
-
I like everything about it except the S-chassis trunk lip. Have you thought about using a E46 CSL trunk lip instead?Leave a comment:
-
An LS engine in a car designed for it that cost less than swapping it into another chassis? Preposterous!
Love the build, I remember drooling over Rhy's Millen's GTO back in the day. This kind of reminds me of it.Leave a comment:
-
holy sheet...totes amazing...i love everything about this. i need more!!!!Leave a comment:
-
Thanks guys!
About to get back into this project now that it isn't 100 degrees outside. No AC in summer sucks so I haven't been driving it much. Next drift event in about a month, if all goes well planning on starting the full custom cage process in November/December. Need to get the 3.90 gears I have laying around with a spool installed in my 3rd differential. Always evolving...Leave a comment:
-
September 2015
New aluminum radiator installed in under 1 hour. First drive in 3 months!

Leave a comment:
-
June 2015
The third round of Lone Star Drift TXSL + ProAm was epic.
[ame="http://www.youtube.com/watch?v=NXpWkBZSHJA"]Gonna Get Louder, Better - Chix's GTO Drifting Compilation - YouTube[/ame]

I would say we were about 10% prepared for this event. The plan was to meet up with a photographer of a popular automotive magazine the morning of the drift event. That meant waking up extra early after pushing it later into the night washing and loading the car on the trailer. I managed to get the new, wider wheels to fit only a few days before. The power steering rack was on it’s last leg…or gear. It popped, crunched, jumped and made all kinds of unhappy noises. I bought a remanufactured unit earlier in the week, but no time to swap it out with a full week of work and rain ever day.

After forgetting one of the wheel centercaps and having to turn around – we made it to Gulf Greyhound Park on Sunday in time to get the photoshoot done. Rick was a really cool guy and I look forward to seeing the final product in the magazine in the coming weeks!


I took some of my own photos before the drift carnage took it’s toll on the car. Which it did.


Despite being quite unprepared, the GTO did amazing. The new wheels gave me access to the angle I needed. The front fenders started self-rolling themselves while adjusting the the larger wheels and increased steering angle. I must say they do a great job!

The Kenda KR20s were consistent the whole event and provided grip all the way down to the end. I even did some drifting after the rain on the small track and didn’t spin once. The only issues I had with the new setup was the steering rack going over center and locking in the full lock position. The overcentering messed up more than a few of my runs, however it might be due to alignment issues. Next time around I hope to throw the car on the rack and get another true alignment. Like I said…about 10% prepared.Last edited by chixwithtrix; 09-30-2015, 11:29 AM.Leave a comment:
-
June 2015
GTOs are notorious for not having enough space for larger, lower offset wheels. Because of my Shane Whalley suspension arms and knuckles I needed lower offset in the front to clear the tie rods�as y�all probably saw in my suspension in motion video.

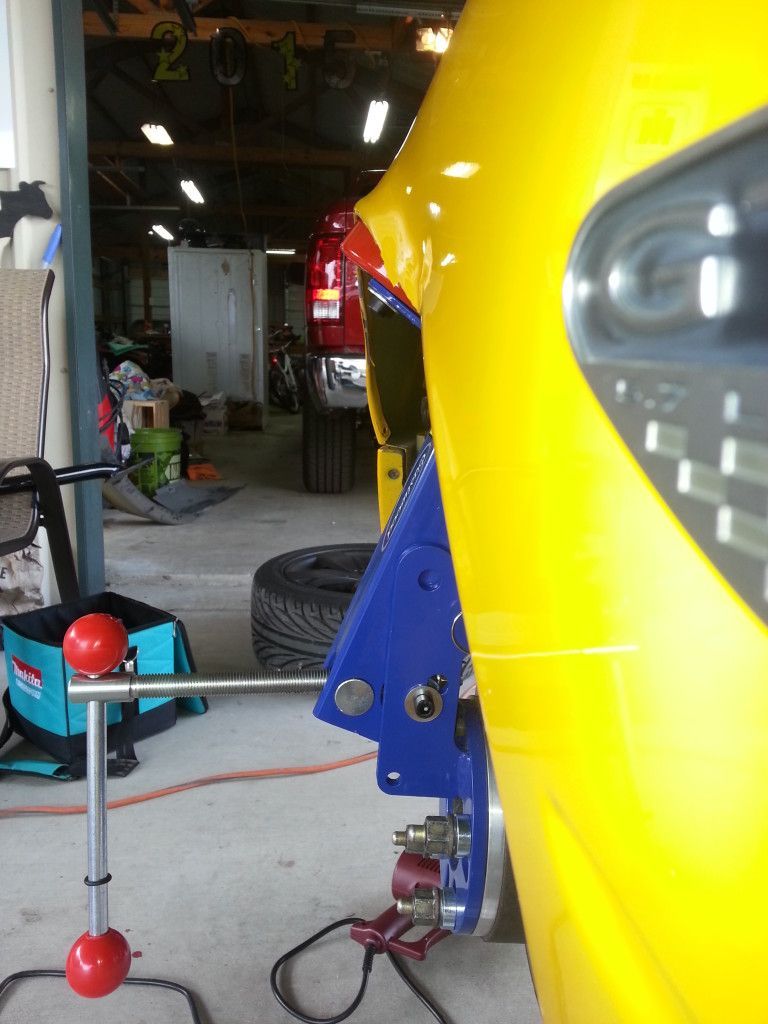
The front fenders required a roll and pull which was achieved with an Eastwood fender roller and a high temp heat gun. I did run into some paint cracking on the edge, but I have some color matched paint on the way to fix it right. The rear was already cut by the previous owner so I rolled back what little was left to make a bit more room for the wheel.
I decided to go with some BMW wheels � 18�9.5 +30 offset all the way around. I added 20mm spacers on the front for even more suspension clearance.


Leave a comment:
-
March 2015
We attended Round 2 of Lone Star Drift TXSL + ProAm event last Sunday April 27th. It was a helluva drive from Houston to Mineral Wells after a long work day on Saturday, but with a few thumbs up and many cameraphone pics from other motorists we trucked through the night.

We got up Sunday morning at the hotel and moseyed out to the track a few miles down the road at an abandoned helicopter area next to the airport. The weather was nice in the morning, but the sun came out and it got hot inside the car while in grid. Fortunately it clouded up around midday, sprinkled off and on, but the awful stormy weather mostly held off until after the event was over.


Pipsqueak performed phenomenally with the new Shane Whalley arms, fresh alignment, perfectly round steering wheel (stock one rotates off center), and Kenda tires on all four corners.

This was my first time to drive such a high speed/large track so I took it slow and entered late until I felt more comfortable with the track. After the competition finished up the practice drivers had only an hour left to drive. I so played harder, entered earlier, and saw 94mph on one of my entries. Dayum. I did have my moments of suck when I understeered and straight up plowed cones.

There was a significant improvement in my driving and the car’s handling. I think this GTO is on its way to becoming a nice drift car.
[ame="http://www.youtube.com/watch?v=6Az7u8nXGEg&feature=player_embedded"]GTO Drifting - R2 TXSL + ProAm Lone Star Drift in Mineral Wells - YouTube[/ame]
The only real carnage was to the front end – I mangled the passenger side fender on the first run. These new arms achieve some serious angle, never had this issue before. We borrowed a hammer and did a pretty good job of rolling the fender the rest of the way. I’m thinking flares are going to be a future mod.


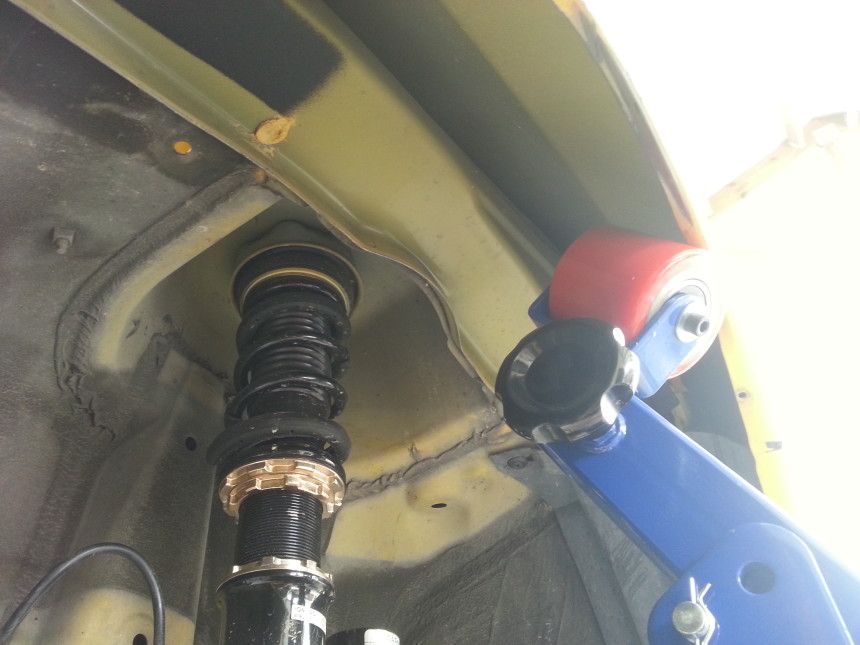
In other news I captured some awesome video of my front and rear suspension in action with some old GoPros. They both actually stayed on the car so no cameras were harmed!

[ame="http://www.youtube.com/watch?v=RFSRtW-l_Sg&feature=player_embedded"]GTO Front Suspension in Motion - YouTube[/ame]
[ame="http://www.youtube.com/watch?v=MfoISJ4mYcc&feature=player_embedded"]GTO Rear Suspension in Motion - YouTube[/ame]Last edited by chixwithtrix; 09-30-2015, 11:28 AM.Leave a comment:
-
April 2015
I just want to hug Pipsqueak after I beat on it a few weekends ago at the first Lone Star Drift event of the 2015 season. The GTO held together despite having issues with the newly installed welded differential and a lot of changes since the last drift event last year.
The welded differential made the car SO much different to drive and I spent most of Saturday trying to re-learn how the car needed to be driven. I had developed bad habits from the crappy stock limited slip differential that was on it’s last leg. The welded diff really helped the GTO step out sideways and transition smooth. And the Hotckis swaybars…wow, the car had none of the transition sway it had before.
I think my ‘Squeak is growing up and turning into a real drift car! I have a lot of work to do to improve my skills, but at least I have a new understanding of what mods the car needs to improve.
Oh and a big thank you to Canton Racing’s Accusump. The LS was on the rev limited a lot this weekend and no oiling hiccups!
[ame="http://www.youtube.com/watch?v=A8IYCTnDW9M"]Who Says a GTO Can't Drift? Chix's TXSL + ProAm R1 Lone Star Drift Compilation! - YouTube[/ame]


My custom, fully adjustable Shane Whalley front suspension arms came in a few weeks ago and I had a chance put them on yesterday. All I can say is wow, they made a bigger difference than I expected.
[ame="http://www.youtube.com/watch?v=24MQIzQEkBI&feature=gp-n-y&google_comment_id=z12wcncpry3dghc1x231h5pxhm24czmy g04"]GTO Adjustable Front Arms by Shane Whalley - Chix Garage Ep 07 - YouTube[/ame]
Not only are they works of art compared to the stock arms – they are functional and fully adjustable. This may not be ‘sick’ angle for a modified drift 240sx, but it is for a GTO compared to the appalling amount of minimal steering angle you get from the factory. The arms have more angle to give, my limiting factor now is the tie rods hitting the inner wheel lip. Shane achieved even more angle on his drift GTO.


The install was straightforward and required minimal modification to the front subframe. I, as usual, had the GoPro running for the install and will post the video once I finish editing it. The car still needs a serious alignment, but the swaybar endlink relocation was immediately noticeable when I was able to go from lock to lock with no binding from the BC endlinks. I drove the car home with the arms unaligned and I could still feel an improvement. Can’t wait to try it on the track. If you are looking to take your GTO to the next level definitely check out these arms from Shane.


Last weekend was a garage party installing fresh new parts on ‘Squeak.


We started off with the Whiteline rear camber bushings install. That was a pain in the ass because we could not find a bushing removal tool anywhere local. Instead, we ended up having to make our own out of some plumbing pipe and all-thread. After hours of drilling and wrestling with the rear outer control arm bushings, we got them removed and installed the Whiteline adjustable units.


Once the worst was over we buttoned up the rear subframe and started on the NRG quick release and steering wheel install. This was not only for aesthetics, but function as well. A removable wheel will allow me to get into the seat easier – especially with a helmet on. The stock GTO wheel also wobbled when I swapped from lock to lock since the mounting point was not centered. The NRG wheel will rotate in a perfect circle so that should allow me to handle it more accurately. Or that’s what I’ll convince myself it will do haha.


Finally we got the Rocket Bunny style rear spoiler ready to go by removing the old wing and previous owner’s wing mount. We cleaned the truck and applied close-enough colored vinyl over the unsightly old drill holes. The S14 240sx spoiler install was straight forward, but required some muscle to get it to form to the GTO’s body lines and be riveted. Too bad there isn’t a RB style duck-bill spoiler available for GTOs off the shelf…


Last-but-not least I plastidipped the rear wheels to match the rest of the black OEM wheels, did some camber and caster adjustments to the front arms with the addition of 20mm front wheel spacers and pressure washed the underbody.Last edited by chixwithtrix; 09-30-2015, 11:21 AM.Leave a comment:

Leave a comment: