Announcement

Collapse
No announcement yet.

Honda CB175 (Cafe Racer)

Collapse
X
 
  • Filter
  • Time
  • Show
Clear All
new posts

  • Honda CB175 (Cafe Racer)

    BOUGHT MY FIRST MOTORCYCLE LAST SUNDAY...

    1971 Honda CB175
    [IMG][/IMG]

    [IMG][/IMG]

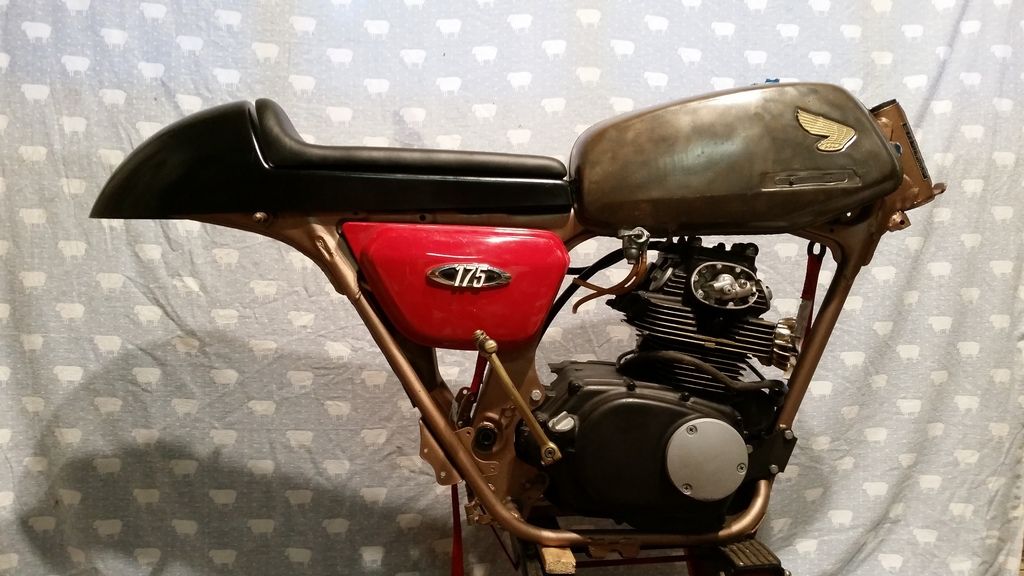
    Setting my unbelievably-almost no headway-possibly never finishing, BMW Kaido/boso project to the side, I picked up this craigslist find from a kid in conneticut. An old and dismantled Honda CB, halfway to being a cafe racer styled motorcycle. Its small 175cc (Technically 174) engine was lifted out with ease upon getting it home.

    [IMG][/IMG]

    I'm trying to have this project done before the summer is over so i can ride by the sea wall! The list of already ordered parts includes: Mini mechanical tach and speedo
    Rear tire and tube
    exhaust seals and half clips
    Velocity stacks (bell style)
    BMW "Rain" E36 M3 fabric...yay or nay?
    Here's the old 4 inch gauges

    [IMG][/IMG]

    And the JUMBLE of a wiring harness, i plan on cleaning it up... also stealing my fathers mini Harley headlight. This stock one is 6" diameter and massive housing. His is 4"
    [IMG][/IMG]

    Last but not least, the OE ehuast pipes with the rather large and unappealing trumpets sawz-alled off. Planning on welding my own!?
    [IMG][/IMG]

    Not a lot of bikes on this forum but I love it in comparison to any other, and thought this classic styled bike would fit in. The paint job in mind for this bike is matt black hardware/brackets/frame. White seat and tank+ triple tree, with honda's classic red and blue in small pin stripe.

    Thats all for now Folks!

    ______________

  • #2
    looks good mate, what are the plans for it all, engine wise and design wise. btw love café racers
    Passion Garage

    http://www.voomeran.jp

    Comment


    • #3
      Paint scheme is in the last sentence above^ and engine wise the big intake box is being swapped to Steel dragon performances's aluminum velocity stacks, the exhaust may also effect performance but thats about it for now. I would like to ride it ASAP. The winter may see some engine upgrades but being as small as it is idk how far i could really push it haha


      ______________

      Comment


      • #4
        oh yep didn't see it lol soz mate, yea sounds heaps mad dude!! looking forward to seeing this finished
        Passion Garage

        http://www.voomeran.jp

        Comment


        • #5
          I love it, I have a thing for CBs. This inspired me to make a thread for my superhawk <3
          Follow me on Instagram @ Promk1ng
          http://instagram.com/promk1ng

          Comment


          • #6
            interesting! I love a bike too! keep up the good work
            Ruining cars since 2006 yo

            Comment


            • #7
              Just figured id share progress from Sunday, othing accomplished today with work and the gym taking up the day.

              Engine Masked for Paint:
              [IMG] photo 20150719_142231_zpsfncmkkqt.jpg[/IMG]

              The "Paint booth" where i sprayed VHT Wrinkle Paint from autozone:
              [IMG] photo 20150719_144424_zpsksdvixhl.jpg[/IMG]

              Cam cover, wrinkle paint came out good here, began hand sanding the fin edges, planning on doing that to the cylinder head fins as well. Takes FOREVER.
              [IMG] photo 20150719_211730_zpsctou9cq5.jpg[/IMG]

              Also, painted oil cap, points covers and other side covers gloss white but have to sand and repaint because of dirt and imperfections. Anyone else shave heat fins for a polished look? Using 150 grit and a block, Dremmel grinder tip sucked...

              ______________

              Comment


              • #8
                That paint booth is by far the most hi-tec paint booth I have ever seen. This is awesome. I've always wanted to build a cafe racer. I'll be watching this
                I am a party pooper. I poop at parties.

                Comment


                • #9
                  I would like to ride it ASAP. The winter may see some engine upgrades but being as small as it is idk how far i could really push it haha
                  looks cool

                  Comment


                  • #10

                    alright alright alright
                    Follow me on Instagram @ Promk1ng
                    http://instagram.com/promk1ng

                    Comment


                    • #11
                      If you are going with stacks, don't forget to change out your jets (idle and main). The increase in airflow will lean out your carbs and you will not be able to get it going or it will bog/die at speed. Luckily you only have two carbs instead of four. Should be a little easier.

                      Here are my Steel Dragon stacks on my kz650:

                      Comment


                      • #12
                        Originally posted by promking View Post

                        alright alright alright
                        This was perfect, McConaughey is the man! News season of True Dectective is the biggest disappointment.
                        Originally posted by skurvybstard View Post
                        If you are going with stacks, don't forget to change out your jets (idle and main). The increase in airflow will lean out your carbs and you will not be able to get it going or it will bog/die at speed. Luckily you only have two carbs instead of four. Should be a little easier.

                        Here are my Steel Dragon stacks on my kz650:
                        Indeed I have read that, my dads worried that because of where we live that having open velocity stacks (even with the small screens) will not be a good thing but i had to have em! Can always buy cheap air cones. Wanted the classic style horns but the center support blocked the needed room . I did see one guy actually cut to fit his that was cool.

                        ______________

                        Comment


                        • #13
                          Well hello, did You think I and my thread here was dead?
                          THINK AGAIN MUCKA LUCKA'S!

                          sooooo beeen real busy with the new job and gettin back into the gym 6 days a week, but heres whats happened. Prepare for hectic uploading here:

                          PARTS PARTS PARTS PARTY (and paint)

                          Everything except the tank and seat will be MATTE BLACK. The tank/ seat will be white with red striping,.. the points/side covers/ exhaust fins are all white. also polishing engine fins...

                          Sandblasted this rear wheel, [IMG] photo 20150813_193543_zpsaxuklwfs.jpg[/IMG]

                          Then painted and mounted the tire..

                          Dirty valves, will be pelacing top end gaskets and cleaning cylinders/ valve job

                          [IMG][/IMG]

                          Frame: before [IMG][/IMG]
                          after [IMG] photo 20150809_145151_zpsfnphqkmh.jpg[/IMG]

                          Will be chopping front and rear fenders...here is the old rear with the HUGE brake light [IMG] photo 20150815_161605_zps74v7xaa0.jpg[/IMG]

                          PARTS:
                          clutch and brake levers
                          left switch housings
                          right switchhousings
                          4" Harley Davidson Headlight
                          Mini Tach
                          Mini Speedo
                          Cover screws
                          Steel Dragon stacks
                          Cone airfilters
                          exhaust ring gaskets
                          exhaust c insert thingys
                          Rear shocks
                          kickstand
                          swing arm pivot bolt
                          swing arm (Spare)
                          rear tire/ rim strip
                          sprocket cover
                          1" tube seat hoop
                          LED rear brake/turn signals
                          Mini front turn signals
                          top end gasket kit


                          [IMG] photo 20150822_194656_zpsjcgc6cju.jpg[/IMG]
                          [IMG] photo 20150815_161954_zpsams000xa.jpg[/IMG]

                          Attempting to cut away rear fender for a battery tray under the cafe seat
                          [IMG] photo 20150816_162757_zpsdv9ujuz2.jpg[/IMG]

                          HOW SHE SITS AS OF NOW:
                          [IMG] photo 20150816_153536_zpsvr4zrjxg.jpg[/IMG]

                          ______________

                          Comment


                          • #14
                            Its been awhile...and she still ain't done.But i will play catch up with my thread!

                            Slowly working on the engine it was dissasembled and gaskets were replaced parts cleaned and checked. One valve seemed to be bent... So i ordered a new one! ALL the rocker arms had the hardened steel worn down, although the cam shafts were okay to pass, the arms were not so, I ordered new ones! This all seems simple but really this is weeks at a time and lots of "well f**k me surely, would you look at that". however its been coming together and is close! [IMG][/IMG]

                            The seat has been my biggest struggle, first i welded in sheet to use as a base, eliminating my rear fender would allow dirt to fly into all sorts of places, so this fill plate prevents that.[IMG][/IMG]

                            Then i attempted a mock up of tail design because i Really want to fab one up..however this lead to lots of frustration. Go ahead and laugh at this picture.
                            [IMG][/IMG]

                            So i decided to go with the fiberglass one provided with the parts i was given. I made a battery holder box on the fill plate [IMG][/IMG]
                            [IMG][/IMG]
                            the shield sticking up from the fill plate helps to fill the gap in height between the seat, the band of metal is for the LED third brake light to sit on...but alging the seat to the frame posed problems when the gas tank gasket was finally put on. the seat just sits to high, and I done like the way the upholstry attaches...by glue..or hinges. and the fact that my battery box didnt line up... SO i ordered steel sheet and im GOING IN on the fabrication! [IMG][/IMG]

                            I have dodged the long and ardous task of rebuilding these fine beauties:
                            [IMG][/IMG]
                            Thats a fine box 0' carbs and other..things..
                            Heres the nice new ones, with the filter/horn options ill swap between
                            [IMG][/IMG]

                            SO, I think thats the major stuff...heres how it sits now, thats the Harley davidson mini headlight on the front, still need to fab up a proper bracket for the gauges...
                            [IMG][/IMG]

                            Thats all for Now!
                            Last edited by FowlerE30; 11-18-2015, 09:57 PM.

                            ______________

                            Comment


                            • #15
                              Sat down last weekend with a sharpie and some cardboard and said "Im going to focus and work this out until i'm done. and I wont leave the garage any sooner". 6 hours later, I had some concept drawings, and 85% of a cardboard template for my seat pan done. After months of slacking and frustration as to approach.

                              Again, here was my first attempt, I wanted the seat pans hump to be simialr to the tank, in that it wasnt just a round lump but more squarish. But too much of a box shape would look cheaply done. it had to be smoothed. [IMG] photo 20150830_091335_zpsdyoyyw2p.jpg[/IMG]

                              So, I went back to pen and paper and just drew basic lines until i had what I liked, a hump similar to the tank in that it would be near the same height and shortest width, with straight lines, connecting points smoothed together.. Also, the biggest characteristic would be the seat actually coming too a point towards the lower back, it gives it a more aggressive feel. [IMG] photo 20151127_144631_zps0kirhkwh.jpg[/IMG]

                              Began measuring and creating templates until i had the seat pan and sides of the tank done. The profile is the most important thing to me. I ended up trimming back the point in order to give more comfort and less chance of getting speared in the ass. Laying fabric down and rounding it would also create problems. Also, a small hump in the middle brings the seat pan together with the tank and covers the tank mounting gasket. I plan to use longer bolts there to also secure the seat. [IMG] photo 20151128_172156_zpsl3hr9a51.jpg[/IMG]
                              [IMG] photo 20151128_172224_zpsw8aaiejg.jpg[/IMG]

                              Fast Forward to Yesterday, a cramped and dirty garage...
                              [IMG] photo 20151205_131112_zps5siezkb6.jpg[/IMG]
                              [IMG] photo 20151205_131147_zpssdux349a.jpg[/IMG]

                              Removed excess tray/fender that had been previously put on. [IMG] photo 20151205_131524_zpska8z9dzj.jpg[/IMG]

                              Trouble laying top of the hump and rear seat leads me to making a shutter out of strips. [IMG] photo 20151205_133602_zpsqleelac7.jpg[/IMG]

                              [IMG] photo 20151205_140334_zpskkwsffxz.jpg[/IMG]

                              [IMG] photo 20151205_140345_zpsyuvcftcn.jpg[/IMG]

                              [IMG] photo 20151205_140542_zpsvyyhfe3g.jpg[/IMG]

                              In this last picture you can see that the crest/peak of the seat comes to a flat line, its just like a wave crest. I do plan to round his, so its not just an awkward looking pinch. You can now sigh in relief. Began cutting metal, will return to it today after breakfast. Next up will be tacking together the pieces, checking fitment and then bringing it to the shop for body-filler and primer!

                              ______________

                              Comment

                              Working...
                              X