Announcement

Collapse
No announcement yet.

Lucile Killer 302i

Collapse
X
 
  • Filter
  • Time
  • Show
Clear All
new posts

  • Lucile Killer 302i

    Disclaimer: This build was actually started June 2013. Slow, I know. I copied the posts below from a different forum. Since starting the build I have decided to go the full cage drift route.


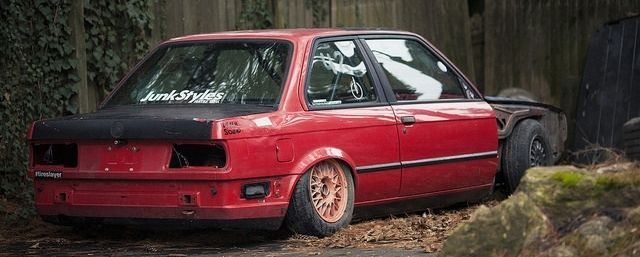
    So, I am creating this thread in case anyone is interested in the work I am doing, and as a way to keep track of it all. With that said the car is a 1988 325 that I picked up in December of 2011. This is the SETA model. The car came on H&R springs and stock wheels. The first thing I did was change all four shocks to Bilstien Sports and bought TR 15" wheels and new tires. I then did the I swap, 2-into-1 exhaust, poly control arm bushings, new control arms and changed the diff from 2.93 to 3.73. I enjoyed a summer of driving and a couple autocross events, but I wanted more power. I thought turbo, but did not want to spend the money to do it right. Then I saw e30v8 mounts, and with my father giving me most of the ford parts this is definitely a budget build.


    Removed and sold the engine and transmission.


    ---------- Post added at 12:28 AM ---------- Previous post was at 12:17 AM ----------

    I found a good deal on an engine. It was a running engine, but I am going to rebuild it before putting it in the car.


    Before I go any further with the engine, I want to have the car ready. I decided to start at the back. This means poly subframe bushings, rear trailing arm bushings, toe and camber adjustment tabs, fuel cell and fuel gauge. While removing the rear subframe I found frozen park brake cables and worn axle boots. So I will be ordering new ones. The subframe did eventually come out.


    But not quite all of it!


    The last thing I did tonight was remove the RTAB's. I used a 36mm socket a c-clamp and a little heat.

  • #2
    Well I had a little time so I removed the fuel tank tonight.


    Here is a picture of the expansion system for the tank. I had no idea this was on the car. It is behind a plastic cover.

    The lines that run from this tank to the fuel tank go through a tube in the car and then back out again. I found that rust had started where that tube goes into the wheel well. I think I will cut the tube back and have a patch panel welded in the trunk.

    Comment


    • #3
      I decided to patch the hole myself. I do not have a welder. I cleaned out all the rust and cut a patch panel. I then covered the backside of the panel with urethane, and riveted it to the body. I then covered the edges in urethane and finished it off with spray on plasti-dip.


      My friend Paul welded my camber and toe plates onto the subframe for me. He owns a shop in West Mansfield. He is a fabricator who specializes in foreign vintage motorcycles and cars. If you are interested his shop is called Paul's Place and you can e-mail him at scorchedtrumpet@gmail.com


      Here is the painted subframe ready to go.


      Installed RTAB's


      ---------- Post added at 12:17 AM ---------- Previous post was at 12:07 AM ----------

      Just need axles and then it will be time to go back up.


      It kind of sucked taking my brand new bushings over to the grinding wheel, but they had to be shaved back for the new adjustment bolt.


      I also got my old park brake cables free and installed the new ones.


      The fuel cell is in place. The only thing left to do is run the feed line and the wires for the gauge.


      I am not sure how filling the tank is going to be. I may need to add to the filler neck, but I would like to keep it tucked back there if it is not too much of a pain.

      Comment


      • #4
        I replaced the boots on both axles. I was able to remove just the inner knuckle and slide the outer boot all the way down the axle.


        My Dad was in town so he helped me out.


        Fresh grease, new boots, ready to go!


        I got the rear subframe back in. I put it back on the wheels so I could turn it around, and start working on the front.


        My dad also helped me start the wiring. I think we found all of the wires I need in the BMW harness. I think I will only end up using 8-12 wires from the engine room harness.


        I pulled the seats and gauge cluster to start installing my gauges.


        Next was the carpet. It was more of a pain than I thought it would be. In order to pull the carpet whole, I would have to remove the heater core and I think most of the dash. I decided to just cut the carpet. I cut so when reinstalled you should not see any cut lines. If I do anything more to this car after the engine swap, there will be no carpet anyway.


        Looks like I have another hole to patch. Nice! I think water must have sat there, because as you can see the rest of the floor is clean.


        I also took my OBC out. I am not sure how much of it would work with this new engine, and I decided that is were my fuel gauge will go. I am not sure if I am going to try to make a face plate out of metal or buy a plastic one.


        Comment


        • #5
          Got the block ready to go to the machine shop. It is going to get hot tanked, bored 30 over, honed, and cam bearings installed.


          I picked up a set of forged flat top pistons. They are 30 over and fly cut for the larger valves.


          I cut the rust out of the floor tonight. Now I just need to get some metal to put back in it.


          I also made my fuel gauge plate. Just need to drill the hole and paint it black.

          Comment


          • #6
            Quick update: not much work going on. I have been working on my beater/drift car. It's debut is Sunday at Columbus motor speedway. If you stop out say hi. It is a black 87 325 and I have never drifted before so I should be easy to find.:clapclap:

            I got the engine back from the machine shop so now it is 30 over. I sprayed it with white lithium, as I am not sure when it will go back together.


            I also got this today. It is the trick flow stage one split profile cam.

            Comment


            • #7
              Wow it has been a minute. I haven't given up on the E30. A couple of things have gotten in the way. I did a couple drift events last summer and then sold that car.

              Then in November 2013 I bought an 85 Volvo 240 and did a bunch of work to it. It is my current daily driver. Here is the build thread:
              Post your build threads here! Keep us updated on what you're doing in your garage.


              I also took some time and rebuilt my trailer, so I look good hauling my junk around.


              My wife and I also raced BMX bikes this year starting in February. That has been a blast.

              Anyway, Monday I cleaned out the garage and am ready to get back to work on the car.

              Small update tonight: I added the rack spacers to the E36 rack. Need more angle for those parking lot maneuvers. :happy175:


              Hope to have the rack in this weekend and have the car off jack stands. I also have decided that the car is getting a cage and no interior. So if you know of anyone looking for a good interior send them this way.

              Comment


              • #8
                I added this block off plate to the rack. I had it on the original E30 rack. Once I have the engine in I will get some lines made and take this off.


                To install the E36 rack the steering shaft needs to be shortened, and it is about the thickness of the guibo. As you can see I decided to remove the guibo. I thought I could just bolt the two halves together (like it is now), but that puts the joints out of phase and makes a stiff spot in the steering. My friend is making me a steel plate about 3mm thick to take the place of the guibo and line up the joints. I temporarily put the steering together, so tomorrow I can push the car out side and organize the garage. Once I get that plate I will tighten everything down.

                Comment


                • #9
                  I finally got some metal. I found a place in Akron (that is where I was for thanksgiving) called Service Steel. I went there Friday, but they said they are open most Saturdays as well. It was a great place, I wish they were closer. Hopefully this pile will turn into a patch for my floor, a vice stand, and a tubing bender stand.


                  I made a rough template for the patch.


                  I also started tearing down the front end. I think I am going to cut it off and build a removable bash bar set up that will still hold the factory bumper. This will help with engine install, allow me to mount my radiator where I want, and most importantly give me practice with the bender and welder. Oh and further delay this car ever driving again.:emotlol_2:

                  Comment


                  • #10
                    Ok if you made it this far, we are all caught up. Hopefully it wont be another month before I have an update.

                    Comment


                    • #11
                      One heck of a build, great job sir!

                      Renato
                      Team TWM Performance
                      TWMPerformance.com | TWMShiftKnobs.com | GodSaveTheManuals.com
                      sigpic

                      Comment


                      • #12
                        Not much done to the car, but I did get out in the garage today. I got to play with my new saw. It is an evolution rage 3. It cold cuts steel very well especially for the price. Check them out.


                        I made this plate for my vise.


                        Then made this portable stand.


                        Here is the plate my friend made for the steering shaft. Turned out nice. I need to get it put on.


                        I did test fit my new wheels. I know why does the car need new wheels when it doesn't have an engine? The wheels are 17x9 et25. The rear has 11mm of clearance and the fronts are contacting the strut. I am thinking of running 20mm spacers all around. I know this will require fender modification, but will it be enough clearance up front? The spacers will put the wheels at et5. Thoughts?


                        Comment


                        • #13
                          20mm will be plenty of spacing, and fenders shouldn't need more than a roll or pull to fit the wheels, depending on tire sizing.

                          Looking good so far.

                          E30 V8 Build thread

                          Go here be happy!

                          Instagram: stuartrussell

                          Store: alwaysindividual.bigcartel.com

                          Comment


                          • #14
                            Thanks. I think I will run 245/40/17.

                            Comment


                            • #15
                              wait I remember seeing that Volvo for sale. I think it sold to someone in Detroit? if I'm not mistaken. are you from MI? also rad build always wanted an e30.(still do)

                              Comment

                              Working...
                              X