 Tweet
Tweet
I love A4s, and I like where this is going
-
-
Hello again everyone. I appreciate all the positive comments.
I'll start with a picture of my Bug since Mr. BeetleGuy spotted it:


This poor car is so neglected. The battery died in it about 2 years ago and I haven't moved it since. Chances are I will probably sell it soon, but we will see.
So, progress has been slow... but steady. I spent some time tossing around how to mount the rear eLevel sensors and decided to go with a variation similar to what Accuair offers on their B8 kit. Since I had to ditch my rear sway bar, I liked the idea of using their mounts for something. Below is what I came up with:


Also, since I took 2mm off my wheels, they started to come into contact with my upper shock mount. Easy fix...busted out the grinder!

So, at this point all my suspension is DONE! Feels like I spent waaaaay too much time on something that is essentially bolt-in, but that's what I do best. Next I turned my attention towards the air management. Since I decided to hardline this using all AN fittings I went with Accuair's VU4 manifold with all NPT ports. This allows me to use my own fittings rather than their standard PTC fittings. However, it will be a little more of a wait before that shows up so I spent some time mounting my elevel ECU, relays and fuses. Originally everything was going to go on a bracket mounted in the spare tire well, but my creative juices started flowing and this is what I came up with:
The original concept. I decided to ditch the Stinger relays per Reno's suggestion at Accuair. Apparently they have been harmful to the ECU in the past, so I'd rather not play with fire:


I started with a cardboard filler piece (show above), then coated it with fiberglass resin on the front side...then some fiberglass mat on the back side for support.

All wired up along with a final install pic:


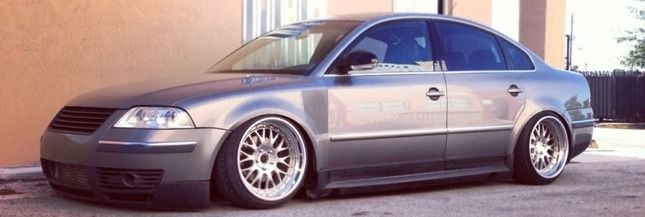
Tires still aren't in...it's killing me! So, I threw a front wheel on to get a visual of how low it will sit with my new side skirts and front end. Looking like I ought to be pretty close to the ground:

That's about it for now. Hopefully this weekend with be a productive one!Comment
-
This is simply incredible.Comment
-
hello mr bug, nice to meet youFloccinaucinihilipilification
Comment
-
Great attention to detail, nice work! Most people(myself included for the most part) would usually see cars like this and think it's simply bags and wheels. This tells a whole different story on the amount of work that goes into getting it just that little bit lower.
Your other 2 cars are/were nice too, love the Beetle!
Comment
-
All of my wow. Amazing.Comment
-
i cant wait to see the finished resultsComment
-
Dude this thing is so clean, really like the attention to details, and well the fact that you can mill your own shit.


"Never argue with an idiot; they'll drag you down to their level and beat you with experience"Comment
-
-
Loving the A4 so far. Do the B8's chew through their front control arm ball joints like B5's do or did they finally update with something that doesn't wear at such an accelerated rate? Seeing the level sensor bolted to the lower arm is what brought the arm issue to mind.
I/G: DeltaAlpha9Comment
-
Sweet build. I can't wait to see more.Comment
-
-
Hello everyone! Sorry for the lack of updates. With my limited free time, every minute has being consumed getting this car ready for Wuste. It's amazing how long the simplest takes can take, but that is what I have loved about this build...I never had a real deadline and I could really enjoy each detail and over think every step of the build.
Anyhow, last time I posted I was waiting on my tires. I went with Toyo Proxes T1 Sports in a 245/30ZR20 and I love them! They stretch beautifully on my 10" wide wheels and drive very smooth and quiet. Below are a few photos:


There were a few moments through this build that I would consider the highlights and getting the wheels on was certainly towards the top. There was always a certain amount of 'unknown' as to whether I would be able to tuck as much wheel with the tires on....and everything fit perfect! Clearance was ridiculously close, which is awesome! [ ]
]
Next on my list was to install my Accuair eLevel. Accuair suggest you mount their module outside the vehicle, but only gives about four feet of cable to accomplish that. I wanted my eLevel neatly (and symmetrically) placed behind my back bumper (new S4 rear bumper, btw), so the only way to achieve this was to tediously cut, solder, end extend each of the wires in the harness. Because I'm neurotic, I also bought color coded wiring to match the colors supplied in the Accuair harness.


My air management was going to be installed in a fashion visually similar to others, so I had to be sure to take extra steps with the details to set me apart from everyone else. My rack was all CNC cut from a design I drew in CAD. After I welded it together, I smoothed all my welds and did some minor body work prior to paint


Now is where the fun starts. One thing that I always disliked about the Accuair VU4 manifold is the asymmetry of the harness. From a business point of view, I would probably do the same as them....but I couldn't deal with it personally. The top of the VU4 manifold is nothing more than a printed circuit board with the dump coils soldered in place. I cut all the wiring off and carefully extended each valve coil wire so they could neatly (and symmetrically) exit from the bottom of the manifold. This allowed me the pleasure of cutting off the plug and drastically cleaning up the look of the valve block. Furthermore, since this block was special ordered from Accuair with NPT ports (rather than PTC) I installed my chromed fittings 3/8"NPT to male AN#6 with a 37 degree flare. I also tried something new (for me at least) and used all black anodized AN fittings from Earls with my hardline. These little guys required my lines to have a 37 degree flare using 3/8" seamless aluminum .049 lines. As you can see in the pictures below, I exited my return lines behind the manifold so I could hide my Accuair mufflers (which are also awesome! [] ).


With compressors, I decided to go with dial Viair 444c's. They are a little larger, but I prefer their tone since it is deeper and not as loud as the smaller compressors. To further quiet the compressors, I bought the Airlift compressor isolator kit. This allows you to install mini coils under the 'feet' of the compressor which they claim drastically reduces compressor noise. To stay true to my OCD, I drew up my own design rather than using the brackets that Airlift supplies. My design allowed me to run the isolators with a smaller foot print, give me a platform to run my wiring through, and also provide me a place to mount a (chromed) bulkhead fitting so I could hardline the compressor while still allowing the movement it needed (by running soft line under the compressor for flexibility). Lastly, I TIG welded in some new bungs so I could put the tank fill ports exactly where I wanted them and had my compressor filters painted for that little splash of color.


All the wiring was cleaned up and secured away for peace of mind and all my management junctions take place behind the rear seat bolster for easy access if anything were to happen in the future.


There were a few other installers out there they had done wooden floors in their cars (like @becausebags) and I wanted to incorporate that into my car build with my own special touches. I went to my local household flooring supplier and bought some 3/4" thick costal maple flooring in an 'ash' color. This particular flooring flipped between grey and brown, so I spent about an hour at the store and went through about 10 boxes to find the most 'grey' pieces they offered. The salesman there was so helpful and didn't mind me sorting through the boxes...so that was also awesome! [] I took my flooring, assembled it, glued it, and let it cure overnight. The next day, using a template, I cut my perfect shape using a router. For the extra flash, I installed a thin 1/8" thick aluminum around the perimeter of the wood to help separate it from my carpet...this ended up being one of my favorite details. 


Once I had my floor compete I was able to wrap up my hardline and get everything bolted down. Every bolt used was a chrome hex top with a nylon locking nut. Gotta love the details!


After I soldered my last wire, I plugged in my main 80 amp fuse and said a prayer. I extended all the wires on my iLevel, created my own wiring harness for the compressors, eLevel ecu, I hardwired my VU4 manifold and cut all my eLevel sensor wires to length...this was either going to be a glorious moment or a moment of pure defeat....and it all fired up perfect! The natural step (after I calibrated the eLevel) was to pull the car out of the garage and put it on the ground for the first time (don't mind the abomination of a Honda civic in the background). Awesome! []


And...fast forward a week...some picture of it at Wuste in Las Vegas where it was displayed as a feature vehicle


So...that almost completes phase 1 on this build. I have an exhaust going on it in the next week...then I'm going to enjoy it for a few months before I tear into it again for SEMA. After all, my family misses me I appreciate all the positive feed back and hope you guys enjoyed this build as much as I have.
Comment
-
I feel like a hack job compared to this
ig: @jonnie86Comment
-
I really like what you did with the reworking of the vu4 manifold. So clean. And of course the work you put into getting it this low. Well done man! I see you're in Az as well. Id love to see this thing someday.Comment


Comment