If this is your first visit, be sure to
check out the FAQ by clicking the
link above. You may have to register
before you can post: click the register link above to proceed. To start viewing messages,
select the forum that you want to visit from the selection below.
SOOOOOOOOOOOOOOOOOOOOOOOOO trunk ended up being finished up about a month ago and it came out way better then imagined, pictures dont do it justice especially the wood flooring, the piece in the middle is copper leafed and has started to tarnish more now that i put vinegar on it.>>NOW THY QUESTION IS keep the lines polished or let them tarnish?<<
after that we started to setup everything under the wood, looks a bit more cleaned up now since this pic, but when the tanks our on top you can tell that the floor lifts because the two pieces of wood under the tanks cover up the cuts in the wood . i wanted it to be were everything was hidden but if something fucks up i would be able to get to it quickly and without a problem. So i left extra line under the tank so i can lift up the tanks and have easy access.
in the mean time i got new tires.. kinda wore these ones out a tad.. hahaha
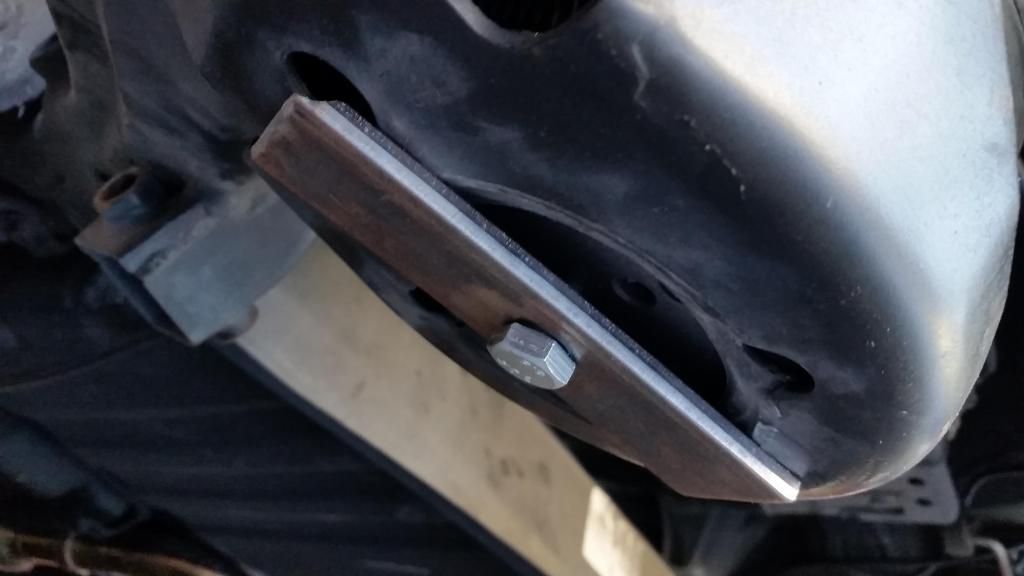
FINALLLY i was ready to actually start installing the airride, so started by shaving down the nipple on the bottom cup in the rear all the way down to let the bag sit flush to it, then shave the top nipple of the cup a bit to be able to let the bag go inside the cup. had to cut that little metal rod out and then cut a hole in the side of the universal cup to put a line through to the PTC. then to hold the bottom on just got a piece of steel from home depot cut it, drilled a hole and thread it under the bottom of the cup to hold the bag on from moving.
rear was done then bolted back up, now onto the front which was a bit more of a trouble maker started to put my air struts together and was wondering why my top hats jiggled so much come to find out i was missing washers from airlift and had to postpone a few days till they got here, then i got the bolts pressed into the top hats while i waited. Washers came in and i put them all back together, went to go put them on the car and the driver side slipped in at top with easy but the passanger side would only get two bolts in at top and the other was off about a quarter of an inch fuck me riight? so i ended up beating all three bolts inwards to make up for the difference of the one, which worked.
After that the damn struts bolts wouldnt go in and neither would the endlink bolts -.- so ended up boring out all the holes and finally it all went it. finally it was done. turned the system on and it filled all the way fixed the plethora of leaks the hardlines had andd DENNN compression dump fittings blew off put it back on, re filled again and it blew off again, so i ended up just using a ptc that connected both dump and plug the other hole with a screw for the time being, ghettooo so now my car is finally on air but its just sitting in my garage waiting for my wheels to get back from powder coating so i havent seen it airr out yet. pics will come when they are on
If you haven't done so already be sure to pull the bump stops out of your rear Megan shocks so you can get fully aired out. Or you can remove the lower shock mount and re-weld it to the side of the shock housing to preserve some of the travel.
i had them polished at first but i touched all the lines when tightening the fittings so now they are getting a nice green brown finish on them from the oils.
If you haven't done so already be sure to pull the bump stops out of your rear Megan shocks so you can get fully aired out. Or you can remove the lower shock mount and re-weld it to the side of the shock housing to preserve some of the travel.
Thanks man hopefully it comes all together with the wheels getting powdered. Your talking about those orange foam pieces the bump stops right? If thats what your talking about i had to remove it for the new cup to fit.
There's a spring bump stop in the cup, but there is another bump stop in the shock hidden under the accordion-shaped dust cover:
It's worth removing because if your shock can't compress completely then you won't be able to lay it down all the way in the rear.
There's a spring bump stop in the cup, but there is another bump stop in the shock hidden under the accordion-shaped dust cover:
It's worth removing because if your shock can't compress completely then you won't be able to lay it down all the way in the rear.
Oh i didnt even know there was a bumpstop under there, didnt bother to pull that cover all the way up an look. Ill give it a look today, i assume itll just be bounceyer?
It shouldn't decrease ride quality. The bumpstop is just there to prevent the shock from collapsing all the way if you go over a seriously large bump. But there really isn't much danger of that on these cars. A lot of static guys were having problems with their rear springs rattling and sounding loose because they were essentially riding on the rear shock bumpstops. Basically at super low heights the bumpstops prevent the rear suspension from compressing enough to keep adequate tension on the springs. A flaw in the design of Forte coilovers, but then again none of the off-the-shelf suspension kits for these cars are really designed to go super low anyway.
Comment