Announcement

Collapse
No announcement yet.

Medium Pimpin' - 1995 E300 diesel build

Collapse
X
 
  • Filter
  • Time
  • Show
Clear All
new posts

  • So, one of the things I get a kick out of among the Mercedes faithful is the way the W124 is fetishized as perhaps the most perfect car ever made. Now don't get me wrong, it's a totally awesome car, and the engineers at Mercedes did a simply amazing job putting the car together. There are a few design details, however, that have always left me puzzled. Just for your entertainment and to upset the purists, I put a little video together about some of the quirks of living with a W124:

    [ame="http://www.youtube.com/watch?v=trp6MlY8RGU"]http://www.youtube.com/watch?v=trp6MlY8RGU[/ame]


    Comment


    • That's way funnier than it should be hahaha.

      Gread video.

      𝔣𝔬𝔩𝔩𝔬𝔴 𝔪𝔢
      @𝔳𝔦𝔳𝔢_𝔪𝔢𝔪𝔬𝔯_𝔩𝔢𝔱𝔦

      Comment


      • ^ Merci. 'Twas fun to put it together. Of course, now that I've enshrined it in video, I've found like five other things that would have been worthy of inclusion.

        Some random crap

        So, some goodies arrived today. The seat covers I got from the Russian on eBay are in spectacular condition, good enough that I don't think any re-dye work is going to be necessary for the foreseeable future.

        Little creases on the seat bottom:


        A little rust stain where the seat back tucks against the bottom:


        A scratch on the inside seat back bolster:


        I think a good scrub with some leather cleaner ought to get most of the marks out, and in any case, they're 100x better than the disaster that's the driver's seat at present.

        A little box arrived from Bag Riders as well, with a gang of fittings:


        I also got completely fed up with the horrible condition of the leather on the steering wheel...


        ...so I ordered a new one, which should be here Monday. I'm thinking of sending the torn up one out to be recovered in black Alcantara.

        Welcome to pollen season, everyone:


        And finally, I MAED A THING:


        The plan for tomorrow and the weekend is to get all this crap installed, though some of that depends on whether I get carted off to Bend or Spokane or wherethefuckever to look at some janky BMW.

        As always, more soon!


        Comment


        • i looove the quirks in my 3 benzes. Some of them are the funniest to think about

          Comment


          • Good stuff! Funny video! My dad gets pissed at the defrost in my mom's e90 (e46 did it too) when the fan comes on full blast instantly (sounds like a jet engine!) on hitting the defrost button, thankfully you can turn it down...
            -Christian.

            '91 318iS AW2/blk slow garage queen/build...
            '02 ///M3 carbonschwartz 6MT daily beast
            '37 Chevy pickup-garagequeen...

            Comment


            • So, quiz time. I'm going to show you an image. See if you can tell me what's wrong.


              Can you see it?


              Have you spotted it yet?


              Yep. The head on my comp is cracked.

              The story is that the leader hose on my 444c was being a leaky POS, so I went to change it out with an SMC check valve and a piece of tubing. Barely even threaded it in, and all of a sudden all resistance went away. I can't help but think that stupid metal plug that intersects the port is at least partially responsible.

              Bag Riders has a replacement head for a reasonable price, but it claims to fit 380cs, 400cs, and 444cs, but the 444c appears to have a slightly different head. We'll see what Bag Riders has to say.

              I just love the idea of blowing another $35 and shipping making this compressor work the way it was supposed to out of the box

              In other news, I haz lots and lots of flow controls:


              Grawr.


              Comment


              • put one of these bad boys in the trunk, run it to a small junction box and BAM. Problem solved


                This is why I haven't even considered air for my car. Good coilovers are expensive, but at least they don't have 1000x more parts that can go wrong.

                I hope you get the compressor fixed and everything. Good luck man, they better not screw up with your next order.

                𝔣𝔬𝔩𝔩𝔬𝔴 𝔪𝔢
                @𝔳𝔦𝔳𝔢_𝔪𝔢𝔪𝔬𝔯_𝔩𝔢𝔱𝔦

                Comment


                • To be fair to Bag Riders, the last order was not their fault - apparently their supplier shorted them a bunch of fittings. It would have been nice to have a thing on their website saying they were out of stock, but whatever.


                  Comment


                  • Well, the new head for my 444C arrived a few days ago, and I swapped it out, being extremely careful attaching the new check valve to the new head. I'd hate to have cracked the new one.

                    While I was in there, I snapped a few photos of the disassembled 444C so you can all see what the inside of one of these compressors looks like.

                    Here's the compressor with the head and finned compression chamber removed, showing the piston:


                    Like a two-stroke, the compressor breathes through the crankcase, and the air is retained in the compression chamber by the flap check valve on the piston face. It's a simple system, it probably doesn't seal perfectly, but it's effective and inexpensive.

                    Here's the compression chamber housing, with the rubber ring that seals it to the upper check valve block:


                    Here's the upper check valve block, which you can't actually see from the outside of the compressor:


                    This is the ventral surface. One of the blind holes provides clearance for the check valve screw on the piston face, though the other blind hole is mysterious. If you're going to disassemble your compressor, be careful with this piece, as it can only go on one way. Get it wrong and the compressor will pump air into the wrong location on the head (which you'll see momentarily) or the screw on the piston face will foul on this block, probably bending shit.

                    Here's the dorsal surface, with the upper check valve visible:


                    In function, this is more like the head of a motor, with what we call the head being more like the exhaust manifold, but I digress.

                    And here's the underside of the old head:


                    For reasons I can't fully figure out, the underside of the head is divided into two chambers, one which compressed air flows into and connects to the leader hose, and one which is blind. At first I thought the other chamber might be used as some sort of air spring to assist the piston, but it's completely isolated from the compression chamber by the upper check valve block. Mysteries. This of course is why the position of the valve on the upper check valve block is critical on reassembly - get it wrong, and the valve will either be jammed shut by the wall between chambers, or it will vent into the wrong chamber.

                    And now, a few electronic goodies are on a glacially-slow boat from China - I've got a fun and overly-complicated project up my sleeve that you'll all get to see soon

                    EDIT: Can we un-censor the word hate around here? It's really fucking obnoxious.


                    Comment


                    • So, a sort of emergency update:

                      If you happen to be in the process of doing an install on a W124, do not use my bag measurements on page 7. I've discovered some rubbing in the front, and I'm working on making some adjustments this week. You'll need to kick the bag out at a 45º angle forward and toward the outside of the car in order to clear the fender well when compressed. It's a little weird, because the bag will rub hard on the strut when the car is lifted on a jack, but it's not an issue once the car is on the ground. I will have some updated measurements very soon!

                      More in a minute...


                      Comment


                      • So, aside from the aforementioned rubbing issues that are soon to be sorted out, I’ve noticed a minor issue with the air ride system that I simply did not anticipate. You see, some neighborhoods here in Portland have just absurdly high curbs, and I’ve noticed more than once that if I air out when parking, my lovely passenger can’t get her door open. Hmm.

                        There are a lot of ways of approaching a solution to this problem. I could have her get out first and then air down, of course. But, if it’s raining, she gets wet, and that’s not very cool. Worse, when getting back into the car, she’s got to wait for me to get in, start the car (which is a longer operation on a diesel than a gas-powered car), and air the car up before she can get in. That’s not very cool either. Plus, it kind of ruins the magic of air ride if it’s going to have to be a production every time I want to set the car on the ground.

                        I decided that the solution was going to be some sort of remote control for the air ride system, to allow me to air the car out as I’m walking away or air it back up to ride height before opening the door for my girl. Now, there are a couple of great off-the-shelf solutions for this that AccuAir themselves offer. The most obvious choice is e-Level Wireless which is a keychain remote that allows you to select any of your three presets from up to 200 feet away. Sounds great! But, I ultimately didn’t choose to go this direction. The reason is that, for what should be obvious reasons, the e-Level Wireless system has its own separate remote for air ride control. Now, since I’ve been wanting to add keyless to this car anyway (can you believe in 1995 a Mercedes didn’t come with keyless!? It wasn’t even an option in the US!), wouldn’t it be nice if I could avoid having to add a fourth remote to my already bulky keychain (yeah, that’s one for my house alarm, one for my Mitsubishi, one for the Mercedes’s keyless, and one MORE for air ride. Blech.)?

                        The other option is i-Level, which sets up a Wi-Fi network that allows control from a linked iPhone, presenting an interface that is pretty much identical to the e-Level touchpad controller. Since it is an app on my iPhone and apps don’t take up any additional physical space, this avoids the additional keychain remote issue completely. I may yet purchase this system, but it’s not the right solution here either. Aside from the hassle of digging out my phone, unlocking it, and loading up an app every time I want to adjust the suspension, I worry that the WiFi network it broadcasts will compete with my home WiFi when the car is parked, which might lead to flakiness with my phone syncing to my home server and so forth.

                        What I wanted was a single, simple RF remote that controls both my door locks and my air ride. Is that too much to ask? I don’t think so. But it’s going to require some creativity to get there.

                        You’d think with only four channels to control (lock, unlock, air down, air up) that we could find some universal keyless entry or remote relay control system on eBay that would work and simply hack it to work, but there are problems with this approach. You see, aside from the fact that the vast majority of cheap 4-channel keyless systems have simply hideous remotes, the air ride control actually requires a bit of logic to make sure that the AccuAir control unit is powered on for a couple of seconds before sending a control signal, then left on for a few seconds while the suspension adjusts. For any off-the-shelf keyless system, that was going to require some logic with timers and such, which was going to be complicated, inflexible, and fiddly.

                        This is a task that’s actually much easier to do with a small inexpensive microprocessor to handle the tasks of making sure the right signals are sent at the right times, since instead of adjusting timers with capacitors or timer relays, I can just change a couple variables in my code. If this smells like it’s going to start getting more complicated than it ought to be, then you’re absolutely right .

                        Enter the Arduino Uno R3 microcontroller:


                        (all photos shamelessly stolen from their vendors' websites and/or Amazon)

                        For those unfamiliar, this is an Italian-made microcontroller with a 16 MHz processor, 32 KB of flash storage, 2 KB of RAM, and a variety of both digital and analog inputs that allow it to interact with its environment and a large number of expansion boards. To give you an idea of this thing’s processing power, it’s basically 10x as fast as the processor in an original Nintendo, with about half the storage capacity. It’s WAY more power than we need. Arduinos are programmed in C++ with the addition of a library called Wiring which makes interfacing with the board’s inputs and outputs basically painless. The code is very straightforward and easy to learn, even if your a putz like me whose last programming experience was writing a Pong clone in Pascal back in 1999. No joke, I called it “PONG 2000” (yep, I was pretty fuckin’ creative) and it crashed every time either player won the game.

                        Microcontroller in hand, I still needed a remote of some description and an expansion board to allow the Arduino to see the remote’s inputs. Luckily, I found a simple and inexpensive 315 MHz RF receiver:


                        … and its associated remote. And it’s not completely hideous! Boring maybe, but certainly not as atrocious as some of the stuff on eBay:


                        I immediately divorced the remote from that stupid little clippy thing. The remote receiver is extremely simple in operation: four pins (D0 through D3) are individually associated with a single button on the remote, and output a 5V signal the Arduino can read when its associated button is depressed. Really simple, really straightforward.

                        Arduinos run ideally on between 7V and 12V, and beyond 12V, their voltage regulators become unstable. We need the onboard voltage regulator to supply a clean 5V to the remote receiver. Since the car’s alternator supplies 13.6V when running, we need to step the voltage down. To do so, I snagged a simple voltage transformer that will step the 13.6V the car puts out when running down to a healthy 9V:


                        Incidentally, the one I received says SMAKN on it, which is kind of hilarious.

                        To do all the electrical switching we’re going to need to do, we need to control a bank of relays. But, Arduinos are limited in the amount of power they can output. Each output can theoretically output 40mA at 5V, but it’s best to keep them around 20mA. Unfortunately, a standard 40A relay requires more like 100–300mA to switch, which will burn out the microcontroller. Since we’re switching a DC load, the relay also has to be electrically isolated from the controller, otherwise an induced load on the relay coil could burn up the Arduino. To solve this problem, I acquired an 8-channel relay board, which uses transformers to augment the Arduino’s limited power output, and has a bank of optoisolators to decouple the relays’ coils from the Arduino:


                        I also acquired a bunch of other little accessories, like some jumper wires to connect everybody together, a 40A relay, and an ABS plastic box to house everything, all of which you’ll see soon.

                        Does this seem unnecessarily complicated and fussy? Good. Because it is. But it’s playing with electronics and programming, and that is by definition fun. Plus, how many people can say they built their own keyless entry system out of chips and relays and shit?

                        Stay tuned for part 2: programming!


                        Comment


                        • Woah, that's pretty badass.

                          Arduinos are pretty popular with people who build show cars because you can program ridiculous light displays for their cars.

                          𝔣𝔬𝔩𝔩𝔬𝔴 𝔪𝔢
                          @𝔳𝔦𝔳𝔢_𝔪𝔢𝔪𝔬𝔯_𝔩𝔢𝔱𝔦

                          Comment


                          • Originally posted by rice4life View Post
                            Woah, that's pretty badass.

                            Arduinos are pretty popular with people who build show cars because you can program ridiculous light displays for their cars.
                            Yeah, Arduinos are pretty damn sweet. There are some cool tricks you can do to index enormous arrays of LEDs to do very impressive lighting displays and so forth, like you mention. It's pretty amazing the traction they've gotten in the market and just how many accessory boards there are for just about any function you can imagine. 1000 points to them for making them so easy to program as well.

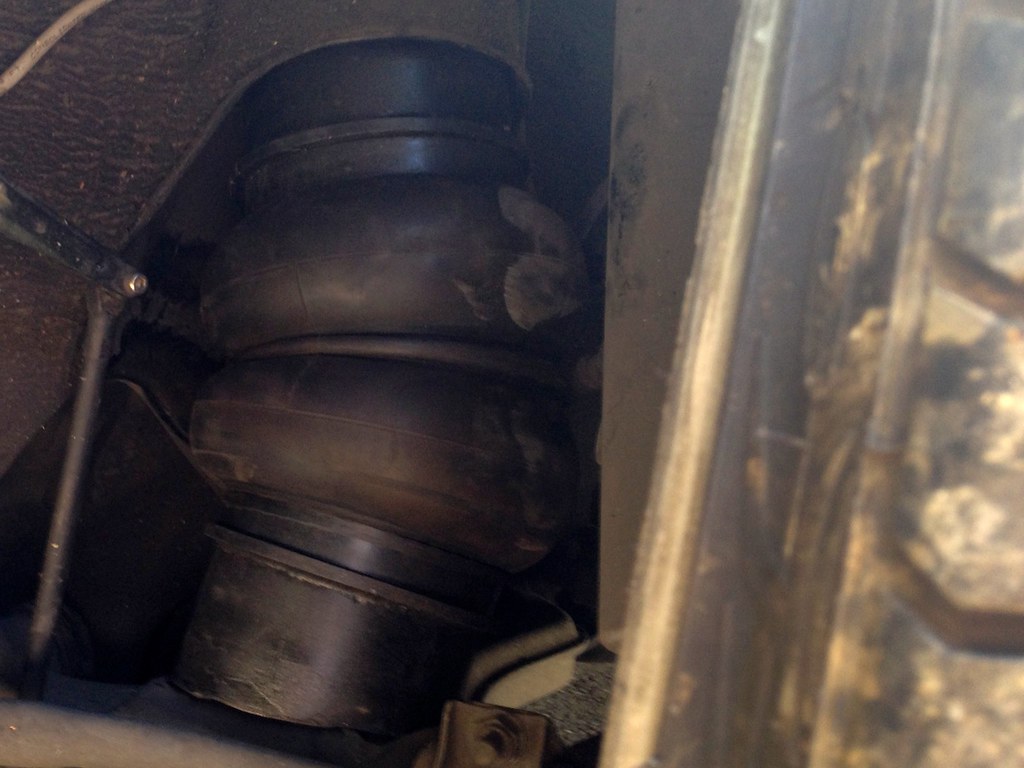
                            So, as I mentioned above, I was having some rubbing issues on the front suspension that had graduated to a pretty bad clunk going over bumps, which turned out to be both front bags banging against the bottom of the inner fender well. Luckily, I seem to have caught the issue in time, and the bags remain intact, though I will probably reserve one of them for use as a spare as soon as I can secure a replacement. If anyone from Slam Specialties is listening, much love for making the bags so thick and durable, but if I might request a SS4-sized bag, I'd adore you forever.

                            While under the car, I realized that my initial concern for kicking the bags in away from the front shock was not only incorrect, but precisely opposite what I needed to do. With the short front control arm, the annular relationship between the shock and the LCA changes drastically as the suspension cycles. With the car in the air, the angle between the two is strongly acute, which makes the shock migrate much further into the spring area than it actually is in operation. At stock ride height, the shock is basically perpendicular to the LCA, which gives WAY more room between the shock and the spring area. Lowered, the LCA-shock angle goes slightly obtuse, which gives even slightly more room yet.

                            What I decided to to was kick the bags outwards toward the shock in order to keep the bags from rubbing on the inside of the fender well. To do this, I switched the mounting brackets side-to-side, and made some adjustments to each. On the lower right bag (which used to be the lower left), I cut the spiral even deeper, another 1/2" per rotation, for a total of approximately 1-3/4" per rotation of spiral. On the lower left, I cut a kind of funny spiral into the mount such that the mount sits in the spring cup at about a 10º angle, tilted toward the outside. On both upper mounts, I cut them at a 10º angle, also kicking toward the outside of the car. The upper mounts now look like this:


                            It's going to look like it's going to rub when you stick it all in the spring pockets. The bags will foul on the shock absorbers HARD when the car is lifted (like, to the point where they're hard to install), but once the car is on the ground, there's about 1" between the shocks and the bags:


                            Ignore the dirt on the bags, it's just from where they rubbed on the shock when installing. You'll want to be careful not to kick the bags out at too steep an angle, or a bolt on the back of the hub will rub on the bag at full lock.

                            I took it for a test drive, and no more clunking noise! It also appears the car floats a little better over speed bumps, which suggests to me the bags were basically jammed against the fender well when heavily compressed. I hit a pretty big speed bump at about 30 MPH, and the car soaked it up pretty much like it did when stock - that's a big improvement.

                            More soon...

                            EDIT: I just noticed this, but if you look closely at the second image, you can actually see where the bag has rubbed the fender well clean on the inside, as well as the fender well edge that the bags were getting caught on.
                            Last edited by Oh Damn, it's Sam; 04-29-2014, 05:41 PM.


                            Comment


                            • Keyless / Air Ride Remote Part 2: Programming:

                              With components in hand, I needed to program the Arduino to listen to the remote and respond appropriately, turning on the right relays at the right time for the right duration. There are some easy ways to go about this using delay functions and so forth, but what I elected to do allows the processor to continue listening to commands while working on a command, queue additional commands up, and execute them in order. This allows me to hit the lock button and the air down button immediately afterwards, without having to wait for the lock function to complete. This should make the system a little slicker to use. I have optimized the code as much as I was able for the sake of speed and responsiveness - as it stands, my Ardunio can start the program in under two seconds, and can complete a cycle through the program in about 6.5 milliseconds. This means the program is extremely sensitive to input from the remote. That’s a good thing, meaning you won’t have to hold the button down for a hundred years for the thing to respond.

                              I’ll spare posting the lengthy code here, but if you’d like to see how it works, I’ve got a couple heavily-commented versions that should be pretty straightforward to read. Here’s an .ino file that’ll open in the Arduino programming environment and is ready to load onto an Arduino, and also a.txt if you haven’t got the software installed. Comments are welcome; I’m not a programmer, and I’m sure there are plenty of areas where the code could be cleaned up, both to make it cleaner and more readable. For those of you who aren’t in the mood to read code, here’s a simplified flowchart of how the program functions:


                              (click to embiggen)

                              If you look at the code, you’ll note that it’s designed around the Ride Height on Start function of the AccuAir ECU, meaning that every time the AccuAir ECU is powered up, it will move to preset 2. So, this means to air the car up to ride height, we only need to power the ECU for a minute, and we don’t have to send an air-up command. This means preset 3 (all up) will be unavailable from the remote (at least without adding a lot of logic to the code and trying to sense the car’s suspension position from the e-Level’s indicator lights on the rocker switch), but I honestly can’t see a situation in which preset 3 will be necessary. If I change my mind, changing the code to allow preset 3 is trivial, though I’ll lose Ride Height on Start. For now, I’m going to leave it as-is.

                              In order that you can see what’s going on when I press a button on the remote, I scabbed together a breadboard with five LEDs: one for each relay I’m going to use. I pieced together a short video to show just what is going on:

                              [ame=http://www.youtube.com/watch?v=JkTkzdUVxtU]http://www.youtube.com/watch?v=JkTkzdUVxtU[/ame]

                              All the timer lengths are easily adjustable at the top of the code. I plan to install the system and trim the timers as short as possible so that everything still works, but everything runs as fast as possible. Since no relays are shared between the air ride section of the code and the door lock section, I may also modify the code so that a lock / unlock function and an air down / air up function can run simultaneously. That’s for another day, however.

                              Stay tuned for part 3: building the enclosure!
                              Last edited by Oh Damn, it's Sam; 02-07-2015, 11:45 AM.


                              Comment


                              • THis is gonna be sweet!

                                Should do puddle lights or something also powered by the relays when you air up and down.
                                -Christian.

                                '91 318iS AW2/blk slow garage queen/build...
                                '02 ///M3 carbonschwartz 6MT daily beast
                                '37 Chevy pickup-garagequeen...

                                Comment

                                Working...
                                X