Announcement

Collapse
No announcement yet.

Medium Pimpin' - 1995 E300 diesel build

Collapse
X
 
  • Filter
  • Time
  • Show
Clear All
new posts

  • rice4life
    replied
    Wow, those spacers really improve the fitment.

    I'm dieing to see that arduino setup in action

    Leave a comment:


  • Oh Damn, it's Sam
    replied
    So, Leavenworth's coming up, and it sounds like I'm going, so aside from it officially being time to start spamming my Instagram feed with #leavenworthprep hashtags like all you SoWo assholes did a few weeks back, it's actually time to get something done on the big lumbering beast.

    Some of you may remember that back in the Paleozoic era I got myself a set of wheel spacers, but needed to roll my fenders to fit them. Well, I finally got around to rolling all four today. Having never rolled fenders before (can you believe it?), I initially wanted to get my hands on one of the Eastwood rollers, but Tonys18t's thread on the subject convinced me otherwise. I guess the squared-off fender openings on the W124 don't play well with the Eastwood roller, which makes sense.

    Instead, I said fuck it and rolled 'em with a deadblow hammer and a pair of vice grips. I got a little paint cracking on the left rear fender, which I expected, since that side has been somewhat poorly repainted, and the paint is thus very thick there. Other than that, I accomplished a fairly tight roll without managing to bacon up my fenders. Yay me!

    First, since I'm installing spacers, I had to get longer lug bolts, which I have previously ranted at you all about. After Baxter Auto Parts fucked up my order and wouldn't help me get the right bolts, I ordered some from Otis Inc., who were just completely awesome, and actually quite a bit cheaper than anything local:


    I now have no less than three sets of lug bolts for the car, 24mm cone set for the front wheels, 39mm cone seats for the rears, and whatever ball seat for the stock spare.

    The spacers I snagged off Amazon fit perfectly, and thankfully come with a hubcentric lip for the wheels to rest on. Very nicely-made, and very inexpensive:


    Here's a couple before and after shots so you can see the difference the spacers make. Please ignore any water spots and/or spider webs:

    Before:


    and after:


    I probably could have gotten away with a 20mm spacer in reality, and I may yet go that direction, but that would require a fender pull. Since I don't know how much of my left rear fender is body filler (I'm guessing the amount is more than zero, since that side's been resprayed), I'm hesitant to do a pull until I can afford to respray the car. Nevertheless, it looks MILES better than it did, and I'm super happy with the way the car sits with the spacers.

    And a gratuitous ghetto booty shot for y'all:
    Last edited by Oh Damn, it's Sam; 05-27-2014, 03:47 PM. Reason: fucking flickr

    Leave a comment:


  • Loch Ness Dongster
    replied
    Originally posted by Oh Damn, it's Sam View Post
    Do it! I'd love to see what you come up with!


    So, to test this, I copied the program, changed all the const ints to #defines, and added a digitalWrite to kick on an LED as soon as the loop void started. I then ran both the const int version and the #define version with a video camera watching at 30 fps. For the #define version, which should be more efficient as you suggest, I measure 1.47s from Arduino power-up until the loop void is reached. For the version where I initialize all those constants, which should be less efficient, I get... drumroll please... 1.47s. The two were frame-for-frame identical in speed.

    To test whether using #define was any faster in the main loop than constantly pulling constants from memory, I asked each program to dump its timer (the millis() function) over the serial port. No doubt this slows the program somewhat, since the serial port on an Arduino is sloooooooow, but it should be the same amount of slowing for both programs. I let each program dump to the serial monitor for about 30 seconds, copied the contents of the serial monitor to an Excel spreadsheet, and averaged the lengths of time between each timer output. Millis() only has a 4ms resolution, so there's error in each measurement, but averaged over approximately 3500 measurements, the error should average out. The resultant should be the average amount of time the program takes to complete the main loop of the program, listening for remote inputs and then not doing anything since there aren't any. This pulls a few constants from memory (4 of the 15 to be exact), so if there's a difference between methods, it should show.

    The results are as follows: for the #define version, the average loop speed was 7.0703ms. For the version with constants, the loop speed was 7.0688ms. In fact, the two timer dumps are line for line identical with the difference in times a result of the fact that I killed the serial dump on the version with constants about 154ms before the #defines version. It appears the two are precisely the same in terms of speed.

    I'm guessing that, while #defines has some obvious and non-trivial efficiency advantages, the program is so simple and fast that they're just not showing in testing.
    Ah, so it mostly is a stylistic choice then. That's actually good to know especially for future projects. Your claim that the program is too simple to be affected by the code sounds about right. Thanks for testing it out!

    Leave a comment:


  • Oh Damn, it's Sam
    replied
    Originally posted by Loch Ness Dongster View Post
    But anyways, I have an Arduino Uno and also a a club lab here at my Uni so when I have some time, I'm probably going to try and tinker/optimize with your code and see where I get. Maybe I'll use this for a class project
    Do it! I'd love to see what you come up with!

    Originally posted by Loch Ness Dongster View Post
    EDIT: Actually, using #define might make the code run faster as what happens is that no variables are initialized, rather the variables used in the loop are then referred to the value for the said variable, thus may raise efficiency. If you can, try it and let me know if it made any difference :O
    So, to test this, I copied the program, changed all the const ints to #defines, and added a digitalWrite to kick on an LED as soon as the loop void started. I then ran both the const int version and the #define version with a video camera watching at 30 fps. For the #define version, which should be more efficient as you suggest, I measure 1.47s from Arduino power-up until the loop void is reached. For the version where I initialize all those constants, which should be less efficient, I get... drumroll please... 1.47s. The two were frame-for-frame identical in speed.

    To test whether using #define was any faster in the main loop than constantly pulling constants from memory, I asked each program to dump its timer (the millis() function) over the serial port. No doubt this slows the program somewhat, since the serial port on an Arduino is sloooooooow, but it should be the same amount of slowing for both programs. I let each program dump to the serial monitor for about 30 seconds, copied the contents of the serial monitor to an Excel spreadsheet, and averaged the lengths of time between each timer output. Millis() only has a 4ms resolution, so there's error in each measurement, but averaged over approximately 3500 measurements, the error should average out. The resultant should be the average amount of time the program takes to complete the main loop of the program, listening for remote inputs and then not doing anything since there aren't any. This pulls a few constants from memory (4 of the 15 to be exact), so if there's a difference between methods, it should show.

    The results are as follows: for the #define version, the average loop speed was 7.0703ms. For the version with constants, the loop speed was 7.0688ms. In fact, the two timer dumps are line for line identical with the difference in times a result of the fact that I killed the serial dump on the version with constants about 154ms before the #defines version. It appears the two are precisely the same in terms of speed.

    I'm guessing that, while #defines has some obvious and non-trivial efficiency advantages, the program is so simple and fast that they're just not showing in testing.
    Last edited by Oh Damn, it's Sam; 04-30-2014, 11:25 PM. Reason: jesus christ, you'd think I could speak english

    Leave a comment:


  • Loch Ness Dongster
    replied
    When it comes to programming, it's all about efficiency Although when the Arduino compiles your code, it will automatically optimize your code. Just in this case, the const is a sure fire way to prevent any of your code itself from accidentally modifying those variables. Also, using preprocessor #define is just a stylistic habit for me. It essentially does the same thing.

    But anyways, I have an Arduino Uno and also a a club lab here at my Uni so when I have some time, I'm probably going to try and tinker/optimize with your code and see where I get. Maybe I'll use this for a class project

    EDIT: Actually, using #define might make the code run faster as what happens is that no variables are initialized, rather the variables used in the loop are then referred to the value for the said variable, thus may raise efficiency. If you can, try it and let me know if it made any difference :O
    Last edited by Loch Ness Dongster; 04-30-2014, 09:01 PM.

    Leave a comment:


  • Oh Damn, it's Sam
    replied
    Originally posted by Loch Ness Dongster View Post
    Might just have to snatch up that C code and also do a DIY keyless entry
    Steal it, modify it, make it better! I will say, if you're just looking for keyless, it's a lot cheaper to just get an off-the-shelf unit off eBay or wherever.

    Originally posted by Loch Ness Dongster View Post
    But why'd you opt for initializing certain variables instead of #define though?
    Because I don't know what I'm doing

    You're right, I don't need to treat all those constants at the top as variables. From what little I've read, #define is largely a stylistic holdover from C which didn't have constants. At least according to the Arduino documentation, const is preferred these days, since #define has the pitfall of #define foo 0 overwriting foobar as 0bar. Mostly I'm trying to avoid using preprocessor directives since I'm not very familiar with them.

    I will change those constants at the top of the code to actual constants, though!

    EDIT: Just went through and constant-ized all the constants at the top of the code and saved 120 bytes, which is actually pretty significant on a 2.4KB program. Yay! Thank you, Mr. Dongster! The code in the post above should be updated in a second.
    Last edited by Oh Damn, it's Sam; 04-30-2014, 08:26 PM.

    Leave a comment:


  • Loch Ness Dongster
    replied
    Might just have to snatch up that C code and also do a DIY keyless entry

    But why'd you opt for initializing certain variables instead of #define though?

    Leave a comment:


  • Oh Damn, it's Sam
    replied
    Originally posted by DER E30 View Post
    THis is gonna be sweet!

    Should do puddle lights or something also powered by the relays when you air up and down.
    That's actually a great idea! Since this build has some obvious VIP-style influences, that would be a good detail to add. I've got an extra couple of relays on my relay board that I could easily put to use.

    Originally posted by speakerboy View Post
    Bravo good sir. I am jealous of your free time to tackle a project of this magnitude:
    1. Building an Air system from scratch? Check.
    2. Learning C++? Check.
    3. Building a keyless entry system and custom air ride control from scratch? Check.


    Hopefully one day I will be able to simply refer to this thread, purchase necessary pieces, and shamelessly copy all of your hard work.
    Ha! I’d be flattered. There is just so little information on building W124s on the Internet (at least in English), it’s the least I can do to share my trials and tribulations for those to come.

    Originally posted by tyler589 View Post
    Digging this so far, and awesome attention to detail man, something alot of people forget about when modifying cars
    Thanks so much! Lots more to come!

    Originally posted by SD202 View Post
    good ol' c++ I actually read all your code.And enjoyed it. How come no Endif ? I went to school for programming a few years back Only took a couple C++ classes mostly all C# ASP.NET experience here. Did You know kids in india are taught c++ at a grade school level. Imagine if US schools taught C++ to elementary school children! LOL anyway.... Love the work going into this dude!
    Why no endif? Probably because I don’t know what I’m doing . If my understanding is correct, endif is only used as part of a preprocessor directive, as in an #if / #endif block for conditional compiling or whatever. Regular if statements can be killed with a closing curly brace. That might be wrong, being that the extent of my programming experience is limited to terrible high school projects in long-dead languages that mostly didn't work.

    Incidentally, I remember being taught BASIC in grade school, probably on an Apple II. Most of our programs consisted of something like

    10 PRINT “DICKS”
    20 GOTO 10

    We thought we were pretty. fucking. hilarious.

    Leave a comment:


  • SD202
    replied
    good ol' c++ I actually read all your code.And enjoyed it. How come no Endif ? I went to school for programming a few years back Only took a couple C++ classes mostly all C# ASP.NET experience here. Did You know kids in india are taught c++ at a grade school level. Imagine if US schools taught C++ to elementary school children! LOL anyway.... Love the work going into this dude!

    Leave a comment:


  • tyler589
    replied
    Digging this so far, and awesome attention to detail man, something alot of people forget about when modifying cars

    Leave a comment:


  • speakerboy
    replied
    Bravo good sir. I am jealous of your free time to tackle a project of this magnitude:
    1. Building an Air system from scratch? Check.
    2. Learning C++? Check.
    3. Building a keyless entry system and custom air ride control from scratch? Check.


    Hopefully one day I will be able to simply refer to this thread, purchase necessary pieces, and shamelessly copy all of your hard work.

    Leave a comment:


  • DER E30
    replied
    THis is gonna be sweet!

    Should do puddle lights or something also powered by the relays when you air up and down.

    Leave a comment:


  • Oh Damn, it's Sam
    replied
    Keyless / Air Ride Remote Part 2: Programming:

    With components in hand, I needed to program the Arduino to listen to the remote and respond appropriately, turning on the right relays at the right time for the right duration. There are some easy ways to go about this using delay functions and so forth, but what I elected to do allows the processor to continue listening to commands while working on a command, queue additional commands up, and execute them in order. This allows me to hit the lock button and the air down button immediately afterwards, without having to wait for the lock function to complete. This should make the system a little slicker to use. I have optimized the code as much as I was able for the sake of speed and responsiveness - as it stands, my Ardunio can start the program in under two seconds, and can complete a cycle through the program in about 6.5 milliseconds. This means the program is extremely sensitive to input from the remote. That’s a good thing, meaning you won’t have to hold the button down for a hundred years for the thing to respond.

    I’ll spare posting the lengthy code here, but if you’d like to see how it works, I’ve got a couple heavily-commented versions that should be pretty straightforward to read. Here’s an .ino file that’ll open in the Arduino programming environment and is ready to load onto an Arduino, and also a.txt if you haven’t got the software installed. Comments are welcome; I’m not a programmer, and I’m sure there are plenty of areas where the code could be cleaned up, both to make it cleaner and more readable. For those of you who aren’t in the mood to read code, here’s a simplified flowchart of how the program functions:


    (click to embiggen)

    If you look at the code, you’ll note that it’s designed around the Ride Height on Start function of the AccuAir ECU, meaning that every time the AccuAir ECU is powered up, it will move to preset 2. So, this means to air the car up to ride height, we only need to power the ECU for a minute, and we don’t have to send an air-up command. This means preset 3 (all up) will be unavailable from the remote (at least without adding a lot of logic to the code and trying to sense the car’s suspension position from the e-Level’s indicator lights on the rocker switch), but I honestly can’t see a situation in which preset 3 will be necessary. If I change my mind, changing the code to allow preset 3 is trivial, though I’ll lose Ride Height on Start. For now, I’m going to leave it as-is.

    In order that you can see what’s going on when I press a button on the remote, I scabbed together a breadboard with five LEDs: one for each relay I’m going to use. I pieced together a short video to show just what is going on:

    [ame=http://www.youtube.com/watch?v=JkTkzdUVxtU]http://www.youtube.com/watch?v=JkTkzdUVxtU[/ame]

    All the timer lengths are easily adjustable at the top of the code. I plan to install the system and trim the timers as short as possible so that everything still works, but everything runs as fast as possible. Since no relays are shared between the air ride section of the code and the door lock section, I may also modify the code so that a lock / unlock function and an air down / air up function can run simultaneously. That’s for another day, however.

    Stay tuned for part 3: building the enclosure!
    Last edited by Oh Damn, it's Sam; 02-07-2015, 11:45 AM.

    Leave a comment:


  • Oh Damn, it's Sam
    replied
    Originally posted by rice4life View Post
    Woah, that's pretty badass.

    Arduinos are pretty popular with people who build show cars because you can program ridiculous light displays for their cars.
    Yeah, Arduinos are pretty damn sweet. There are some cool tricks you can do to index enormous arrays of LEDs to do very impressive lighting displays and so forth, like you mention. It's pretty amazing the traction they've gotten in the market and just how many accessory boards there are for just about any function you can imagine. 1000 points to them for making them so easy to program as well.

    So, as I mentioned above, I was having some rubbing issues on the front suspension that had graduated to a pretty bad clunk going over bumps, which turned out to be both front bags banging against the bottom of the inner fender well. Luckily, I seem to have caught the issue in time, and the bags remain intact, though I will probably reserve one of them for use as a spare as soon as I can secure a replacement. If anyone from Slam Specialties is listening, much love for making the bags so thick and durable, but if I might request a SS4-sized bag, I'd adore you forever.

    While under the car, I realized that my initial concern for kicking the bags in away from the front shock was not only incorrect, but precisely opposite what I needed to do. With the short front control arm, the annular relationship between the shock and the LCA changes drastically as the suspension cycles. With the car in the air, the angle between the two is strongly acute, which makes the shock migrate much further into the spring area than it actually is in operation. At stock ride height, the shock is basically perpendicular to the LCA, which gives WAY more room between the shock and the spring area. Lowered, the LCA-shock angle goes slightly obtuse, which gives even slightly more room yet.

    What I decided to to was kick the bags outwards toward the shock in order to keep the bags from rubbing on the inside of the fender well. To do this, I switched the mounting brackets side-to-side, and made some adjustments to each. On the lower right bag (which used to be the lower left), I cut the spiral even deeper, another 1/2" per rotation, for a total of approximately 1-3/4" per rotation of spiral. On the lower left, I cut a kind of funny spiral into the mount such that the mount sits in the spring cup at about a 10º angle, tilted toward the outside. On both upper mounts, I cut them at a 10º angle, also kicking toward the outside of the car. The upper mounts now look like this:


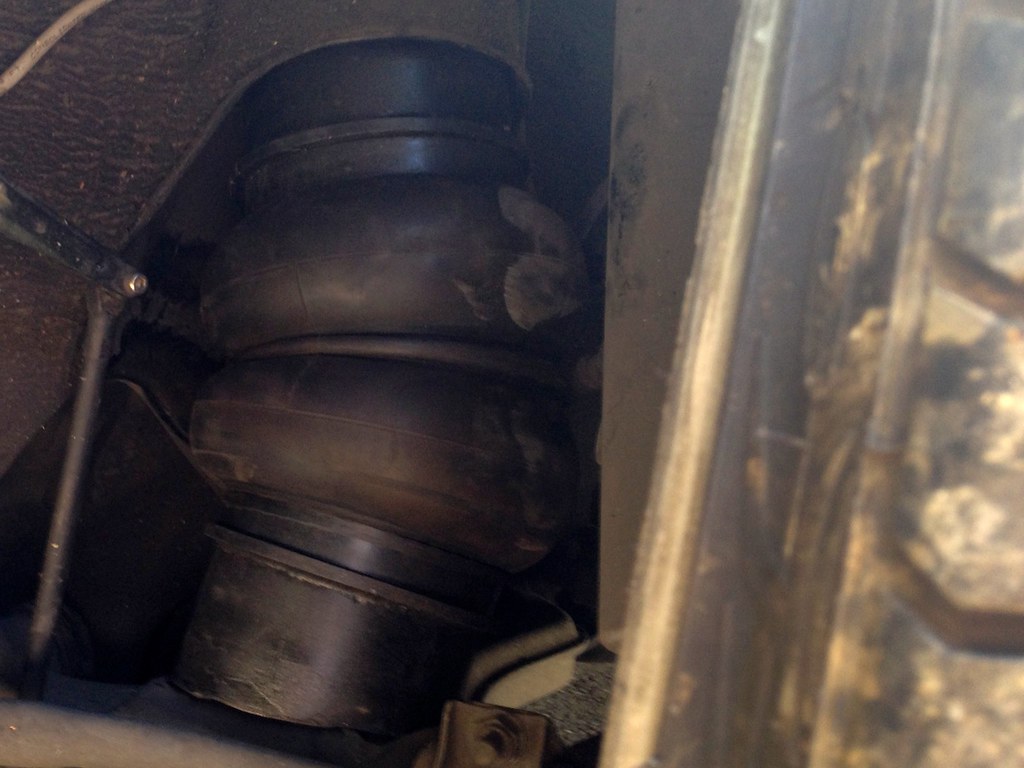
    It's going to look like it's going to rub when you stick it all in the spring pockets. The bags will foul on the shock absorbers HARD when the car is lifted (like, to the point where they're hard to install), but once the car is on the ground, there's about 1" between the shocks and the bags:


    Ignore the dirt on the bags, it's just from where they rubbed on the shock when installing. You'll want to be careful not to kick the bags out at too steep an angle, or a bolt on the back of the hub will rub on the bag at full lock.

    I took it for a test drive, and no more clunking noise! It also appears the car floats a little better over speed bumps, which suggests to me the bags were basically jammed against the fender well when heavily compressed. I hit a pretty big speed bump at about 30 MPH, and the car soaked it up pretty much like it did when stock - that's a big improvement.

    More soon...

    EDIT: I just noticed this, but if you look closely at the second image, you can actually see where the bag has rubbed the fender well clean on the inside, as well as the fender well edge that the bags were getting caught on.
    Last edited by Oh Damn, it's Sam; 04-29-2014, 05:41 PM.

    Leave a comment:


  • rice4life
    replied
    Woah, that's pretty badass.

    Arduinos are pretty popular with people who build show cars because you can program ridiculous light displays for their cars.

    Leave a comment:

Working...
X