Announcement

Collapse
No announcement yet.

Medium Pimpin' - 1995 E300 diesel build

Collapse
X
 
  • Filter
  • Time
  • Show
Clear All
new posts

  • #61
    HOLY JESUS THUNDERFUCK SHITBALL ASSHAMMER CHRIST

    This subwoofer.

    This fucking subwoofer.

    It is... life changing. I still have the factory speakers up front, and haven't had a chance to even really set the gains correctly, but I can already tell you that the FI Q is a BEAST. I haven't even taken the rear speakers out, and I probably won't, because the volume level from the sub is FAR more than I expected, even through the gas tank and rear seat. The sub is far from broken in yet, but my initial impressions are that the Q is wonderfully musical and incredibly fast, not to mention the ridiculous amount of sound it puts out.

    After listening to it for a minute in the driveway, I simply had to take the car for a drive. Still halfway torn apart, and with the horrid stock speakers still clapping at me from the dashboard, I took a cruise around the neighborhood. Listening to the sub, I couldn't help but grin uncontrollably, the first time this car has really made me smile.

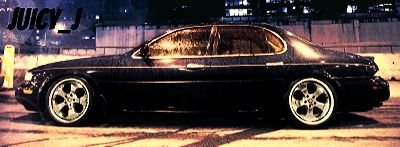
    On the way through the neighborhood, I also happened across this little guy:


    Hoping to finish up the audio install before Friday!

    Originally posted by mike-81-240d View Post
    Mine is a single stage car as well, so MB stopping in the 70's isn't the truth. I know for a fact that in the W123 body style the non metallic cars were single stage, and the metallic cars had clear-coat.

    She's looking great though! Gotta love the '95 E300 my buddy always gets over 30 mpg in his, even while driving like a douche.
    Thanks for the kind words! I'm glad I'm not the only one whose buffing pad agrees with the rumor that some of these later cars retained single stage paint, as weird as it is.

    So far, I only have put two tanks in the car since April, and between the two, my mileage averages at 29 MPG, most of that being city driving. Very pleased with the mileage, especially for as big and heavy of a car as the E-class.

    How's Bellevue these days? I used to work in Crossroads, and I lived in Kirkland for a spell. It's a nice area, if you can manage to avoid having to go across the lake

    EDIT: Quick question for all the W124 experts on here! Does anyone know the location in the car of the splices I have circled below?


    If I can find these splices, I can hopefully avoid running 1100 miles of speaker wire through the car. Thanks!
    Last edited by Oh Damn, it's Sam; 04-08-2014, 02:31 PM. Reason: Fixed broken image


    Comment


    • #62
      Lol. Mine is a '86. So I don't even have door speakers. But what I do know is that the splice can be in two places:

      #1: Behind the A-pillar (where the cables transit between car and door).
      #2: In the black kable tray in the divers foot well.

      If you want to be really sure, remove the lower dash under the steering wheel and the dash speaker itself. Follow the cables from that and I'm sure you'll end up finding that splice
      Lucas
      Daily: 2004 Pontiac GTO. . . . . . . . . Daily Econobox: 2009 Mini Clubman Cooper
      Originally posted by LCG
      High 21! It's like a high 5 but includes both hands, both feet and a boner.

      Comment


      • #63
        this is one of my favorite merc's and it being a diesel just makes it that much better!
        Instagram: Dariusrusu
        Vwvortex: Vwdubluvin

        c by [url=http://www.flickr.com/people/55829963@N05/]

        Comment


        • #64
          Originally posted by loekaaz View Post
          Lol. Mine is a '86. So I don't even have door speakers. But what I do know is that the splice can be in two places:

          #1: Behind the A-pillar (where the cables transit between car and door).
          #2: In the black kable tray in the divers foot well.

          If you want to be really sure, remove the lower dash under the steering wheel and the dash speaker itself. Follow the cables from that and I'm sure you'll end up finding that splice
          Thanks for the info! I'm going to go fishing for wires this weekend.

          The last couple of days have been spent running wiring for the stereo and the air ride, and that's not very exciting to photograph. I did get the sub box trimmed out and finished, though:


          The trim is just clear acrylic trimmed to fit, and painted gloss black on the back. The effect is a mirror black finish, without having to do any obnoxious polishing.

          Currently waiting on quite a few shipments before I can start with the air ride in earnest. Should have most of the goodies early next week
          Last edited by Oh Damn, it's Sam; 06-28-2013, 02:25 PM.


          Comment


          • #65
            sorry dude, pic doesn't work
            Lucas
            Daily: 2004 Pontiac GTO. . . . . . . . . Daily Econobox: 2009 Mini Clubman Cooper
            Originally posted by LCG
            High 21! It's like a high 5 but includes both hands, both feet and a boner.

            Comment


            • #66
              Weird, the URL is correct, and I can see it here. If it doesn't show up in the next few minutes, I'll move it onto my home server.


              Comment


              • #67
                i can see it! this looks great. setup is totally hidden.

                Comment


                • #68
                  Audio Build - Finito!

                  The last step on the audio build was to install the components. The stock speakers are a 6.5" subwoofer in the doors and a ≈4" full range speaker in the dash. Unfortunately, there's not much in the way of aftermarket speakers that will fit the dash location, so we're going to have to make an adapter, but we'll get to that in a moment.

                  The doors were relatively straightforward. The factory sub is mounted in a weird little speaker pod:


                  Image Dynamics CTX65cs midbass next to stock speaker:


                  Unfortunately, the new speaker is too thick to fit into the pod, so I separated the pod into two pieces. We'll use the front to space the speaker away from the window inside the door:


                  The new speaker fits nicely into the existing hole, though only two screw locations are usable:


                  With the back of the pod removed, the speaker sits just slightly closer to the window. Ordinarily, this wouldn't be a problem, but the magnet on the Image Dynamics midbass is enormous, so I had to place some washers on one side to keep the magnet away from the window:


                  The door panel fits perfectly, as would be expected, and none's the wiser.

                  As for the tweeter in the dash, I had to make a mounting panel out of some plastic. The stock speaker hole, with new speaker wiring coming through:


                  Because the stock speakers receive their signal from a shared wire, I had to run new wires to the tweeters so I could use the proper crossover. With the trim around the door opening removed, as well as the lower kick panels, I was pleasantly surprised to find it was very easy to snake speaker wire up through the dash and to the speaker openings.

                  I took some architectural modeling board and made a template for the tweeter mount:


                  I then trimmed up some black plastic to fit, and mounted it in place with doublestick foam tape:


                  The factory grille fits nicely, and once again, none's the wiser:


                  With the midbass in the stock location in the door, the imaging is not going to win any awards, but I'm pleased with it. Ordinarily, I would have made fiberglass kickpanels for both the midbass and the tweeter, but since this car has a foot parking brake, and not a whole lot of legroom thanks to the monster transmission tunnel, I decided the factory speaker locations are going to have to do.

                  Unrelated to the audio build, I also decided to rice out the car a little bit and ordered some clear turn signals:


                  As soon as the UPS truck arrives this afternoon, I'm going to get to work on the next step in the air ride portion of the build


                  Comment


                  • #69
                    I took the car out for a drive in the sun, and along the way, I realized I really didn't have any photos of the car before the suspension and wheels are installed. Luckily, I live in a rad industrial park, so the requisite gritty backdrops were easy to come by.


                    Comment


                    • #70
                      i really love what u are doing


                      W I L D M A N 'S R O D S H O P


                      R.I.P P.WALKER 2013/11/30

                      Comment


                      • #71
                        Originally posted by 244Brick View Post
                        i really love what u are doing
                        Thank you! In fact, thanks to everyone for all the kind words as I build this thing. It's keeping me motivated to have such an interested audience

                        On to today's work!

                        Before we begin, allow me to express my feelings on the current weather here in Oregon in the form of a short video interlude:

                        [ame="http://www.youtube.com/watch?v=IwanXPWEgg4"]http://www.youtube.com/watch?v=IwanXPWEgg4[/ame]

                        Yep, it's hot, and I'm bitchy. I have a nice shady garage I can work in, but the Mercedes is too damn low even in stock trim to make it up the driveway. Honestly, that's half the reason I'm going with air ride, so that I can actually raise the car to get in the stupid garage.

                        Anyway, enough whining. With the audio done, I moved on to the next step in the air ride build: getting the trunk install squared away. You'll remember a while back that I mounted a bunch of bulkhead fittings on the rear (or front, depending on how you look at it) trunk wall, through which all the air to and from both the tank and the air ride valves will travel. My shipment of MOAR FITTINGS from BagRiders arrived with much fanfare yesterday, and I got to work on connecting up the lines that will route and control the air on the backside of the wall:


                        I yarded out just about everything aft of the front seats in the interior just to get the package tray off the rear deck. Once that was done, I ran a couple of long bolts through and mounted up the 2.5 gallon tank to the underside of the tray:

                        Inside, where I stashed the bulk of the interior parts, my "helper" decided she needed to colonize the rear seat of the car:


                        Over at Harbor Freight, I picked up this little guy for the grand sum of $6.99:


                        It works... okay... though for $7, I can't complain much. It's certainly easier and more consistent than trying to bend the tube with a bending spring, and it can do 1" radius bends, which I'd be hard-pressed to do by hand. Were I doing multiple installs or lots of tubing, I'd invest in a better bender to be sure, but this one is actually alright for the cash.

                        Bender in hand, I proceeded to turn about six feet of perfectly good copper tube into scrap. I did, finally, get one tube I was happy with, which connects the tank to the bulkhead and ultimately, to the manifold on the back of the sub box and the compressor itself:


                        I tested what I had for leaks by running the compressor up to full pressure and watching my highly-calibrated and not-at-all-completely-inaccurate pressure gauge fall over time. After 75 minutes, the gauge dropped about 6 PSI, so I've got a touch more leak chasing to do.

                        One of my little fussy irritations with air ride is that you can often hear the compressor quite clearly from outside the car, which sort of ruins the magic a little bit, I think. This is part of the reason I crammed the compressor where I did, so the vibrations from it running don't transfer into the chassis of the car. I took a couple of video clips to show just how quiet the compressor is compared to the (already rather quiet) rattle of the diesel:

                        [ame="http://www.youtube.com/watch?v=WFBLJaY79Fc"]Mercedes Air Compressor First Run - YouTube[/ame]

                        Near as I can tell, from outside the car, the compressor is just about inaudible.

                        Anyway, it doesn't look like I got much accomplished today, but tearing out the rear interior was a bigger PITA than I expected. Tomorrow I'll get the valves all mounted up and see if I can't get them wired in a way I'm happy with.

                        Thanks for tuning in!
                        Last edited by Oh Damn, it's Sam; 07-03-2013, 08:06 AM.


                        Comment


                        • #72
                          sam, do you get my answer?

                          HYPETODAY // '89 Mercedes-Benz W124 260E
                          HYPETODAY // DTM MEETS JDM - The #W6666 project

                          Comment


                          • #73
                            are those clears pirate pieces?
                            or is just the pic that makes it look , like they not aligned
                            Floccinaucinihilipilification

                            Comment


                            • #74
                              wow thats pretty quiet. all i hear is some tractor noise :P jk hehe

                              Comment


                              • #75
                                Originally posted by Junya View Post
                                wow thats pretty quiet. all i hear is some tractor noise :P jk hehe


                                Originally posted by P78 View Post
                                are those clears pirate pieces?
                                or is just the pic that makes it look , like they not aligned
                                Yeah, I noticed that too. They're Depo brand, and I'll admit I'm not 100% satisfied with the fitment yet, though that photograph seems to exaggerate the problem. I think I can probably shave a bit off the bottom of the mounting tabs to get them to line up better.
                                Last edited by Oh Damn, it's Sam; 02-07-2015, 11:41 AM.


                                Comment

                                Working...
                                X