Announcement

Collapse
No announcement yet.

My Jetta Build...Low

Collapse
X
 
  • Filter
  • Time
  • Show
Clear All
new posts

  • My Jetta Build...Low

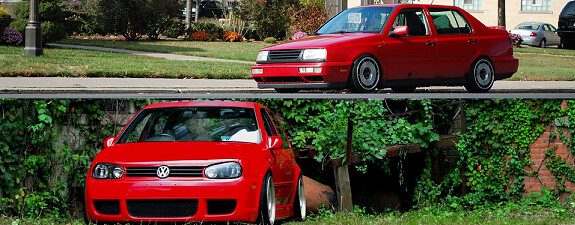
    I originally purchased my Jetta to fix and flip. I started driving it and I fell in love with the vr6. I originally came from a mini trucking life style and found a few people in the dub scene since I started working for a vw dealer. The dub scene had exactly the same atmosphere I loved so much with the minitruckers. Like many dubbers money was always an issue so I horded parts and waited till I was able to build what Ive always wanted to build. I found a lot of great people along the way and made some great friend ships. well the shit aint over yet so sit back and watch.

    built this in 03-05


    sorry those pics suck they are all I have left before it was totaled in 05

    Now for the Jetta I picked up. It was always ment to be a daily driver/ toy and grew and grew.


    that ment time to rebuild at this point I was just going to sell the jetta and rebuild it to stock.

    I saw so much potential and here is the slow progression from 09 to now


    started getting some small bolt ons etc.


    the head liner was falling and I was looking into different options of what to do with it. I was bored and loved writing on things. My ability to do graffiti is sad so I called a friend.


    the carpet was also smelly so I replaced it as well


    Tdi fifth gear I was able to get from a transmission in the shop that was getting replaced for a blown diff.

    Last edited by homebuilthotrods; 03-21-2012, 08:38 PM.
    Build it for a purpose.

  • #2
    went for the magna flow this was probably the largest purchase I made up to this point. just in case none of you saw the awesome ricer exhaust that was soo loud I couldn't wait to replace it.


    less bling


    just cause


    5-6 set of wheels Not sure at this point. coils down to the bottom. Thanks Ian and every one else who helped with those on the polishing. sean thanks for the paint (that no one can see)


    Now shits starts getting serious
    coils ditched em


    interior and all out (again!!! *:banghead2


    engine and bay stripped down


    Go ahead and punch yourself


    Long story short on this sub frame was going to hit so my friend Anthony and I made it work. Next time Ill build one from scratch would have take same amount of time any way. all the mounts are basically lowered an inch. the control arms are notched out and will alow for the extra movement.


    after some basic mock up we quickly realized this is going to go deep down a rabbit hole.


    still not enough.


    so strut towers had to be raised.


    Tubs were the only option *;D


    it was a little too wide


    so like every thing else I cut it.


    More on that later I still have to up load those so more on the engine bay.
    Now since Im making the jetta "lay out"on its rocker Im not going to be able to run wires etc like most shaved bays. so Im doing things a hair different.


    yes I know shitty cell phone pics. thats what I had time for. Ian took some great shots of things and can re do his shots here if he can get a sec.


    and what most cant see is the end of this extends out to run the wires under the frame rail.


    Build it for a purpose.

    Comment


    • #3
      Some more fancy shots by Ian K.


      Oh Hi!


      At this point Im aware of the whoring Im doing. I have my build on 3 forums now is that a bad thing? fuc it....


      yeah the hood fits.


      started building my own frame cause nothing else was going to work how I wanted it to.


      This part of the build proved to be the hardest part yet. It took way longer then thought but Its starting to come around and worth it. keep looking.


      Rear section of frame rails.


      first of many mock ups.


      Picked up some seats along the way.


      Tail lights F tail lights

      Build it for a purpose.

      Comment


      • #4
        Sick I can appreciate all the fab work....looks good.

        Comment


        • #5
          The ac had to get mocked up to get other parts made while I do more work.
          I did a little changing. I wont have recirc any more but who cares.


          this is what I cut.


          you shouldnt be afraid to cut.


          Yea thats the tubs coming through the blower motor area.


          just like factory


          a shot of both sides


          Started working back on the rear frame section. Made these gussets


          even got the wife to help a few times.


          this is actually the second battery tray I made. The first one wouldn't let me fit the bumper.


          Tight fit.


          some fish plates not 100% finished.,


          so Ive been working on it when ever I get a chance. Im working on the rear bag mounts and shock mounts. I also have several other things going on in the back ground like fuel cell etc.

          I started playing with the rear sub frame and how I want to fit the camber. I lowered it back down an inch I get more camber out of it and dont have to modify the outside fender. I then started cutting *what was needed to get the wheel to fit right. This is what accomplished. I removed the driver side door striker cause the shit was in the way and trimmed the rest. I will bolt on the rest of the front suspension and lower the rear down to get it to actually sit on the ground and go from there. I really want the fitment perfect I think this will be the best route.


          once I started getting things fitting right I did this and got an idea of what else I needed to get out of the way.


          some more fancy stuff by Ian K


          rear shock mounts mocked up and tacked,


          Now for the control arms in the back. I did this. I started cleaning up the trailing arm. Im going to use tubing to finish this one. first step cut (as always).


          Cleaned up. The lower control arm mounts also pictured. I can move the other mount up or down for different bag set ups in the future.
          I welded them up in stages to not warp it. I also hope it will utilize the existing strength and more.


          I have to say first a big thanks to the guys at http://metalworxinc.net/ !
          I've been going back and forth making sure everything with them was right. Then in the middle I changed the whole plan and they accommodated me in my ever evolving project. The customer service is the best! The craftsmen ship 100% pure awesome! Ill let the pics do the rest of the talking. *I can't wait to get the cell in and lines ran! If you need a cell call them and they will make what ever you want! They now also have what is needed to accommodate a factory fuel pump for a mk4 (welcome guys).


          I've been testing size and offset's etc trying to figure what I can use and do since Ive been over doing it a bit with out further ado.

          I test fitted some 19's and 20's yes it layes out on both wheels.

          The 20's


          The 19's


          20s from the inside


          19s from the inside


          Both


          a little side shot 19's


          not quite a great side shot of the 20's


          no photoshop here


          the fuel cell in the car


          This is now the most up to date on the build. Ive been working on this for about a year to date.I had a build thread on vortex as well and since I joined here and have been lurking for a while any way. I may as well start a thread here as well.
          Build it for a purpose.

          Comment


          • #6
            Need more!!!!! So sick.

            Comment


            • #7
              I was not expecting that.. definitely waiting for the rest!

              Comment


              • #8
                Yesssssssssss - I've been waiting for something like this for a while now. Will be keeping an eye on this.
                Blog for all things low....

                http://www.pankaked.com

                Comment


                • #9
                  Fab skills are awesome, but I made a sad face when I saw said fab skills shave the tail lights.

                  Comment


                  • #10
                    sub'd, this is awesome. was not expecting this when i came in here, i agree with him ^ though regarding the tailights. any plans for them?

                    Build Thread

                    Comment


                    • #11
                      You are fuckin' crazy man.

                      Mad props.
                      _abbi

                      Comment


                      • #12
                        I loved it until the tail lights and plans of 20s. Keep with 18/19s.

                        That said, I do still love where it is going.

                        Comment


                        • #13
                          太不可思议了~~~

                          Comment


                          • #14
                            If my google search was right 太不可思议了 means amazing??? thanks!

                            The car isnt going to make every one happy. Im cool with that. funny part is the tail lights are usually the deal breaker. Im going to use 12-14 inch led strips in the trunk for tail,turn,reverse lights.
                            Ive had help from several friends of mine to help me get to this point.
                            I cant thank them enough for all the help. Anthony R, Tony b,Jason G, Ian.K,Drew W etc....
                            I just test fitted the 20's Ill be using 19x9 all the way around et 52 rear not sure on the front yet cause they didn't fit great in the front with the spacer adapters. The polished Mercedes wheels are actually what ill be driving on for a bit. I cant do wheels yet maybe after paint? Ill deal with that when I've test driven the car a bit.

                            I have a lot to still do yet. I wrote up a 3 page list the other day to get me on track on what to focus on.

                            (art of noise) I like the club and members have some great rides.

                            Thank you all for the likes and dislikes.
                            Build it for a purpose.

                            Comment


                            • #15
                              in for more!!! I was waiting for people to start chopping and getting away from the cookie cutter "bag n done"


                              || Forester thread || E46 M3 || MK4 R32 (sold) || MK3 VR6 (sold) ||

                              Comment

                              Working...
                              X