 Tweet
Tweet
Nice project, man!
-

1997 BMW 328is Alpine White // Dove Grey
ZF Swapped | 3.23 LSD | FK Coilovers | 17x8.5 Borbet Type C | 75mm Wheel Studs | 12mm Vorshlag Spacers | 5000k HIDs | Euro Taillights | Suede Headliner/Pillars -
^cheers
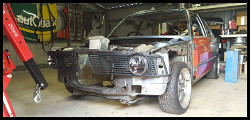
got the cooler finished today, rolled the front guards, so no more grabby on the tyres and put the stock bumper back on.
adaptor bolted to block, tight squeeze. have to tighten top hose fitting on first, then the bottom one


overall shot of the layout in the engine bay. ended up swapping the old catch can for new one(which i bought to replace the crummy plastic overflow bottle) because the old one wouldnt fit anywhere but where the filter now is.

cooler mounted. ended up cutting some more metal out from in front of the radiator(old radiator was narrower)

and old front back on

overall, dropped the temp by about 15f. pretty good, just gotta check it for oil leaks throughout the week. had a couple of fittings i tightened up a bit after a test run, so far so good. see how it goes and next weekend i might install my oil temp gaugeComment
-
this thread is definitely in advance about what i exactly plan for my car except the bike carbs.
But the work is better here than what i expect form me!
I love your attention to details and good quality work!!!
Will come back often! for sure!
Comment
-
Awesome car! I love the e21's, how dad was it tunning those carbs and wqhat exactly did you get them from?Comment
-
theyre off a honda cbr1100 blackbird.
so far, ive bought smaller idle jets, need to adjust the screw for them though, too far in now. i need slightly smaller main jets, just havent got around to buying them. to start with, they were pretty much just whack em on and run, they ran very rich, but worked fine.
with the new motor, theyre working even better!!Comment
-
picked up some more bits the other day, got time to install them today
new overflow bottle, can finally get rid of the crappy plastic thing, msd coils, safety wire for the brake rotors, and a bling radiator and oil cap(unfortunately the oil cap doesnt fit, my bad!!)

circuit breaker to isolate the battery from possible shorts(had a 140a on there, but tripped it too many ties, and it died)

and now for the piece de resistance, my dizzy delete housing, mate did awesome again!!

overflow bottles on, that was hard, took me a whole 5 minutes to do that!!

now for the dizzy housing
comparo pic between the stock one and new one

its on and working fine, no leaks!!

close up shot of it bolted on, yes the sensors a bit crooked. i really need to get a good tap and die set that includes a decent handle

Comment
-
I love how this e21 is turning out, keep up the good workComment
-
hey man i **** to dig this up but where did you get those velocity stack filtersJoin the dark side:The Boog Build ThreadComment
-
hey, got em here http://www.bills-b-racing.com/products.html he does a few different colour rings aswell, theyre good stuff, they dont budge, and are easy to clean. he does any size you want, just need to tell him the measurements of the stacks.Comment
-
so i finally test fit the cv adaptors i had my mate make today.
gotta drill the holes in the cv's out a tiny bit, i managed to get the pcd like .5mm too small, not a major thing, its easily fixed with a slightly bigger drill bit through the holes.


the backing plates fit inside the adaptors with ample space to breathe

for the diff flanges, i had printed out a few measured pcd sheets, and tried lining up with the bolt holes on paper, but everything was off a bit. so i took a guess, and went with the pcd that nissans use, which is 5x114.3(the measurements id tested all came close to this, but nothing was 100%).
looks like nissan was smart, and i got it spot on!!


and since i dont have a spare control arm to bolt the outer adaptor to for testing, i slid it into the bolts on a spare e21 cv. the gaps only because its the hub side, not cv side. but it lines up perfect.

and now the e21 is in the shed, have to tighten up the steering rack, which i now have the right tool to do it, not a botched up diy piece that would bend :p im also going to do the rear wheel bearings, and brake lines. i have a car i can use for getting to and from work, so i mght even start doing the new brakes and diff swap while its in there.Comment
-
so i got bored and decided id tap out one of the front caliper brackets, and bolt it all up.
came up good, may need to skim the bracket a bit to center the disc some more. will see where it sits on the struts on the bmw, coz these are my spares, not cleaned or anything.
i had allowed for the ability to shim the bracket out to center the disc, but obviously my measurements werent spot on. not the end of the world though.


just have to shim the caliper out a bit for some clearance from the edge of the rotor.Comment
-
and some more playtyimes.
took the steering rack out today, going to fix the up and down movement of the pinion from when i first built it. the quickrack pinion was machined wrong, so i couldnt lock the bearing in place, so sitting still, the wheel would move a bit before the rack moved. its gotten a bit worse over the last few weeks, so time to fix it. going to source a thinner bearing, or get the pinion machined.
thought id take my suspension bits down for a looksee while the cars in the air and the wheels off.
looks pretty good. wont really know until i start mocking t up without the stock stuff there.
the control arms almost dead on for stock length with it screwed all the way in.

and a couple pics of the joys of riding low.
this thing really is a snow plough!!(well a tarmac/gravel plough)

reallllllly need to sort out a "scrape" plate before it sees the road again

Comment
-
as always, great suff in this build thread!!!!
if i well understand you put a Nissan differential (LSD i guess) on the E21 and it was narrower than the E21 one so you make some spacers/adapters?
great great great!!!!Comment
-
yeh, putting a nssan r200 diff in(its factory lsd, but can put anything i want in there). its actually wider, the adaptors are to bolt on holden cv joints(easy to get in aus), which i will get shorter shafts made to suit.Comment

Comment