 Tweet
Tweet
Alright, today�s our last day of the E46 M3 Subframe Reinforcement DIY. Let�s finish this off the way we�ve been doing it so far � with plenty of pictures and info!
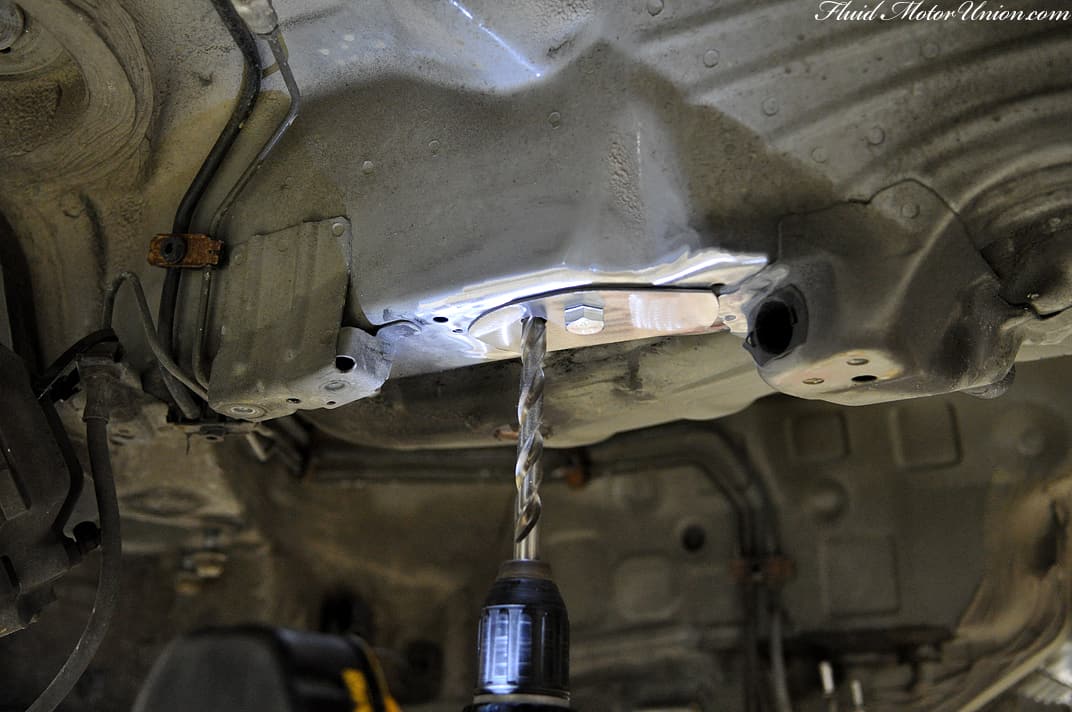
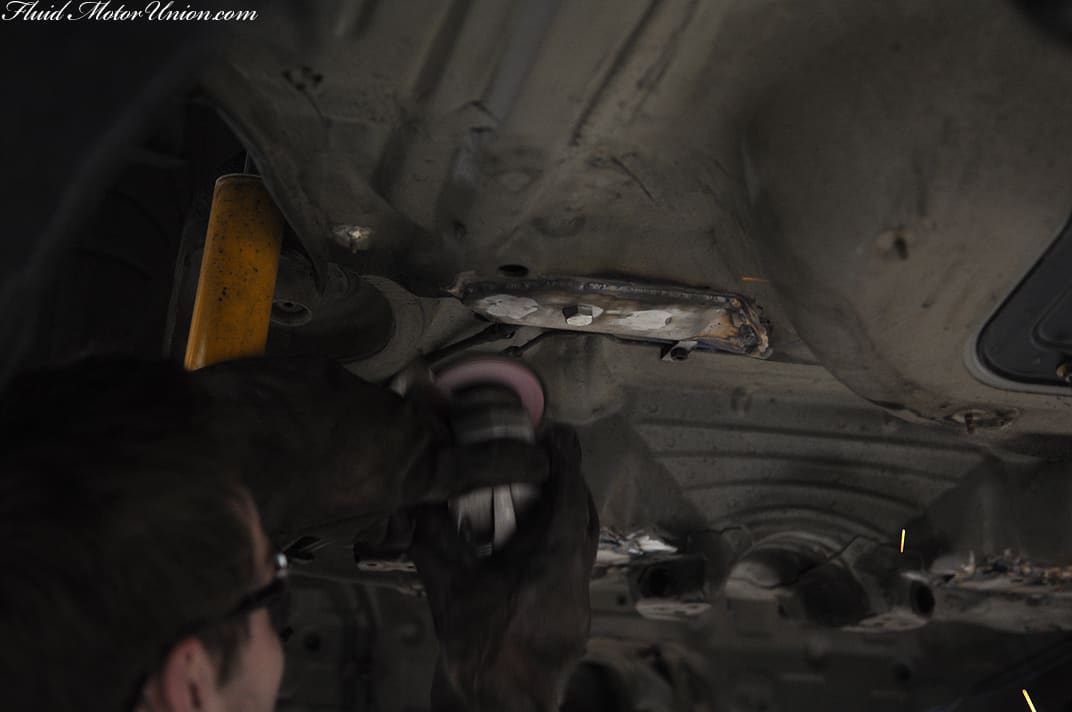
If you�ve been following the last two parts of the DIY, which we�ve run yesterday and Tuesday, you should have your underbody surfaces prepped as well as your reinforcement plates. From here, it�s a good idea to whip out your Turner-supplied instructions as a complement to the pictures here, just in case something isn�t clear. The first thing you�ll need to do today is break out your cordless drill and 1/2″ drill bit. You see those larger holes in the subframe reinforcements? That�s where you�ll be drilling. After mounting up the plates using the supplied bolt, take the drill and drill slightly into the sheet metal through that hole; don�t punch all the way through to the inside of the car, but drill it just enough so that you can lay down a rosette weld to seal together the layers of metal underneath the reinforcement plate.
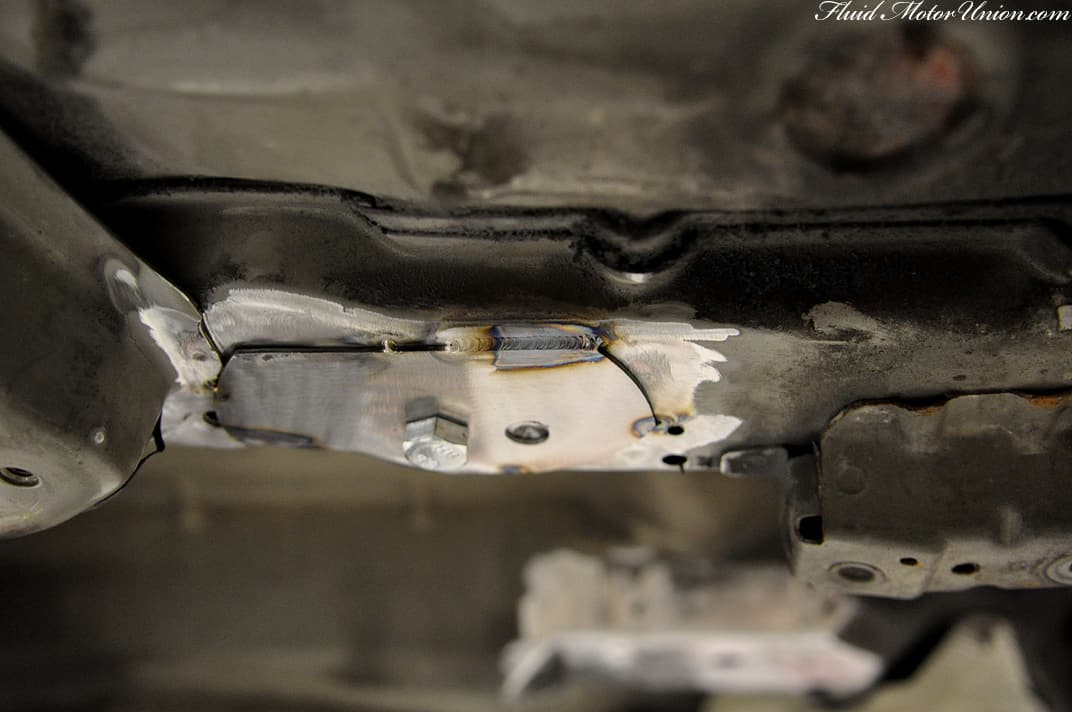
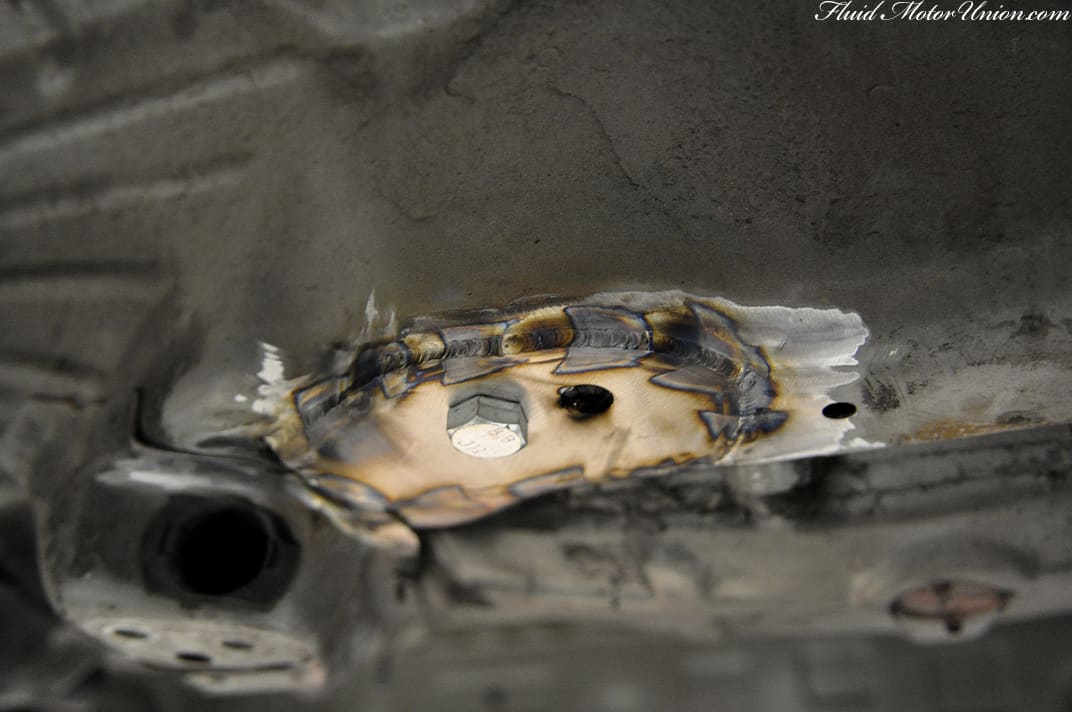
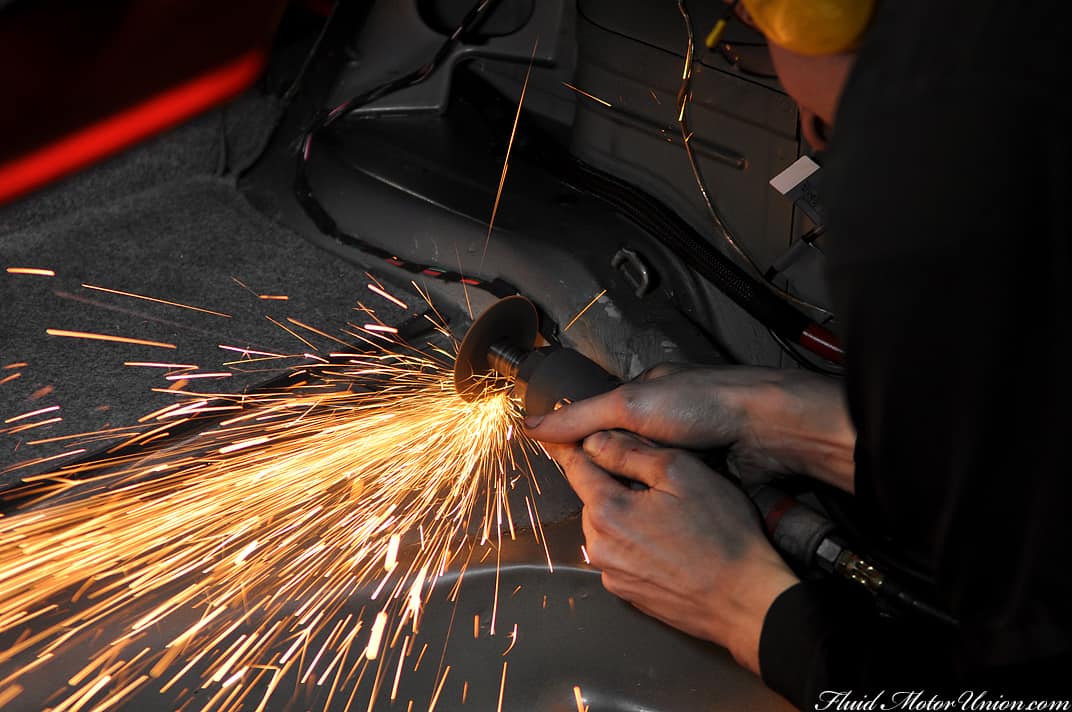
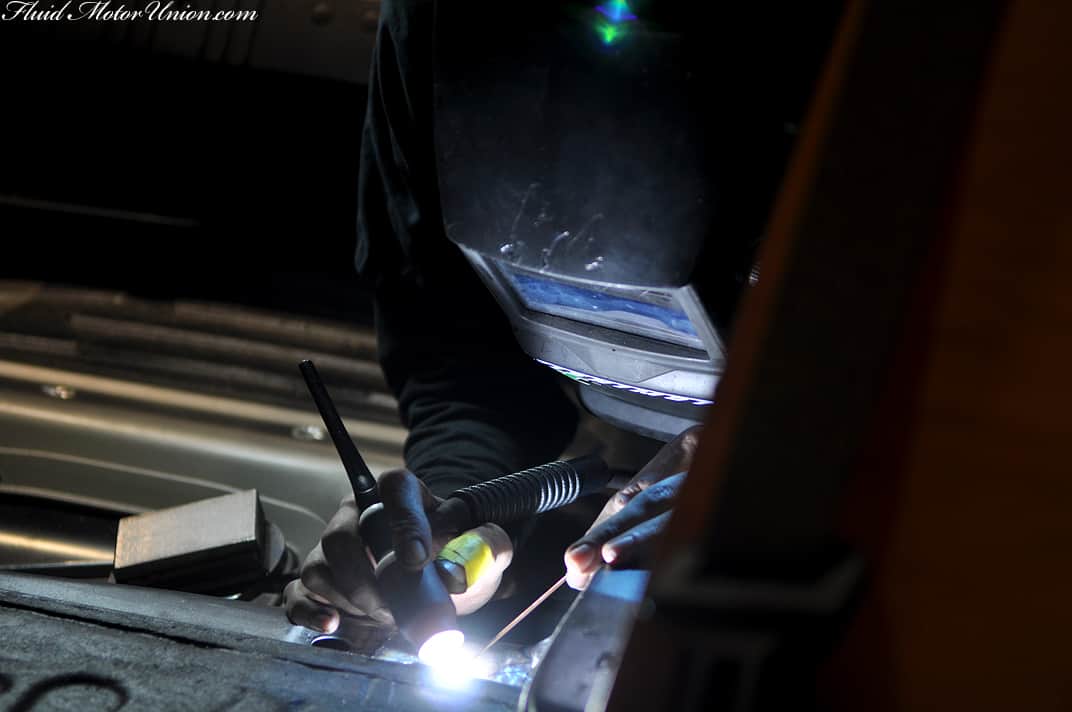
From there, lay down your welds! The customer requested we TIG the plates, but using a MIG welder is 100% okay, as well. As a matter of fact, it�ll be much easier to MIG the holes in the reinforcement plates. Move from plate to plate until they�re complete, making sure you have each plate in the proper orientation with enough space around the edges to account for the welding bead. Some shapes will be more difficult than others. Make sure you get the edges of the plates in their entirety, along with the holes in the middle of the plates.

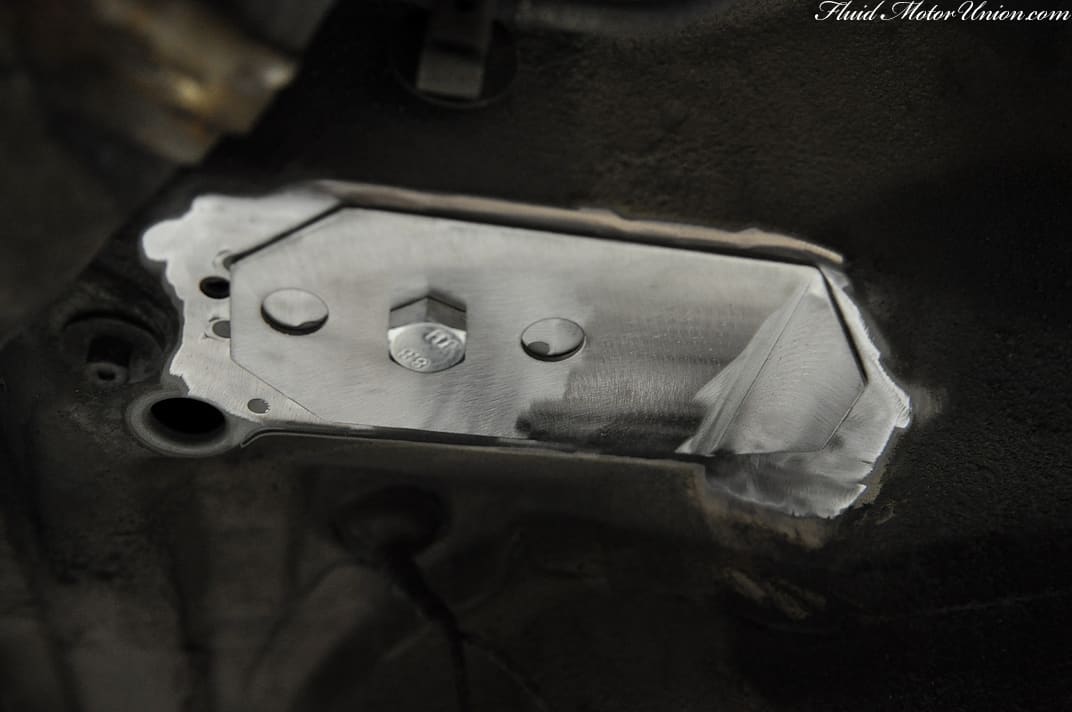
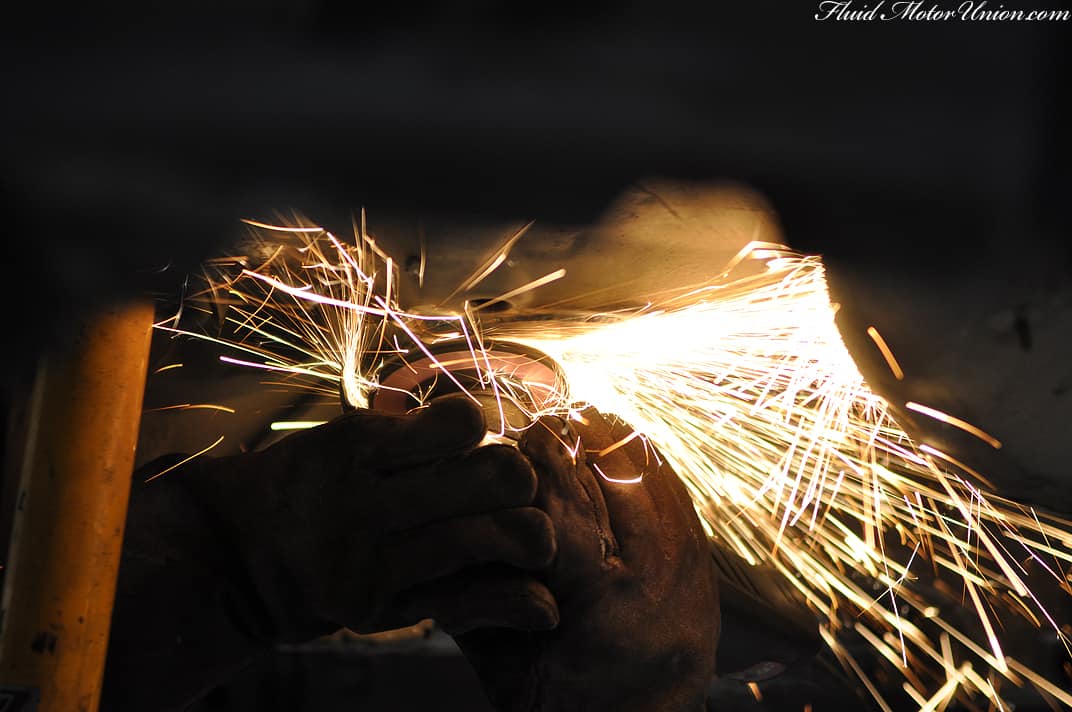
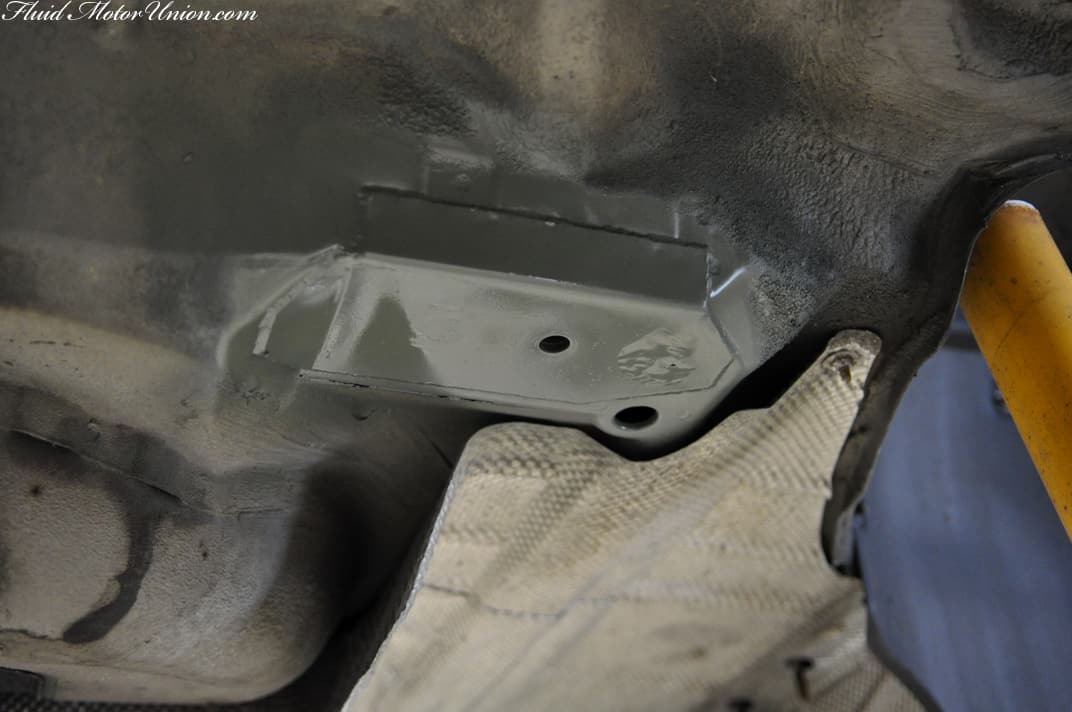
If you MIG welded either your rosette welds or the edges of the reinforcement plates, you might have some excess weld slag that could possibly prevent a full connection between the subframe and its mounting point. You�ll want the surface to be flat, so if it�s necessary, break out your grinder and smooth over the top of the plate. Seeing as how the weld fully penetrated through the steel in the center of the plate, you�ll know you�ve done it right when you grind it all down to a uniform look, as if the holes were never there to begin with.
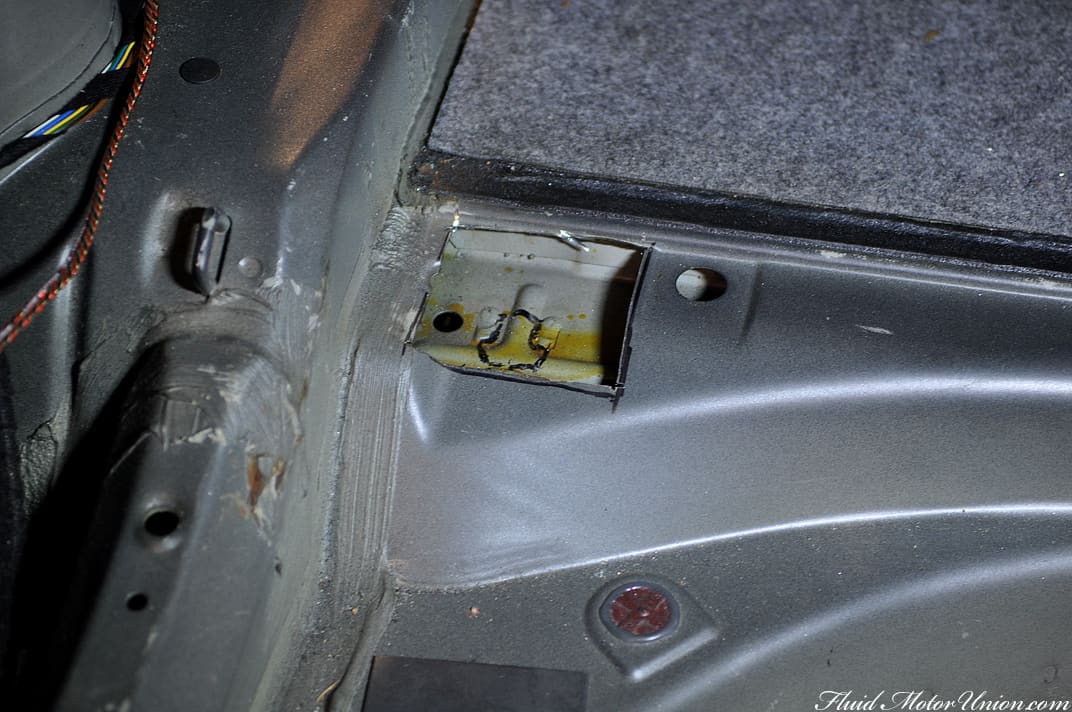
For now, you�re done with the underbody plates. That leaves us with two remaining reinforcement plates, a pair of pretty plain rectangles (there�s two more pieces also, but we�ll get to those soon). For these, you�ll need to dive into your trunk. Remove the trunk carpeting and anything else you may have that prevents you from accessing the sheet metal trunk floor. With all that out of the way, and with your Turner instructions in-hand to double-check everything, find the cutting points (at the edge of each side of the trunk floor, up against the lip where you can see one plate in the first picture below) and use a marker to draw an outline around them. Then, remove the plate and draw another line 1/4″ to 1/2″ inside of that. Cut that inner square out.
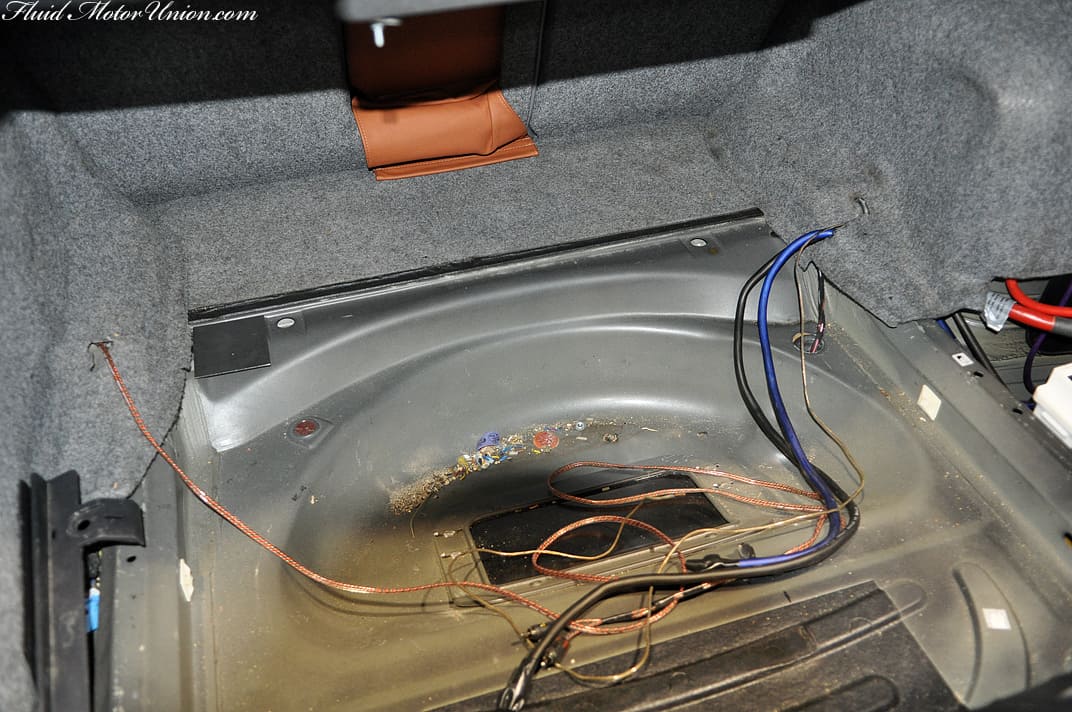
Inside the hole you�ve cut, you�ll see a T-shaped ridge in the metal, with three bumps on each side of that T. Those are OEM rosette welds, but they alone are not strong enough to bear the weight of the subframe and all its components. Therefore, we�ll be strengthening it a bit. Draw a phallic triangle shape on the inside of those rosette welds, on top of the T-shaped ridge, just as you see below. You�ll need to cut that little triangle out, then weld that metal panel to the panel beneath it. Heed caution when welding, as some of the chemicals on this sheet metal do not react favorably to prolonged heat exposure. Once you�ve welded the layers together inside that triangle, lay down some primer (so nothing corrodes). From there, it�s time to use the Turner plates to replace that square hole you cut in the trunk floor. Weld that together, and add primer to once again prevent corrosion.
While you�ve got the primer out, return to the underbody of the vehicle and make sure to cover every piece of exposed sheet metal with new paint. This will prevent corrosion, which can lead to catastrophic failure of the sheet metal. Here, we�re using some delightful olive drab primer to match the rest of the underbody, but really, the color choice is up to you. You can also use seam sealer around the edges for extra protection if you�re worried that you didn�t fully penetrate every angle of the plate.
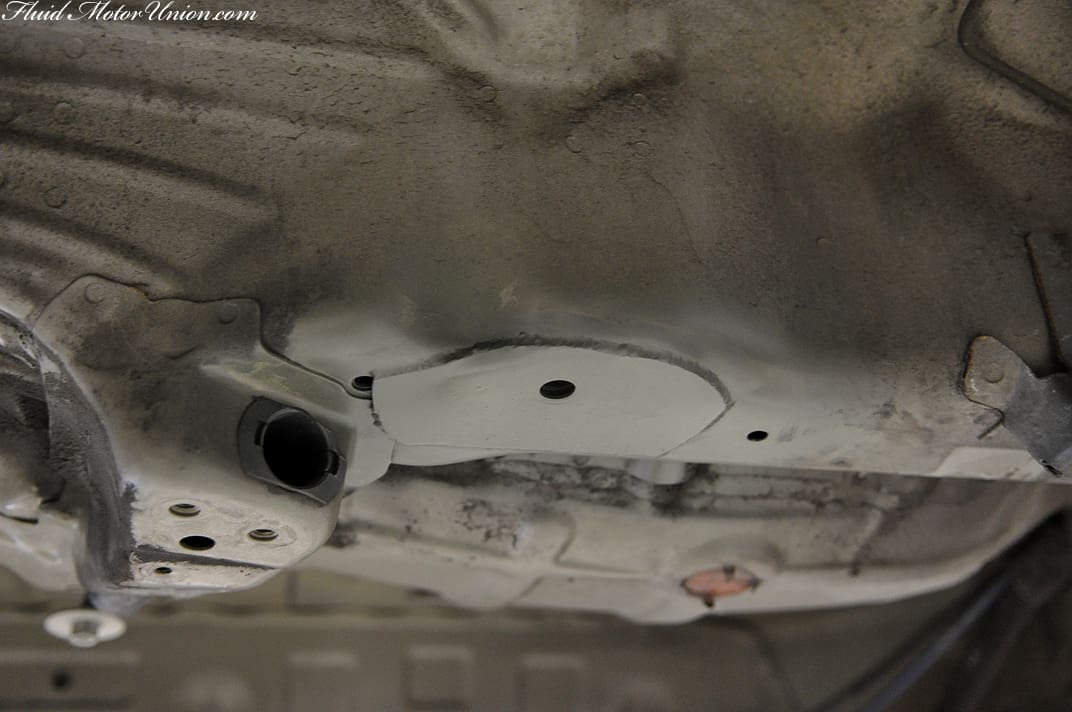
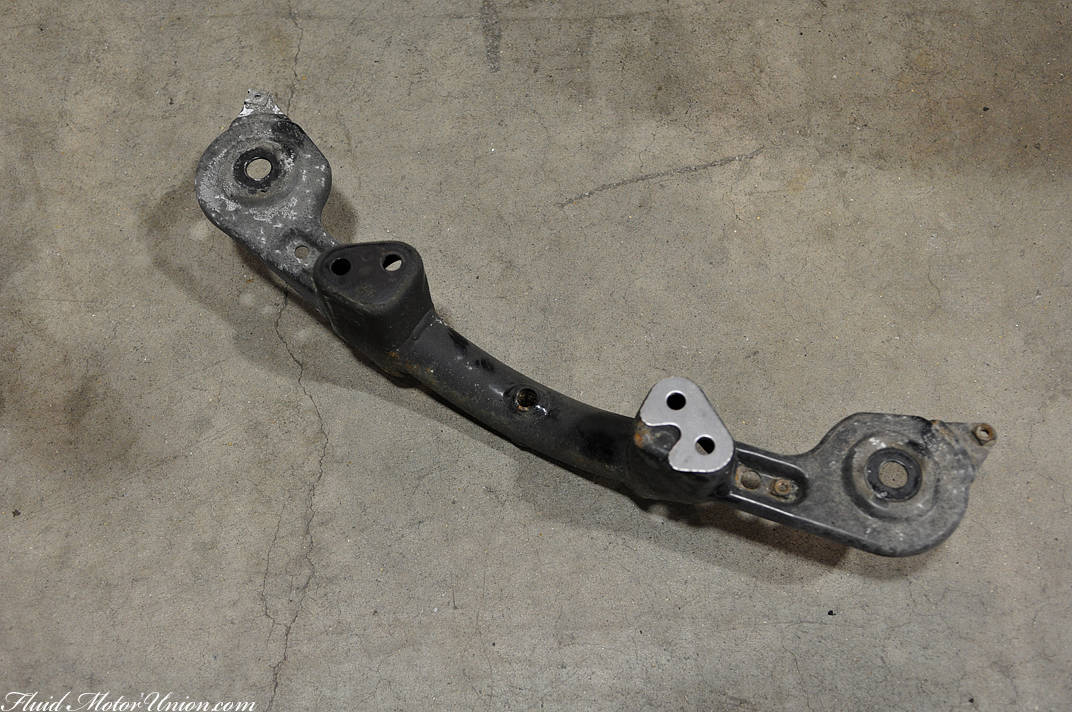
Now, your Turner kit should have two small, B-shaped pieces of metal remaining. Seeing as how we increased the thickness of the underbody by adding the reinforcement plates, we�ll need these two metal spacers to space out the subframe crossmember by the same amount. The steel crossmember you see below is for the E46 M3 we have, but if you are driving a standard-issue E46 non-M, then it�ll be made of aluminum. Either way, don�t forget to add these plates or you�ll risk ruining the crossmember. Below, you can see the picture of the cross-member, with the right-side plate in its correct positioning.
And that�s all she wrote for installing the E46 M3 subframe reinforcement kit! Now, button everything back up in the opposite order, starting with the fuel tank. Bear in mind that you will probably want to borrow a friend to have them help you snake the emergency brake cables through their respective tunnels on the underbody. Make sure everything comes together just like it did previously, and your result should look exactly like it did before you even touched it. Make sure all bolts are tightened to the proper torque specs, and give it a slow jaunt around your block once you�ve completed to make sure everything feels secure.

Now, you can do more while the subframe�s out � specifically, you can replace the subframe bushings, which is what the customer requested we do for him. So come on back tomorrow and we�ll cover that, along with a reintroduction of our regularly scheduled blog programming. Have a great day!
If you�ve been following the last two parts of the DIY, which we�ve run yesterday and Tuesday, you should have your underbody surfaces prepped as well as your reinforcement plates. From here, it�s a good idea to whip out your Turner-supplied instructions as a complement to the pictures here, just in case something isn�t clear. The first thing you�ll need to do today is break out your cordless drill and 1/2″ drill bit. You see those larger holes in the subframe reinforcements? That�s where you�ll be drilling. After mounting up the plates using the supplied bolt, take the drill and drill slightly into the sheet metal through that hole; don�t punch all the way through to the inside of the car, but drill it just enough so that you can lay down a rosette weld to seal together the layers of metal underneath the reinforcement plate.
From there, lay down your welds! The customer requested we TIG the plates, but using a MIG welder is 100% okay, as well. As a matter of fact, it�ll be much easier to MIG the holes in the reinforcement plates. Move from plate to plate until they�re complete, making sure you have each plate in the proper orientation with enough space around the edges to account for the welding bead. Some shapes will be more difficult than others. Make sure you get the edges of the plates in their entirety, along with the holes in the middle of the plates.
If you MIG welded either your rosette welds or the edges of the reinforcement plates, you might have some excess weld slag that could possibly prevent a full connection between the subframe and its mounting point. You�ll want the surface to be flat, so if it�s necessary, break out your grinder and smooth over the top of the plate. Seeing as how the weld fully penetrated through the steel in the center of the plate, you�ll know you�ve done it right when you grind it all down to a uniform look, as if the holes were never there to begin with.
For now, you�re done with the underbody plates. That leaves us with two remaining reinforcement plates, a pair of pretty plain rectangles (there�s two more pieces also, but we�ll get to those soon). For these, you�ll need to dive into your trunk. Remove the trunk carpeting and anything else you may have that prevents you from accessing the sheet metal trunk floor. With all that out of the way, and with your Turner instructions in-hand to double-check everything, find the cutting points (at the edge of each side of the trunk floor, up against the lip where you can see one plate in the first picture below) and use a marker to draw an outline around them. Then, remove the plate and draw another line 1/4″ to 1/2″ inside of that. Cut that inner square out.
Inside the hole you�ve cut, you�ll see a T-shaped ridge in the metal, with three bumps on each side of that T. Those are OEM rosette welds, but they alone are not strong enough to bear the weight of the subframe and all its components. Therefore, we�ll be strengthening it a bit. Draw a phallic triangle shape on the inside of those rosette welds, on top of the T-shaped ridge, just as you see below. You�ll need to cut that little triangle out, then weld that metal panel to the panel beneath it. Heed caution when welding, as some of the chemicals on this sheet metal do not react favorably to prolonged heat exposure. Once you�ve welded the layers together inside that triangle, lay down some primer (so nothing corrodes). From there, it�s time to use the Turner plates to replace that square hole you cut in the trunk floor. Weld that together, and add primer to once again prevent corrosion.
While you�ve got the primer out, return to the underbody of the vehicle and make sure to cover every piece of exposed sheet metal with new paint. This will prevent corrosion, which can lead to catastrophic failure of the sheet metal. Here, we�re using some delightful olive drab primer to match the rest of the underbody, but really, the color choice is up to you. You can also use seam sealer around the edges for extra protection if you�re worried that you didn�t fully penetrate every angle of the plate.
Now, your Turner kit should have two small, B-shaped pieces of metal remaining. Seeing as how we increased the thickness of the underbody by adding the reinforcement plates, we�ll need these two metal spacers to space out the subframe crossmember by the same amount. The steel crossmember you see below is for the E46 M3 we have, but if you are driving a standard-issue E46 non-M, then it�ll be made of aluminum. Either way, don�t forget to add these plates or you�ll risk ruining the crossmember. Below, you can see the picture of the cross-member, with the right-side plate in its correct positioning.
And that�s all she wrote for installing the E46 M3 subframe reinforcement kit! Now, button everything back up in the opposite order, starting with the fuel tank. Bear in mind that you will probably want to borrow a friend to have them help you snake the emergency brake cables through their respective tunnels on the underbody. Make sure everything comes together just like it did previously, and your result should look exactly like it did before you even touched it. Make sure all bolts are tightened to the proper torque specs, and give it a slow jaunt around your block once you�ve completed to make sure everything feels secure.
Now, you can do more while the subframe�s out � specifically, you can replace the subframe bushings, which is what the customer requested we do for him. So come on back tomorrow and we�ll cover that, along with a reintroduction of our regularly scheduled blog programming. Have a great day!


Comment