 Tweet
Tweet
Hello to all.
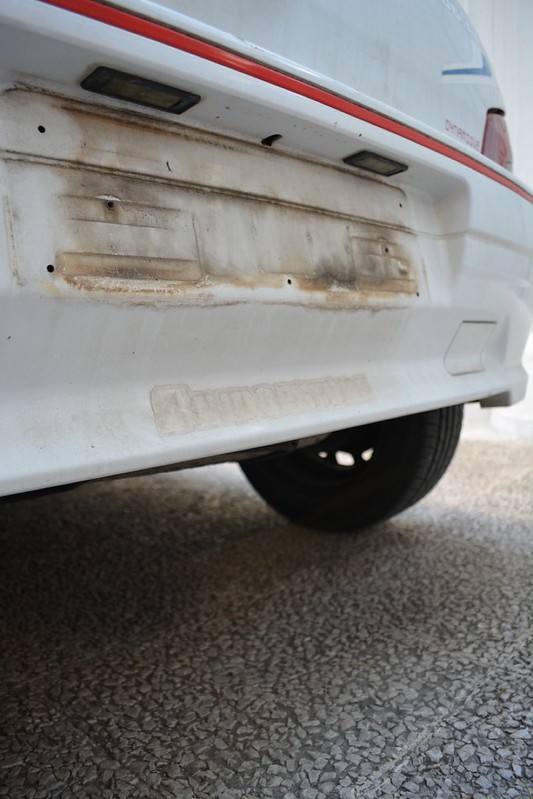
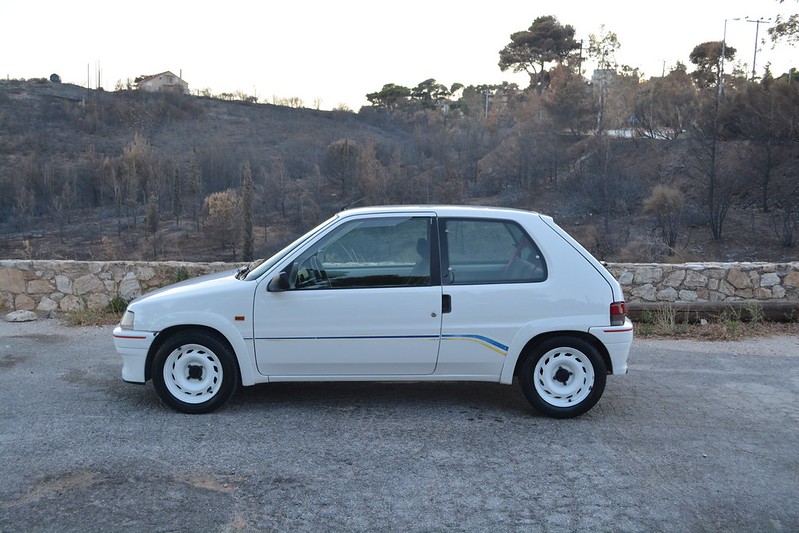
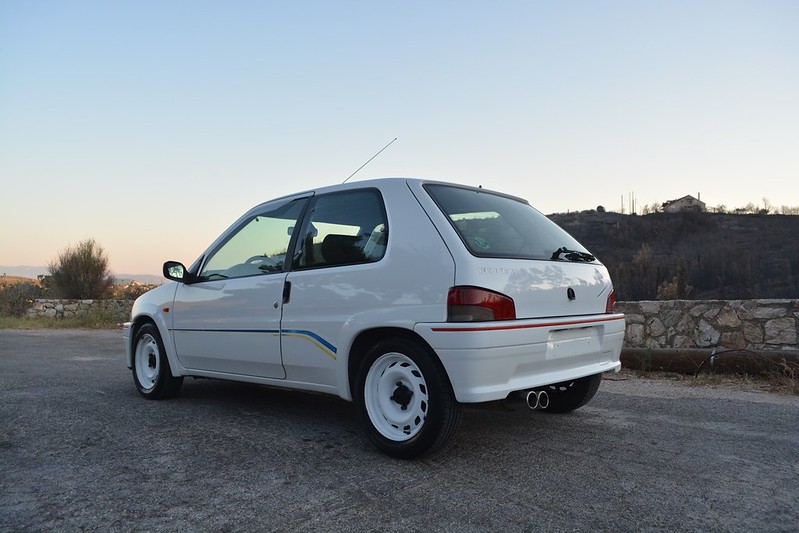
This is the story of a 1996, one owner, 106 Rallye 1,3, no crash history, and except for some superficial rust on the trunk area, a rust free car.
The car was being used as a daily, for the last 26 years from its owner. However as you will see, apart from being dirty and tired, it is a true gem.
The paint, which is a single paint, is tired and the car is flat, with no gloss left, almost like it was wetsanded. Mechanically it has 259k kms, starts right up, has no issues revving to the rev limiter, and honestly, in case you cant tell already, I love this car for many years now. More than 10 actually.
In case you havent figured it out yet, how much I love it, you probably will, by the end of this work carried out by me, in two calendar days. Working time was about 25 hours into this.
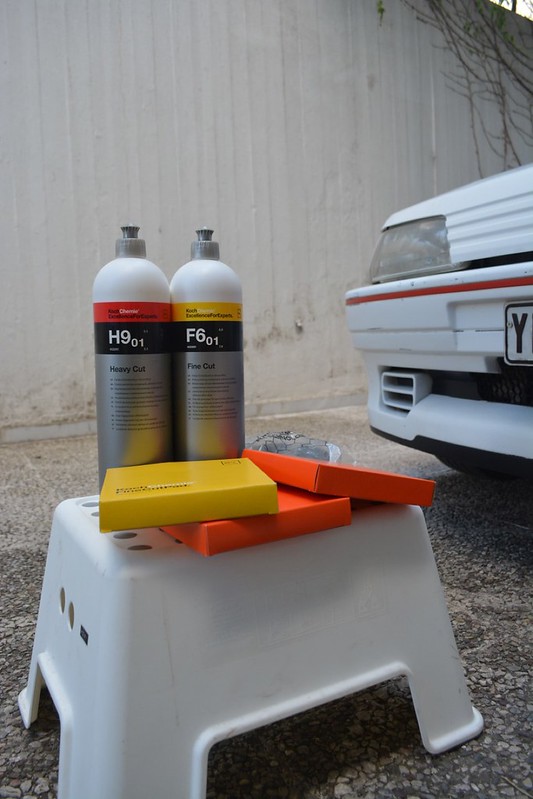
My first task was to clean the exterior of the car as well as i could, decontaminate it, then do the interior, the engine bay, and then, if i had time, and also, the needed skills, to do a correction on the paint to bring back some life into it.
Ideally i would also like to do the underbody of the car, but I needed the shop available to do that, since i dont have a lift. Yet.
So let's dig into the story of how things went.
One of my first tasks was to remove some very old stickers.
 Untitled by mgpdoc, on Flickr
 Untitled by mgpdoc, on Flickr
 Untitled by mgpdoc, on Flickr
 Untitled by mgpdoc, on Flickr
 Untitled by mgpdoc, on Flickr
 Untitled by mgpdoc, on Flickr
No more stickers
 Untitled by mgpdoc, on Flickr
Took a lot of time to remove them all, glue remover, and then cutting compound to remove the outlines.
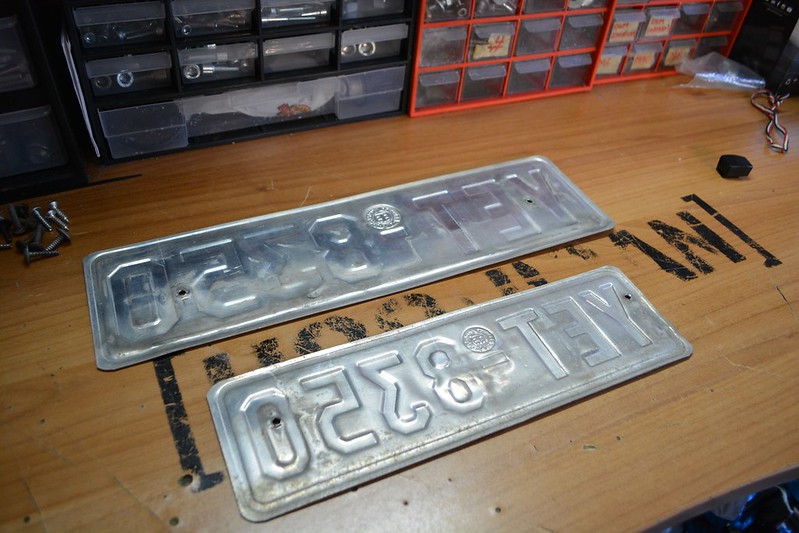
Removed the plates, to throw the surrounding plate, replace rusted bolts, paint the letters, and straighten them
 Untitled by mgpdoc, on Flickr
 Untitled by mgpdoc, on Flickr
After cleaning them , i added some carpet from behind like i always do to prevent rattling and scratching the paint
 Untitled by mgpdoc, on Flickr
 Untitled by mgpdoc, on Flickr
New bolts
 Untitled by mgpdoc, on Flickr
Much better, even though not perfect
 Untitled by mgpdoc, on Flickr
Fuel cap before
 Untitled by mgpdoc, on Flickr
And after
 Untitled by mgpdoc, on Flickr
Rusty wiper arm before
 Untitled by mgpdoc, on Flickr
Removed
 Untitled by mgpdoc, on Flickr
 Untitled by mgpdoc, on Flickr
And somewhat better after my paint booth
 Untitled by mgpdoc, on Flickr
Wheels were next
 Untitled by mgpdoc, on Flickr
 Untitled by mgpdoc, on Flickr
 Untitled by mgpdoc, on Flickr
Multiple passes
 Untitled by mgpdoc, on Flickr
Rears before
 Untitled by mgpdoc, on Flickr
And after
 Untitled by mgpdoc, on Flickr
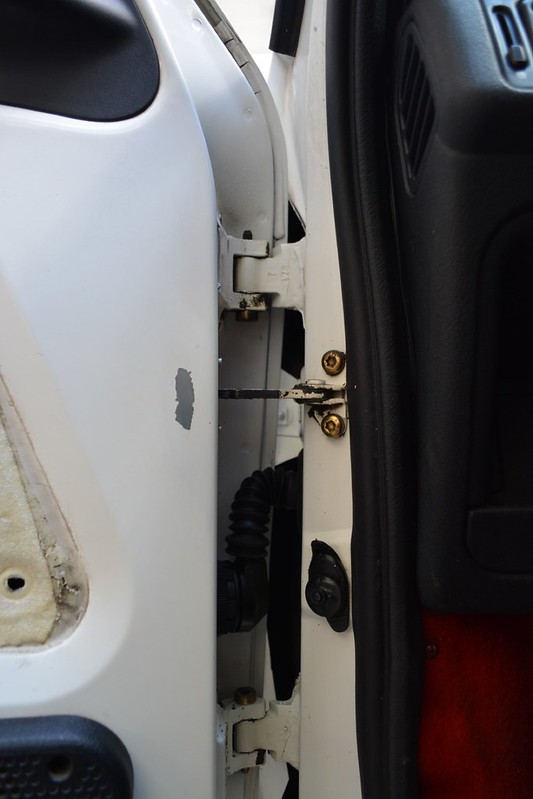
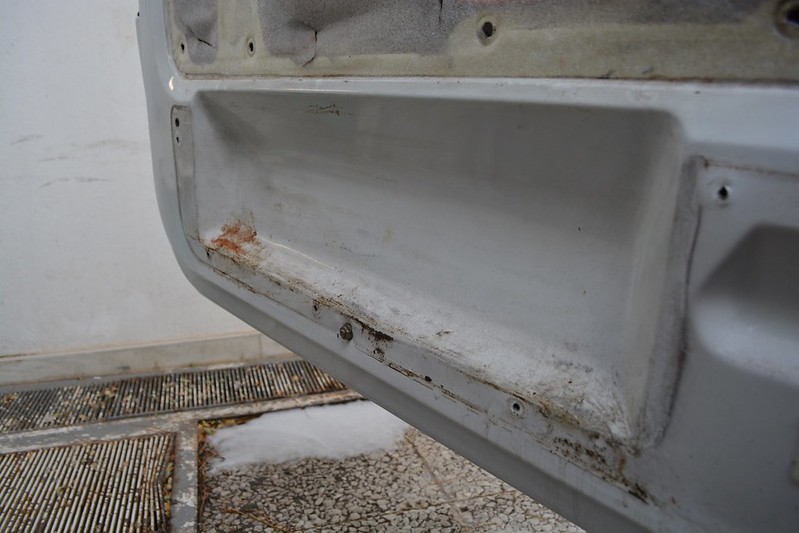
Door shuts
 Untitled by mgpdoc, on Flickr
And after. These cleaned better than i thought they would
 Untitled by mgpdoc, on Flickr
Then i sprayed the car with an iron removed in places to soak before the multiple passes of snow foam.
 Untitled by mgpdoc, on Flickr
 Untitled by mgpdoc, on Flickr
 Untitled by mgpdoc, on Flickr
Nothing to see here
 Untitled by mgpdoc, on Flickr
 Untitled by mgpdoc, on Flickr
 Untitled by mgpdoc, on Flickr
 Untitled by mgpdoc, on Flickr
Lost count of how many times I snowfoamed the car with Koch GS snowfoam
 Untitled by mgpdoc, on Flickr
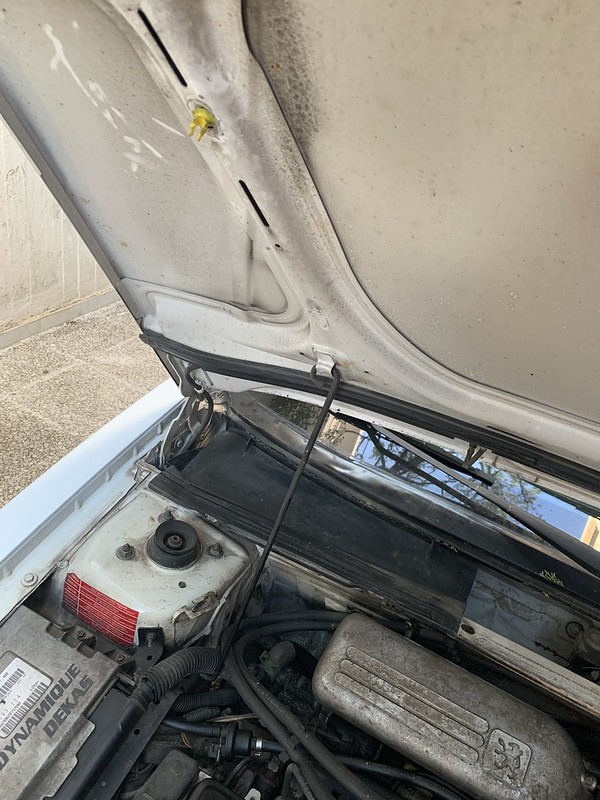
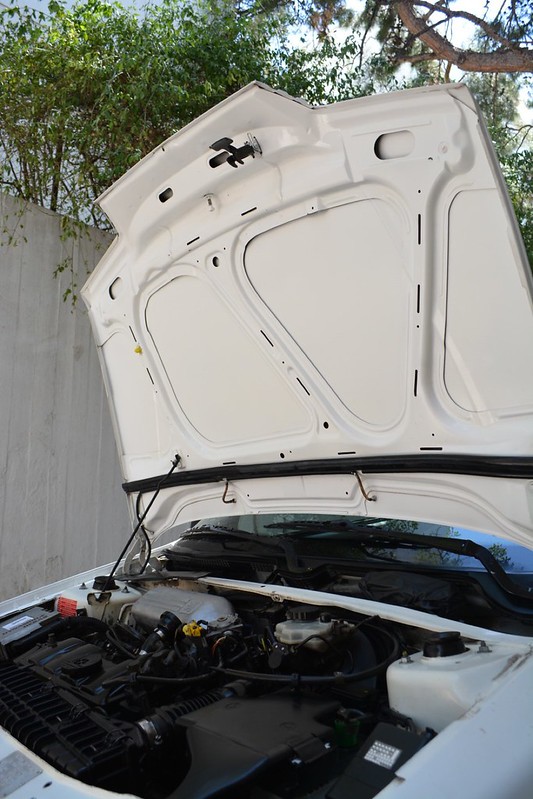
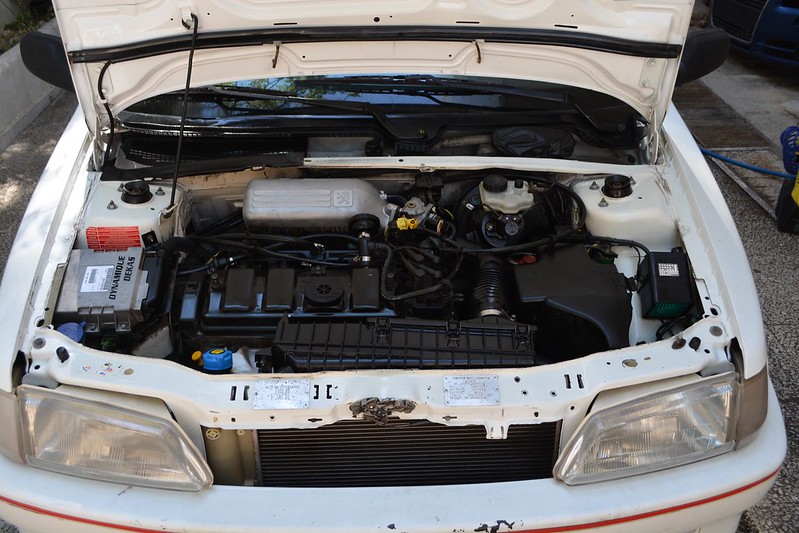
Then before cleaning the car properly i attacked the engine bay, which i was a bit skeptical due to the exposed electrics etc. But if you have common sense and air from the compressor you cant go wrong.
Weapons. Well some of them
 Untitled by mgpdoc, on Flickr
What I had to deal with
 Untitled by mgpdoc, on Flickr
 Untitled by mgpdoc, on Flickr
 Untitled by mgpdoc, on Flickr
 Untitled by mgpdoc, on Flickr
 Untitled by mgpdoc, on Flickr
 Untitled by mgpdoc, on Flickr
 Untitled by mgpdoc, on Flickr
 Untitled by mgpdoc, on Flickr
 Untitled by mgpdoc, on Flickr
 Untitled by mgpdoc, on Flickr
 Untitled by mgpdoc, on Flickr
And here is what i managed, after washing, drying, enhancing the plastics and also hand polishing some body parts with cutting compound to take off the yellowing from the years
 Untitled by mgpdoc, on Flickr
 Untitled by mgpdoc, on Flickr
 Untitled by mgpdoc, on Flickr
 Untitled by mgpdoc, on Flickr
 Untitled by mgpdoc, on Flickr
 Untitled by mgpdoc, on Flickr
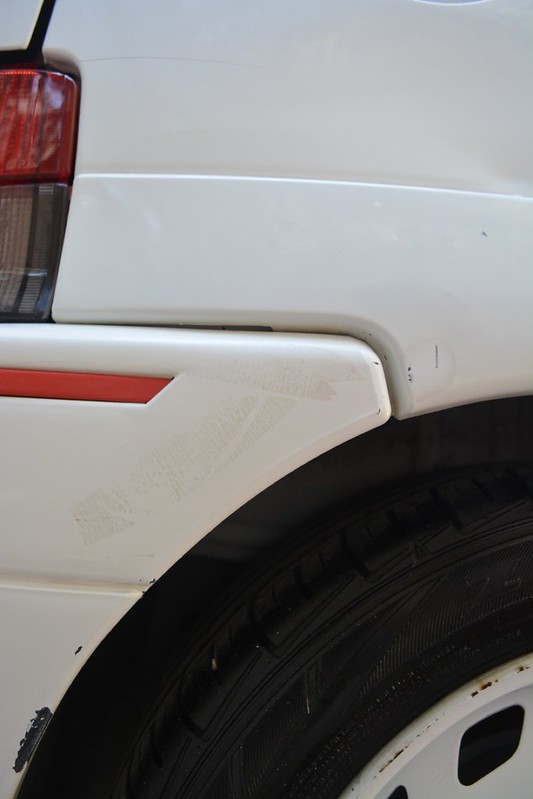
From this
 Untitled by mgpdoc, on Flickr
To this
 Untitled by mgpdoc, on Flickr
Then again a snowfoam, to do the exhaust and spare wheel. Exhaust will be thrown away for a more appropriate one, dont worry.
 Untitled by mgpdoc, on Flickr
Next post is the interior.
This is the story of a 1996, one owner, 106 Rallye 1,3, no crash history, and except for some superficial rust on the trunk area, a rust free car.
The car was being used as a daily, for the last 26 years from its owner. However as you will see, apart from being dirty and tired, it is a true gem.
The paint, which is a single paint, is tired and the car is flat, with no gloss left, almost like it was wetsanded. Mechanically it has 259k kms, starts right up, has no issues revving to the rev limiter, and honestly, in case you cant tell already, I love this car for many years now. More than 10 actually.
In case you havent figured it out yet, how much I love it, you probably will, by the end of this work carried out by me, in two calendar days. Working time was about 25 hours into this.
My first task was to clean the exterior of the car as well as i could, decontaminate it, then do the interior, the engine bay, and then, if i had time, and also, the needed skills, to do a correction on the paint to bring back some life into it.
Ideally i would also like to do the underbody of the car, but I needed the shop available to do that, since i dont have a lift. Yet.
So let's dig into the story of how things went.
One of my first tasks was to remove some very old stickers.
Untitled by mgpdoc, on FlickrUntitled by mgpdoc, on FlickrUntitled by mgpdoc, on FlickrUntitled by mgpdoc, on FlickrUntitled by mgpdoc, on FlickrUntitled by mgpdoc, on FlickrNo more stickers
Untitled by mgpdoc, on FlickrTook a lot of time to remove them all, glue remover, and then cutting compound to remove the outlines.
Removed the plates, to throw the surrounding plate, replace rusted bolts, paint the letters, and straighten them
Untitled by mgpdoc, on FlickrUntitled by mgpdoc, on FlickrAfter cleaning them , i added some carpet from behind like i always do to prevent rattling and scratching the paint
Untitled by mgpdoc, on FlickrUntitled by mgpdoc, on FlickrNew bolts
Untitled by mgpdoc, on FlickrMuch better, even though not perfect
Untitled by mgpdoc, on FlickrFuel cap before
Untitled by mgpdoc, on FlickrAnd after
Untitled by mgpdoc, on FlickrRusty wiper arm before
Untitled by mgpdoc, on FlickrRemoved
Untitled by mgpdoc, on FlickrUntitled by mgpdoc, on FlickrAnd somewhat better after my paint booth
Untitled by mgpdoc, on FlickrWheels were next
Untitled by mgpdoc, on FlickrUntitled by mgpdoc, on FlickrUntitled by mgpdoc, on FlickrMultiple passes
Untitled by mgpdoc, on FlickrRears before
Untitled by mgpdoc, on FlickrAnd after
Untitled by mgpdoc, on FlickrDoor shuts
Untitled by mgpdoc, on FlickrAnd after. These cleaned better than i thought they would
Untitled by mgpdoc, on FlickrThen i sprayed the car with an iron removed in places to soak before the multiple passes of snow foam.
Untitled by mgpdoc, on FlickrUntitled by mgpdoc, on FlickrUntitled by mgpdoc, on FlickrNothing to see here
Untitled by mgpdoc, on FlickrUntitled by mgpdoc, on FlickrUntitled by mgpdoc, on FlickrUntitled by mgpdoc, on FlickrLost count of how many times I snowfoamed the car with Koch GS snowfoam
Untitled by mgpdoc, on FlickrThen before cleaning the car properly i attacked the engine bay, which i was a bit skeptical due to the exposed electrics etc. But if you have common sense and air from the compressor you cant go wrong.
Weapons. Well some of them
Untitled by mgpdoc, on FlickrWhat I had to deal with
Untitled by mgpdoc, on FlickrUntitled by mgpdoc, on FlickrUntitled by mgpdoc, on FlickrUntitled by mgpdoc, on FlickrUntitled by mgpdoc, on FlickrUntitled by mgpdoc, on FlickrUntitled by mgpdoc, on FlickrUntitled by mgpdoc, on FlickrUntitled by mgpdoc, on FlickrUntitled by mgpdoc, on FlickrUntitled by mgpdoc, on FlickrAnd here is what i managed, after washing, drying, enhancing the plastics and also hand polishing some body parts with cutting compound to take off the yellowing from the years
Untitled by mgpdoc, on FlickrUntitled by mgpdoc, on FlickrUntitled by mgpdoc, on FlickrUntitled by mgpdoc, on FlickrUntitled by mgpdoc, on FlickrUntitled by mgpdoc, on FlickrFrom this
Untitled by mgpdoc, on FlickrTo this
Untitled by mgpdoc, on FlickrThen again a snowfoam, to do the exhaust and spare wheel. Exhaust will be thrown away for a more appropriate one, dont worry.
Untitled by mgpdoc, on FlickrNext post is the interior.


Comment