-
You could cut just the hood skin and leave the reinforcing underneath, just have to make a really shallow cut so you only cut the skin. -
Okay, say that fiberglass were used. Would you cut any part of the hood under the bulge area, or would you just bond the bulge over top of the hood? Would it be worth trying to reinforce the underside of the hood to minimize flex? I'm just really trying to make it last as long as possible with hoods being such a heavy flex and heavy use part of the carLeave a comment:
-
Alright guys, I've been meaning to ask this question for a while now.
I have an e46 M3 'power bulge' hood cutout, and I'm trying to put it on a facelift e46 sedan hood. Problem is, the M3 hood is aluminum and the non-M hoods are all steel. I understand that aluminum and steel can't be welded, but what's the best way to bond them? I want to have a 'perfect' appearance and obviously the hood needs to be able to flex a certain amount without cracking bondo and whatnot.
Is this possible?Leave a comment:
-
the point of this thread is for those seeking advice. Not to just post pictures of your welds.Leave a comment:
-
some titanium and steinless love
[IMG]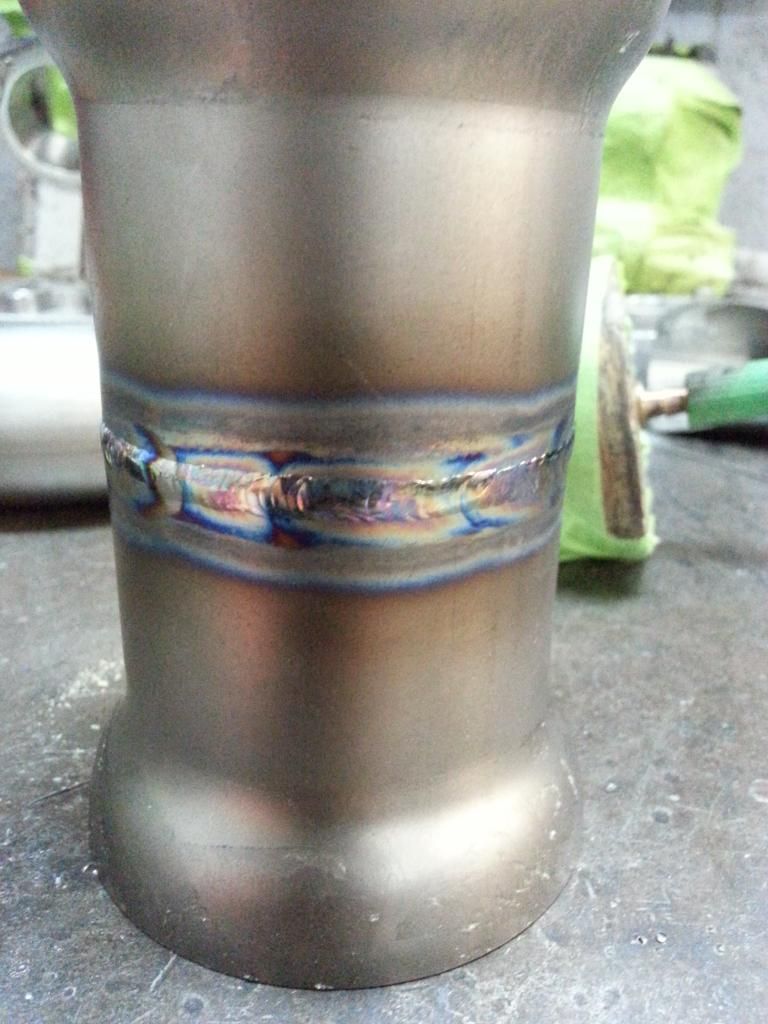 [/IMG]
[IMG]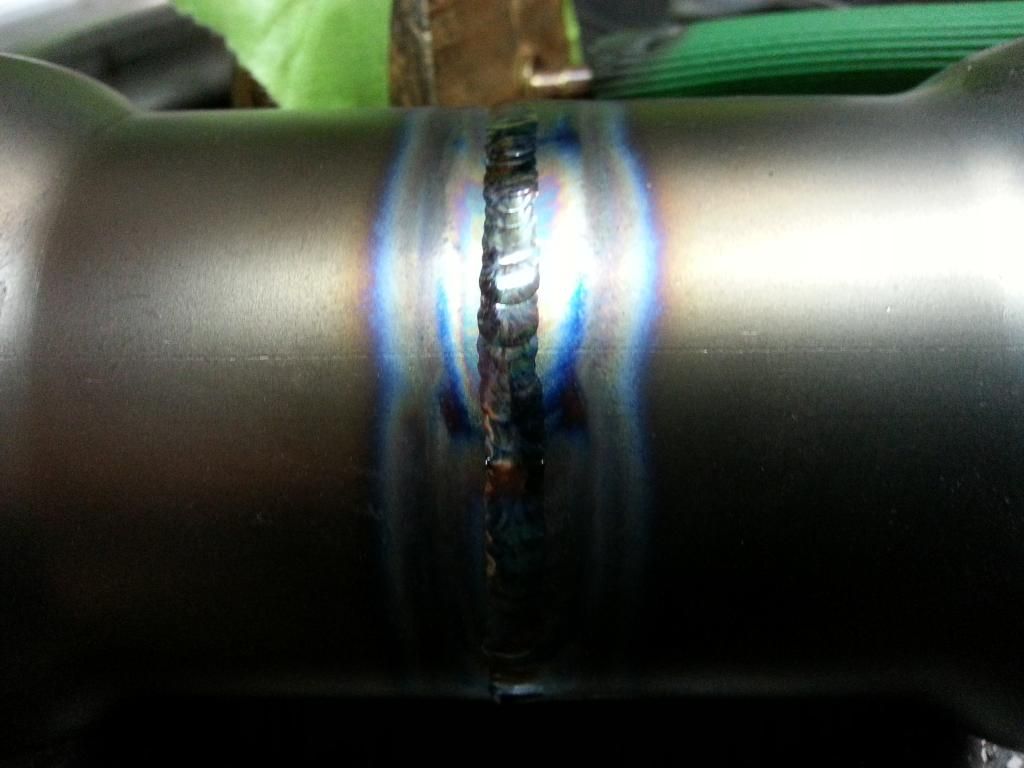 [/IMG]
[IMG] [/IMG]
Leave a comment:
-
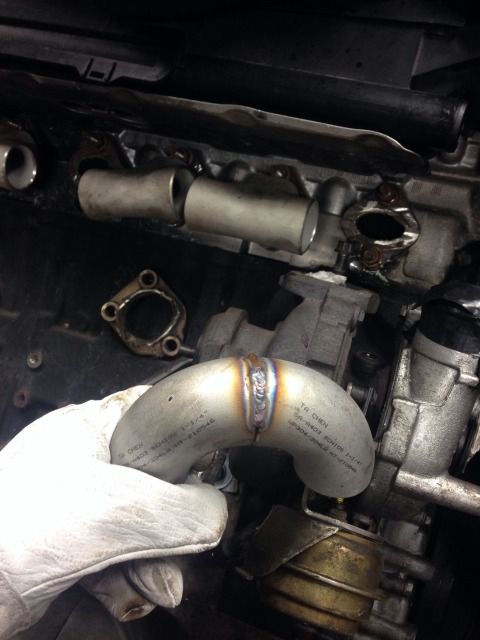
got a but load of sheet metal repairs and fab pics but these where 2 real recent jobs, If anyones after advice on welding in sheet metal panels let me know
Leave a comment:
-
I would try to get it a little better first. It could hold up, but a little more effort will make it that much better.
If you're having to sway to keep the pool something is up. A few variables are at play. What size tungsten and filler rod are you using?
I would start with cranking up the amps. From the first scratch play both sides of the chamfer and get the initial pool started, but try to run the bead straight down the chamfer after that. If it starts sucking the edges in and burning thats fine just add rod to keep up. This will ensure penetration. It's a fine line between pulling the metal in, burning through it, and adding enough rod. A little more practice and you will have it. Keep the arc tight and add some amps. Should get some better results.Leave a comment:
-
Do you think this quality of weld will hold up in a turbo manifold then?Originally posted by Heist View Post
I hadn't thought there was a need to clean up the chamfer pipe so hopefully that will help! I will be back purging when I move onto the manifold I was just trying to save some gas for now. I think some of the left right was just caused by trying to keep a pool going between the two surfaces, would that mean I could turn up the amps or is my joint too open? I was swaying a bit too.
Thanks for your insight, always amazes me how a skilled welder can look at a weld and see just exactly what's going on!Leave a comment:
-
Smokey Bear- Not bad. I would clean the stainless (use a stainless wire wheel and/or some paper). Chamfer pipe is great, but still having the surrounding metal shiny/clean will ensure your not pulling in contaminants. Also, looks like you're not back purging, which is always a good idea, but not the end of the world if you can't. If you're not planning on back purging make sure the gaps are minimal to reduce sugar on the back. Penetration looks ok, but since you're pulling left to right it's hard to judge.
Scratch start is a little more difficult, but I would tack both sides (clean up the tacks) and set up the pipe so you move your arc smoothly along a nice section. That way you can jump on it and keep a clean line moving. It looks like you're swaying a little bit, so just work on your hand position and keep the arc close to the metal and nice and tight.
Little more practice and you will have some clean beads.Leave a comment:
-
This is a practice run for the manifold for my e34.
If anyone can see where I could improve for some extra strength them I'd be very greatful. It's shed 10 stainless using about 35-40 Amps with a scratch start tig inverter welded. The weld seems to be a bit grey, the first pass I did oxidised so u turned the Amos down and gave a little more gas.
All kinds of constructive criticism wanted and welcome please and thanks!!!Leave a comment:
-
also looks like you're just tacking? Not running a full bead? Looks like you're getting penetration ok, hit it with a grinder!
You really need a welder that will let you adjust.Leave a comment:
-
anti.engineered- few things from the second photo that could be part of your problem. The metal needs to be as clean as possible. If you have any paint left on the surface (even on the back) it will suck it up and give you mediocre welds. If you can get shiny metal it's the best. In addition, a stellar ground is day and night. Make sure the ground is on extremely clean metal.
The welds look very uneven, which is usually angle of gun tip and distance. Practice your angle on scrap pieces with similar angles. I would say you're too far from the metal and have the wrong angle from the photo. Try getting closer with the arc and a less vertical torch form.Leave a comment:
-
I wonder if you can "hack" the machine with some DIY wiring to make it more adjustable? Maybe google the model name and number and see if anyone has done it? One thing I thought of that you could possibly adjust is your "stick out", which is the amount that the nozzle protrudes from the shroud.
Yep preparation and clean metal are both very important. Do you have a good ground clamp? You can wrap some copper wire around where you put the clamp to get a better ground on the cheap. Don't forget to NEVER use brake cleaner on your metal before welding, it's highly toxic when burnt.
At the end of the day I'm just a noob with an entry-level MIG too but these are the just some of the things that I've watched/read in the past 12 months. Most of what I've learnt, apart from practicing on scrap, comes from weldingtipsandtricks.com and migwelding.co.uk, give those places a visit when you have time
Leave a comment:


Leave a comment: