If you don't include all the extra stuff I've had to order due to mistakes (such as the first aluminum bag plate idea, extra air line, and lots of extra hardware), I spent almost exactly $3000 on the air ride setup, though that's with e-Level, hard lines, and flow controls. It's a complex setup, and the cost reflects that. God forbid you add in all the extra costs from my bad ideas and screwups.
Were I you, I'd do the following, and you can trim the fat off this to suit your needs and budget:
$1600 for V2 management, 4 gallon tank, twin compressors, blah blah blah.
$400 for SS-5s.
$80 for bag plates
$50-100 for the metal pipe and plates to make the brackets and retention plates (4" pipe ain't cheap!)
$200 for fabrication
$50-$100 for miscellaneous pneumatic fittings, hardware, thread tape, that kind of shit
That takes you to about $2400-$2500 depending on how cheap you can get stuff. You can shave $200 off that if you only run a single compressor, and another $200 if you can find a buddy to cut the tubes and weld for you.
Regarding tank size: A little bit depends on what drivetrain you've got. Part of the reason that a 2.5 gallon tank at 200 psi is so barely sufficient on mine is that the OM606 engine is just absurdly heavy, meaning a lot of air is required to lift the front of the car to ride height. My front bags sit at about 130 psi at ride height, which is a lot for a bag as big as the SS-5. Nevertheless, if you can reasonably package a 4 or 5 gallon tank, go that route. You'll be glad for the extra air.
-
Awesome thanks for the plate link.Originally posted by Oh Damn, it's Sam View Post
Agree about bagriders hence the desire to get an idea and ask them to put it together.
Look to be honest I've learned more about this from you and this thread than before so not really sure what I should do. Basically, whichever way I splice it with v2 management, the ss5's I'm ending up at around 1500-1800 total.. So perhaps I should be asking you instead- what would you spec for the w124 for that budget? Perhaps I'd better just go with that since I'm not really experienced enough to make judgements on psi vs tank size etc- I have no reference and a very gracious host guiding me
Leave a comment:
-
I would still recommend twin comps if you can afford it. A single 444c takes longer than I'd like to fill the tank, though maybe I'm just fussy. I'd especially recommend twin comps if you're going to run a larger tank, which you might want to if you don't plan on filling to 200 psi for the sake of the V2 system. Another advantage is that you get some redundancy in case a compressor fails. I have yet to have that happen, and trust me, I've beaten the SHIT out of Viair compressors, including running a 275c in an enclosed air space for close to an hour straight, but you never know.
SS-5-specific plates are here. The 4.5" ones are correct for the SS-5s.
Yet another reason to go with Bag Riders is that their customer service is superb and they make an effort to be a part of the community. That goes a long way with me.Leave a comment:
-
Lots of food for thought.
Firstly thanks for the vid this really makes me confident 1/4" lines are going to be fine. It also seems to indicate to me I won't need dual compressors if you're able to do what you did in the video within the same "go".. I too prefer the smooth and steady pace also..
I'll definitely get hosing that's a great tip..
Where do you get SS5 specific plates? I couldn't work it out on their website.
You have a 444 right?.. I can option that into the bagriders package.. It'd be good to know it works for you- and if you're saying the tank is nicer etc I'll just go with that... It's better to have over-speced than under speced :PLeave a comment:
-
[ame="http://www.youtube.com/watch?v=29vzMGUl8xc"]http://www.youtube.com/watch?v=29vzMGUl8xc[/ame]Leave a comment:
-
Alright, so, going down your list, a couple of thoughts:
Get the Slam Specialties-specific bag plates. They're cheaper, and they're cut exactly for the SS-5s.
You can get the R129 top mounts from Pelican Parts for about half the price of Amazon.
Bag Riders's kits come with a line cutter already, so save yourself the couple of bucks.
I prefer either the pink gas line thread tape or Rectorseal T+2 myself. The white stuff is fine, but the pink tape is thicker and seems to seal better. Some people swear by Loctitle 565, but I've never used it.
You're also going to probably need a few tees and hex nipples unless you're planning on threading all your accessories into the tank itself. I'd also recommend some sort of tank drain, even with a water trap and an aluminum tank. You're going to also want some PTC-NPT fittings to thread into the bags - they're 1/2" NPT if I remember right. While you're shopping, get yourself enough reinforced fuel line hose or similar to completely cover your lines for their entire run as added protection. You do NOT want something chafing through a line at 75 MPH.
The kit on Amazon comes with a 380c instead of a 400c as you noted, and a considerably less nice tank. It also doesn't come with a line cutter, and I imagine there are a couple other niceties not included as well. Bag Riders's $350-off deal wouldn't apply to you, 'cause they consider a full kit to include air struts, but they are offering $150 off just the V2 kit.
Regarding the difference between the 380c and 400c: since V2 is limited to 175 psi, there's not a huge cost in sticking to a 150 psi-rated compressor for our application. I don't know what engine yours has got, but if it is a gasser, there's even less of a disadvantage for you, since your front bags are going to require less pressure to raise the car to ride height.
I would not, however, recommend the 400c, as its duty cycle is only 33%. For a mission-critical application like an air ride setup on a street car, I would not install anything that does not have a 100% duty cycle, just in case you wind up with a slow leak and the compressor has to work overtime keeping the system aired up. To that end, if you want to stick with 150 psi, a 450c or 460c would be a good choice (they appear to be identical aside from head style). If you did want to do 200 psi, either by putting a regulator before the V2 manifold, or by just risking it, I'd recommend either the 444c or the 480c compressors. One last option to consider if you're thinking of twin compressors is to go with a single Air Zenith OB2, as a single OB2 can flow more than twice what a 444c can, and is rated for continuous duty at 200 psi. They're beasts, though they are big and loud. In an ideal world we'd just all run belt-driven Yorks, and not even need to have air tanks
2.5 gallons at 200 psi is just about the bare minimum you can get away with, especially on a diesel. The additional pressure in the tank offers 1/3 more movement range than 150 psi offers, so in this application it basically acts as though it's a 3.3 gallon tank at 150 psi. Were I to do it again, I would go for a 4 gallon with an Air Zenith, as the 2.5 gallon is barely enough. If I air up to max height to clear my driveway, I don't have to wait for the compressor, but the compressor does kick on to refill the tank, which is annoying to listen to. I'd much rather only hear in when leaving in the morning, if I had to at all. This might not be as much of an issue if you don't have a fucking cliff you have to climb to get into your garage.
I run 3/8" line all around, but with the flow controls, I am not even using half their capacity. In hindsight, I would have been perfectly happy with 1/4" lines, but I prefer air ride to generally be pretty slow and sedate. I typically don't like the look of a car "jumping" to a height preset; it just looks trashy to me.
I'm headed out to give the car a bath in a minute here, and I'll shoot a quick vid of it airing up and down for you.Last edited by Oh Damn, it's Sam; 12-21-2014, 12:57 PM.Leave a comment:
-
Thanks for the info - this is really good.
My setup was going to be really temporary initially. I've installed stereos and such before and changed steering racks etc so I have some knowledge.. again, my fear is I just won't have the little grommet and I'll be stopped in my tracks .. heh
I might leave the spring replacement to the pros..
OK I'll post here, didn't want to derail. Basically I'd like to emulate your setup but am leaning towards the autopilot V2 management due to cost, easier to install, and I don't think I really need constant levelling (also the roads here are real dirty so prefer to have less there).
My list so far goes like this:
Basically trying to order from bagriders as they've answered a few of my enquiries and seems they get a lot of support here but am trying to figure out why there's $300 difference between their kit and the airlift one:Air Lift 27671 AutoPilot V2 Compressor Kit - http://www.amazon.com/Air-Lift-27671...dp/B007VX4DNE/
upper bag plate - http://bagriders.com/modlab/products...BAG-PLATE.html
lower bag plate - http://bagriders.com/modlab/products...BAG-PLATE.html
ss5 airbags - http://bagriders.com/modlab/products/SS%252d5.html
SMC DOT Swivel elbow - http://bagriders.com/modlab/products...VEL-ELBOW.html
SMC water trap - http://bagriders.com/modlab/products...ATER-TRAP.html
safety valve - http://bagriders.com/modlab/products/SAFETY-VALVE.html
distribution block - http://bagriders.com/modlab/products...ION-BLOCK.html
w129 dual shock mount kit - http://www.amazon.com/Mercedes-Strut.../dp/B00JJFHKKU
compressor silencer - http://bagriders.com/modlab/products...LATOR-KIT.html
airline cutter - http://bagriders.com/modlab/products...NE-CUTTER.html
smc check valve - http://bagriders.com/modlab/products...ECK-VALVE.html
tape - http://bagriders.com/modlab/products/THREAD-TAPE.html
vs
[ame="http://www.amazon.com/Air-Lift-27671-AutoPilot-Compressor/dp/B007VX4DNE/"]Amazon.com: Air Lift 27671 AutoPilot V2 Compressor Kit: Automotive[/ame] which is $977
I think the compressor is 380 vs 400. Is that really worth the $300+ difference? (Also it looks like bagriders has a deal going for $350 off v2 management "full kits" - not sure if that applies to what I'm considering but may be a consideration?)
I'm thinking apart from the list above I'm missing a few grommets but mostly should be good to go.. Just trying to understand the kit price difference..
Incidentally in your omnigraffle diagram I notice you have 2.5 gallon tank. The kits above come with 4 and 5 gallon. I understand this means the compressor will take longer to fill it if it's fully empty but it means I have more to 'play' with ... I'm happier to go to a smaller tank like yours but wondering why these kits seem to be around 4-5 (as with others on the forum) and you've chosen to go to 2.5 ? If I can do that I'll be happy to save the room..
You made a point of having a 200psi tank pressure- wondering why that would be a consideration? (Noting that the v2 can only go up to 175psi i believe).
And finally - do you have a completed video of you airing up and down? I'm wondering with one compressor and that tank size how long it's taking you Are you using 1/4 inch lines?
Last edited by scientific; 08-16-2014, 03:55 PM.Leave a comment:
-
I'm honestly not sure exactly how much shorter Bilstein Sports are than stock shocks, so I can't say for sure whether R129 mounts would be overkill with them. In the front, since there's a strut up there, the motion ratio of the strut to the wheel is ≈1, so in my case, since I ride at about -3" from stock, I would ideally want the strut/mount combination to be approximately 3" shorter. This is unfeasible in my case, however, as I have an absolutely insane driveway I have to manage, and I require the ability to raise the car 1" above stock just to clear. Obviously that means I can't have very short shocks that severely limit the suspension's range in downtravel. YMMV.
Since I just used a shitty Harbor Freight angle grinder, the edges of the tube are sort of "naturally" rounded a touch. I would just debur your cut and call it good. I don't think a rubber hose would survive in this application, as the bracket/spring cup interface sees pretty extreme compressive loads when the suspension cycles. I also think it's probably not necessary, as lots of people run springs without the rubber pads, and the way springs are made, they focus force into an even smaller area. If you're worried about it, stretch the stock rubber spring pad over the top of the mount and call it good.
The hoses are routed as follows:
Rear:
From the fabric trunk/tank separating bulkhead, they travel on top of the fuel tank, then inside the trunk side panel covers, down to the bottom of the little side recesses in the trunk, and out through the drain holes. They then turn forward, under the car, attach themselves to the forward edge of the rear pinchweld where it enters the wheel well, and basically directly up to the bags on the back side. You can see the undercar routing in the photos I posted above. They then enter the brackets from the back side, where I have drilled a grommet-lined hole. Inside, I have an elbow fitting which cleanly routes the hose to the bag's PTC fitting.
Front:
From the fabric trunk/tank separating bulkhead, the hoses travel across the tank and through the large square holes at the upper corners of the tank/rear seat bulkhead. They then travel down the seat back, under the seat bottoms, and through a pair of triangular holes formed by the intersection of the seat bottom metal and a reinforcing flange, which is the same route that a bunch of factory wiring goes. They then go under the carpet along each door sill to the front wheel wells, where I punched a hole through at an opportune spot near where you'd place your outer heel if sitting in the seat. In the front, some of the thick foam under the carpet has been relieved to accommodate the hoses. From there, they travel up the fender liner and out at the very top, where they curve downwards to enter the upper bag bracket from the top.
A couple of recommendations if I may. First, I would consider planning your install with either some sort of CAD software, or a flowchart. I used a combination of Sketchup for space planning and Omnigraffle for devising a parts list. I don't think I've shown these in the thread, but I actually created a complete mockup of the trunk in Sketchup, which allowed me to be really efficient with space:

Basically, there's no way I could have figured out I had the room to cram the compressor and its associates behind the audio install had I not done a mockup first.
I also built a flowchart and parts list in Omnigraffle, which shows every pneumatic fitting used on the car:

(click for OMG XBOX HUGE)
It looks daunting, but my setup is quite complex (hardlines and flow controls, which are both unnecessary but nice), and really, it's not that hard if you sit down and start figuring out how to connect what to what.
I also strongly recommend the use of a Klann-style spring compressor. I tried the job with the crappy Autozone compressors I used on my old Jeep, and they are a pain in the ass. I don't know how people get them to work on these cars, but I never could figure it out. Klann-style compressors are not inexpensive - plan on $200 for the tool - but they're amazing devices. I wish they were compatible with more cars. If you're lucky, sometimes you'll find people willing to loan theirs out. I don't know if you're local to me, but I do loan mine out with a refundable deposit.
You're certainly welcome to PM me questions about your setup, though if you feel that your questions might be useful to others contemplating a similar build, feel free to post them in here, I don't mind.Last edited by Oh Damn, it's Sam; 02-07-2015, 12:49 PM.Leave a comment:
-
The information you've provided is awesome and has been very instructive with specing my own setup up..
I think I'm ok with adding a bit more length and then cutting down to size - I think what I could probably do is make one and test as I will likely need to use a fabricator and do the install and adjustments myself..
Your explanations of what is captured etc makes a lot of sense thank you for explaining it.
I understand the r129 mount allows the shock to sit higher. I understand why this would be desirable for a stock shock- but when using a bilstein sport which I understand is shorter do you think that the r129 shock would leave the sport too extended at heights you'd be using?
After you had angle-ground the cups to adjust did you treat the edges in any way before installation? (e.g. by rounding it or adding a hose or something)
How do you route the hoses from the manifold to your bags? particularly wondering about front- e.g. under the car or through the car then down and out somehow..
Sorry for all the questions but I need to know all of these specifics it's not like I can run down to the shop to buy stuff everything I have to order and it will take me a month or two to receive- so if I don't get a little fitting or little clip or something stupid it could stop my build.. I've only owned the car a week and it's been at the shop since I got it so really not familiar with what's there.
So I don't clog up your thread may I PM you a couple of extra questions about my proposed setup?Last edited by scientific; 08-16-2014, 11:11 AM.Leave a comment:
-
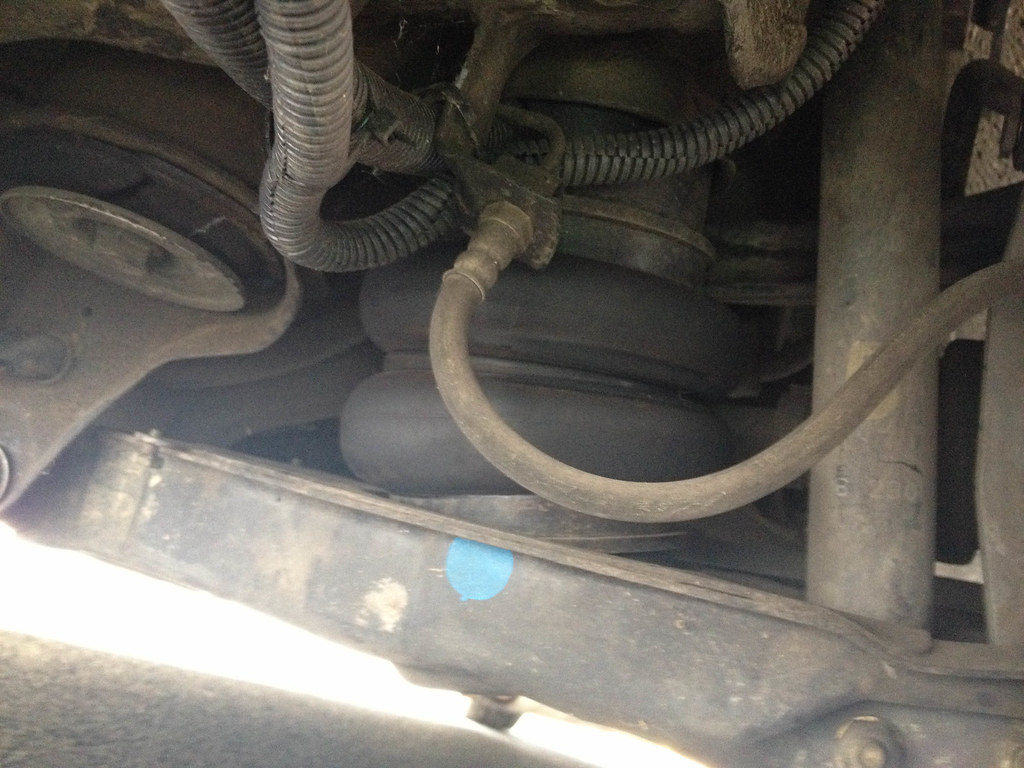
Ideally the bags would come vertically downward from the spring cups, yes. Unfortunately, on the front of the car, that's just not possible. The stock spring is approximately 4" in diameter, and the SS-5 is 5.5". The additional diameter of the bag necessitates kicking it out away from the inner fender, so it sits "bent" at ride height. With the short length of the control arms, they undergo a pretty dramatic change in angle as the suspension cycles, and with the car aired out, the bags lose the majority of their bend and settle nice and flat.
I wish Slam Specialties or someone else would come up with an ultra skinny double-bellows bag for situations like these. It would necessitate running 200 psi in the tank (which I already have) and having a fair amount of air capacity (which I could accommodate), but it would make bag packaging a lot easier.
On neither the front or the rear is the top bracket captive, and the rear lower isn't captive either. Instead, they just nestle in nicely into the spring cup, like how a lot of VW setups work. The spring cups at rear and at the front upper are very deep, and since the piece of pipe I spec'd on the brackets is the same diameter as the spring, the bracket tucks in there better than you'd think. It seems a little weird, but the stock springs aren't captive anywhere on the car, and I figure if it works for the stock springs, it should work for the bags. The way the brackets are designed, you could even stretch the factory rubber spring pads over the brackets for added security, though I've not found it necessary.
The only place where the brackets are captive are on the front LCAs. Up there, there isn't really a spring cup, just kind of formed spiral that the stock spring fits into, and I wasn't comfortable with the security of just resting the bracket on that. Up there, the nut that's welded onto the lower bag bracket comes into play, and I have a piece of plate that sandwiches the bracket to the LCA. I initially intended to do something similar in the rear, but I haven't found it necessary so far.
Regarding welding, MikeyRA has his bag brackets welded to the LCAs and upper spring cups, and it appears to work well for him. I wanted the ability to switch back to springs if I had to, and wanted the ability to remove the bags and brackets for service, so I went with my system. His is certainly much simpler and more elegant a solution, though mine has lent me the ability to perform a lot of necessary fine tuning on my system. Tradeoffs.
In terms of leaving room for error, I would leave each tube on the bag brackets 1/2" or so longer than specified, at least in the front, and then plan on trimming them down as necessary with an angle grinder. The angle I've specified should be correct or at least very close, but both the angle and the length of the tubes come into play both for how low the car can go, as well as clearance to the strut and inner fender. It then becomes a balancing act: too much length and the bags run into the strut when the car is raised to ride height. Too little length and the bottom of the bag rubs on the LCA. Too much angle and the bag bows excessively and rubs on the strut bolts when turning. Too little angle and the lower bellows clunks against the bottom of the inner fender on bumps. I don't mean for this to sound like a horror story - it's certainly doable - but it has taken a lot of fine tuning.
I am on stock shocks with R129 top mounts in the front. No camber kit, and otherwise no suspension modifications. The stock rear shocks on the sedan have an unbelievable amount of range once you remove the bumpstop - they can actually go another inch or so lower than I let them sit when aired out. The fronts won't go quite so low, but new top mounts give a little better range. I do think Bilstein Sports are in my future, as I feel like I could use a bit of additional damping when riding low.Leave a comment:
-
You sir are a mensche !Originally posted by Oh Damn, it's Sam View Post
This is extremely helpful.
MAE's rock on this car definitely. Just with the spacers the back photo looked a little thin for that track(I think it's called the track- the distance between wheels?)
Is the sideways orientation of the airbags considered somewhat undesirable? e.g. should the mounts be directly on top and bottom of the bags or is that just something that changes along with the rest of the suspension geometry?
On that topic I noticed you had some bolts and nuts to keep it captive but elected not to capture the top part is that correct? Can you explain that a little further if you don't mind? Would this be something where some people just weld the cups to the LCAs(not sure if correct term)?
In terms of leaving some room for error for length - this would simply require shortening the tube/cylinder section while maintaining the angle required for the cup to seat properly in the LCA (I think it's called a LCA, though that term might be incorrect?)
Also, which shocks are you using? I'm thinking of getting bilstein sports as I understand these are for lowered cars. Do you have any other specific suspension bits to make this work? I noticed a camber kit somewhere I think?Last edited by scientific; 08-14-2014, 02:03 AM.Leave a comment:
-
Thank you for the kind words!
Wider rear wheels are in the plans at some point, but frankly, I really like the MAEs on there. I think I could cram 10.5s in the back if I wanted, but there aren't many wheels out there I like better than what I've already got, at least not in my price range. My plan is to refinish the MAEs and run them for a while until I get bored.
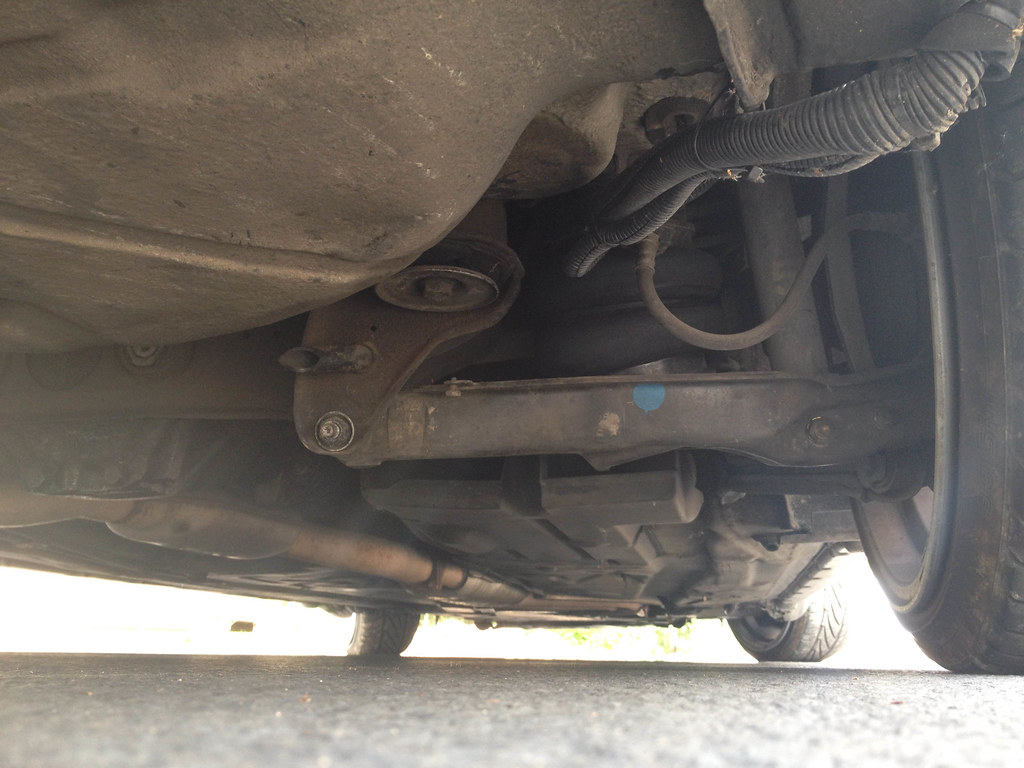
I went out today and took some new pics and measurements for you. They're not the clearest, since it's a PITA to get photos of the suspension setup with the car on the ground at ride height, but hopefully it will help.
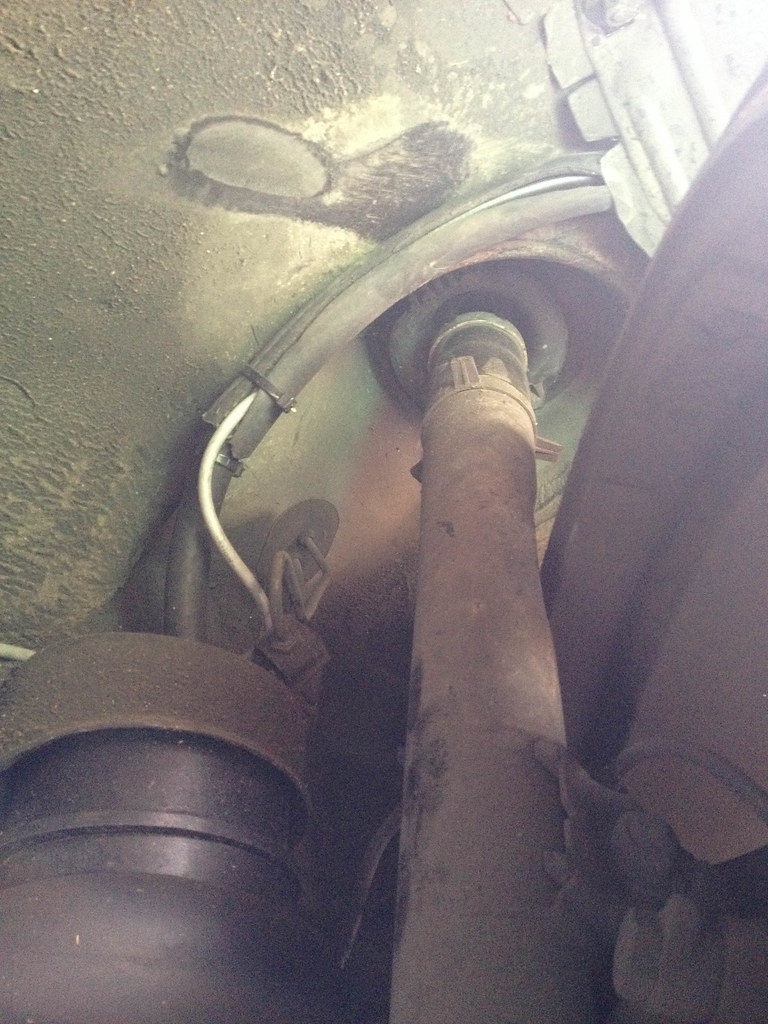
Front at ride height:
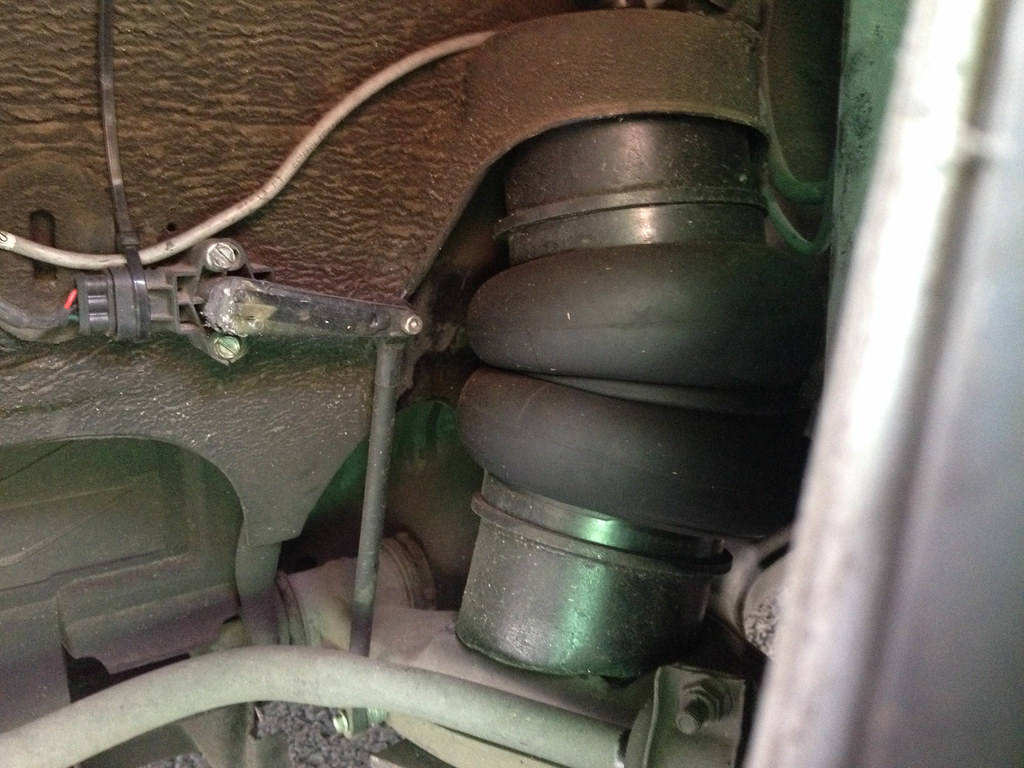
You can see how the line and wiring is routed here. If you're planning on going very low, I'd consider a different route to eliminate the possibility of rubbing. Hasn't been an issue for me yet, but YMMV:
A couple shots of the rear:
The bag plates I just got pre-cut from Slam Specialties themselves. They're dirt cheap and totally worth the money.
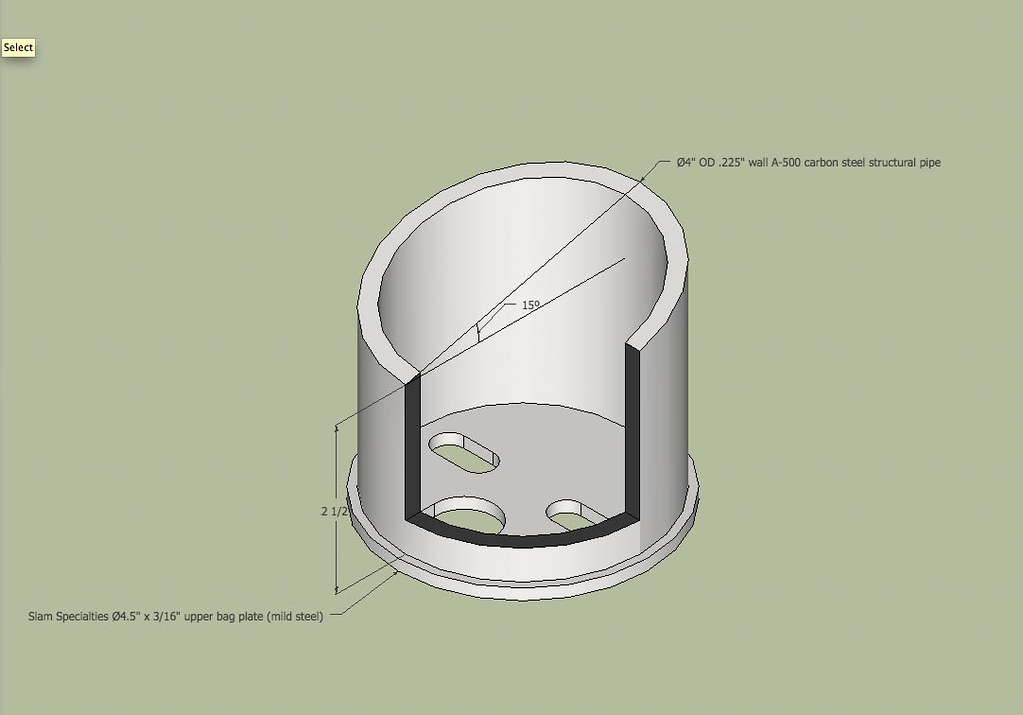
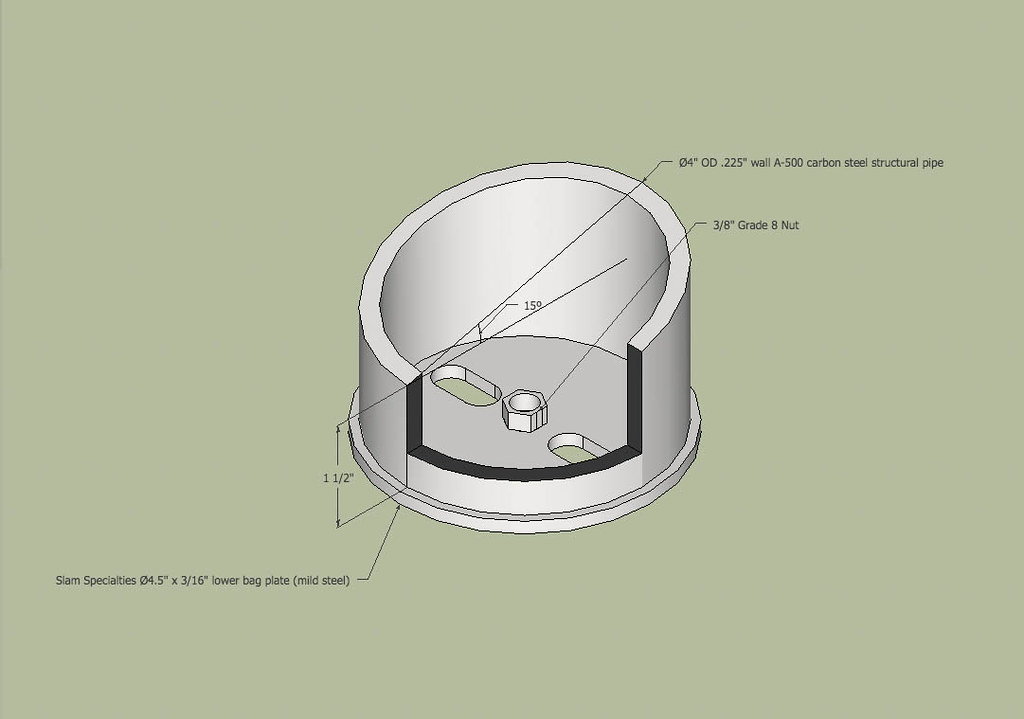
Some updated measurements for the bag brackets:
Front upper:
Front lower:
Rear upper:

Rear lower:
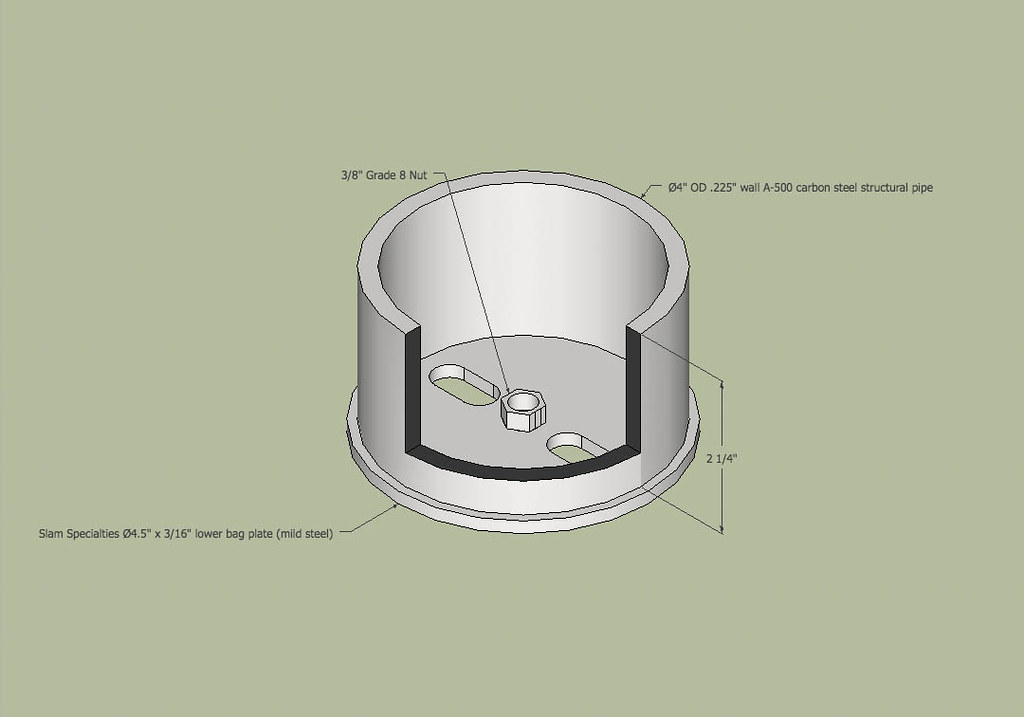
Were it me, at least in the front, I'd leave a little margin for error in those length measurements, and plan on spending some time with an angle grinder to get it perfect. I've mentioned it before, but the front suspension is extremely tight, and it's a little unintuitive how everything needs to fit together to make it work and not rub while driving.Last edited by Oh Damn, it's Sam; 09-11-2014, 11:41 PM.Leave a comment:
-
Just finished reading the thread for a second time. Few comments for what it's worth:
Amazing build and awesome car.
Great you did this yourself!
Post-spacers I was hoping you'd go wider rims. Any plans?
The reason I joined this forum and checking out your thread is that I just bought a w124 and would like to emulate your setup (minus the hard lines and top of the line management)
Do you have any pictures of your airbags/brackets installed and in-situ? Pics of where your lines run through the mudguard area?
Did you get the top and bottom metal plates you had welded to the "cups"/brackets along with the SS5 bags?
Do you have a revised cup/bracket diagram after you fixed your rubbing issues? Where I live no one does airbags but there are plenty of welders.. if I can get something that works that I could get a decent welder with no airbag experience to create I can test on my car
Leave a comment:
-
Originally posted by rightfullrudder View Post
Maybe I'll hang a pierogi off my back bumper as a drift charm.Leave a comment:


Leave a comment: